Alerts & Notifications
Configure real-time alerts for fleet events
Alerts & Notifications
Stay informed about important fleet events with Yipii IoT alerts. Get notified instantly when vehicles speed, enter restricted areas, or require maintenance.
Alerts are the backbone of proactive fleet management. Instead of discovering problems after the fact, you receive real-time notifications the moment something requires your attention. Whether it's a driver exceeding the speed limit on a highway, a refrigerated truck's temperature rising above safe levels, or a vehicle entering a restricted area, alerts ensure you can respond immediately to protect your assets, maintain compliance, and keep operations running smoothly.
Alert Overview
Alerts notify you when specific events occur in your fleet. Think of them as your fleet's early warning system—monitoring every vehicle around the clock and notifying you the moment predefined conditions are met. Unlike traditional monitoring that requires constant manual oversight, alerts work autonomously in the background, only demanding your attention when something genuinely requires action.
You can receive alerts via:
Each notification channel serves a different purpose. Email notifications provide detailed context and are ideal for alerts that require review but not immediate action. SMS messages ensure critical alerts reach you instantly, even when you're away from your computer. WhatsApp combines the immediacy of SMS with richer formatting and media support, making it perfect for alerts that benefit from maps, images, or detailed summaries. Push notifications deliver alerts directly to your device as system notifications — free, instant, and visible even when the app is closed.
Alert Types at a Glance
- • Movement Started
- • Movement Stopped
- • Untimely Movement
- • Unauthorized
- • Speed Above
- • Speed Below
- • Speeding Event
- • Entry
- • Exit
- • Dwell Time
- • Nearest Point
- • Above Threshold
- • Below Threshold
- • GPS Lost
- • GPS Restored
- • Power On
- • Power Off
- • Service Due
- • Health Check
- • Tracker Health
Alert Type Details
Yipii IoT supports over 20 different alert types, each designed to monitor specific aspects of your fleet operations. The diversity of alert types means you can build a comprehensive monitoring strategy that covers everything from driver behavior to equipment health. The following tables break down each category in detail, showing you exactly what triggers each alert and how you can use it to improve your operations.
Movement Alerts
Movement alerts help you track when vehicles start and stop, which is essential for understanding operational patterns and detecting unauthorized use. These alerts are particularly valuable for preventing after-hours vehicle theft, monitoring adherence to shift schedules, and identifying unusual activity patterns that might indicate security concerns or operational inefficiencies.
| Alert | Triggers When |
|---|---|
| Movement Started | Vehicle begins moving after being stopped |
| Movement Stopped | Vehicle stops moving |
| Untimely Movement | Movement outside configured operating hours |
| Unauthorized Movement | Movement when vehicle should be stationary |
Ignition Alerts
Ignition alerts provide visibility into when vehicles are actively running versus parked with the engine off. This simple distinction is crucial for tracking driver hours, detecting unauthorized use, and understanding fuel consumption patterns. Combined with movement alerts, ignition monitoring helps you identify problematic behaviors like extended idling or engines left running unnecessarily.
| Alert | Triggers When |
|---|---|
| Ignition On | Engine is started |
| Ignition Off | Engine is turned off |
Speed Alerts
Speed monitoring is one of the most critical safety and compliance features in fleet management. Excessive speed not only increases accident risk and fuel consumption but can also lead to fines, insurance issues, and damage to your company's reputation. Speed alerts allow you to enforce company policies, protect drivers, and maintain compliance with local traffic regulations. The "Speed Below" alert is particularly useful for highway monitoring, helping you detect vehicles moving dangerously slow in fast-traffic areas.
| Alert | Triggers When |
|---|---|
| Speed Above | Vehicle exceeds configured speed limit |
| Speed Below | Vehicle drops below minimum speed (for highway monitoring) |
Geofence Alerts
Geofence alerts transform static geographic boundaries into dynamic monitoring tools. Whether you're tracking deliveries to customer sites, preventing vehicles from entering unauthorized areas, or monitoring time spent at job sites, geofence alerts provide location-aware intelligence that goes far beyond simple GPS tracking. These alerts work seamlessly with the geofences you create in the Geofencing section, automatically triggering when vehicles cross your defined boundaries.
| Alert | Triggers When |
|---|---|
| Geofence Entry | Vehicle enters a defined geofence |
| Geofence Exit | Vehicle leaves a defined geofence |
| Nearest Point | Vehicle approaches a specific location |
Connection Alerts
Connection alerts monitor the health and connectivity of your tracking devices themselves. GPS signal loss can indicate a tracker malfunction, signal obstruction, or even deliberate tampering. Power-related alerts are critical for detecting disconnected or damaged trackers, battery issues, or attempts to disable tracking. These alerts help ensure your tracking infrastructure remains reliable and that any issues are addressed before they impact your visibility into fleet operations.
| Alert | Triggers When |
|---|---|
| GPS Signal Lost | Tracker loses GPS fix |
| GPS Signal Established | GPS signal is restored |
| Tracker Power On | Tracker device powers up |
| Tracker Power Off | Tracker device loses power |
Temperature Alerts
For fleets managing cold chain logistics, pharmaceuticals, or any temperature-sensitive cargo, temperature alerts are mission-critical. These alerts monitor connected temperature sensors in refrigerated vehicles and storage areas, notifying you immediately when readings drift outside safe ranges. Early detection of cooling system failures can save entire shipments from spoilage, prevent costly compliance violations, and protect your customers from receiving compromised products.
| Alert | Triggers When |
|---|---|
| Temperature Above | Sensor reading exceeds upper threshold |
| Temperature Below | Sensor reading drops below lower threshold |
Operational Alerts
Operational alerts track vehicle systems and behaviors that impact fuel efficiency, wear and tear, and driver habits. Excessive idling wastes fuel and increases maintenance costs—idle alerts help you identify drivers who need coaching on shutting off engines during extended stops. Air conditioner monitoring is particularly relevant for refrigerated transport and climate-controlled delivery vehicles, where A/C status directly affects cargo integrity and fuel consumption.
| Alert | Triggers When |
|---|---|
| Idle | Vehicle idling longer than configured time |
| Air Conditioner On | A/C system activated |
| Air Conditioner Off | A/C system deactivated |
Maintenance Alerts
Maintenance alerts help prevent breakdowns and keep your fleet in optimal condition by notifying you when service is due or when tracker health issues arise. Rather than relying on spreadsheets or manual tracking, these alerts automatically monitor mileage, engine hours, and scheduled intervals to remind you when maintenance is approaching or overdue. The Daily Health Check provides a consolidated summary of your entire fleet's tracker status, making it easy to spot connectivity issues, offline devices, or signal problems before they impact operations.
| Alert | Triggers When |
|---|---|
| Maintenance Required | Service reminder threshold reached |
| Daily Health Check | Scheduled daily tracker health summary |
| Tracker Health | Tracker health status changes |
Creating an Alert
Creating an alert is straightforward, but taking the time to configure it properly ensures you receive meaningful notifications without being overwhelmed. The process walks you through defining what you want to monitor, who should be notified, and when those notifications should be sent.
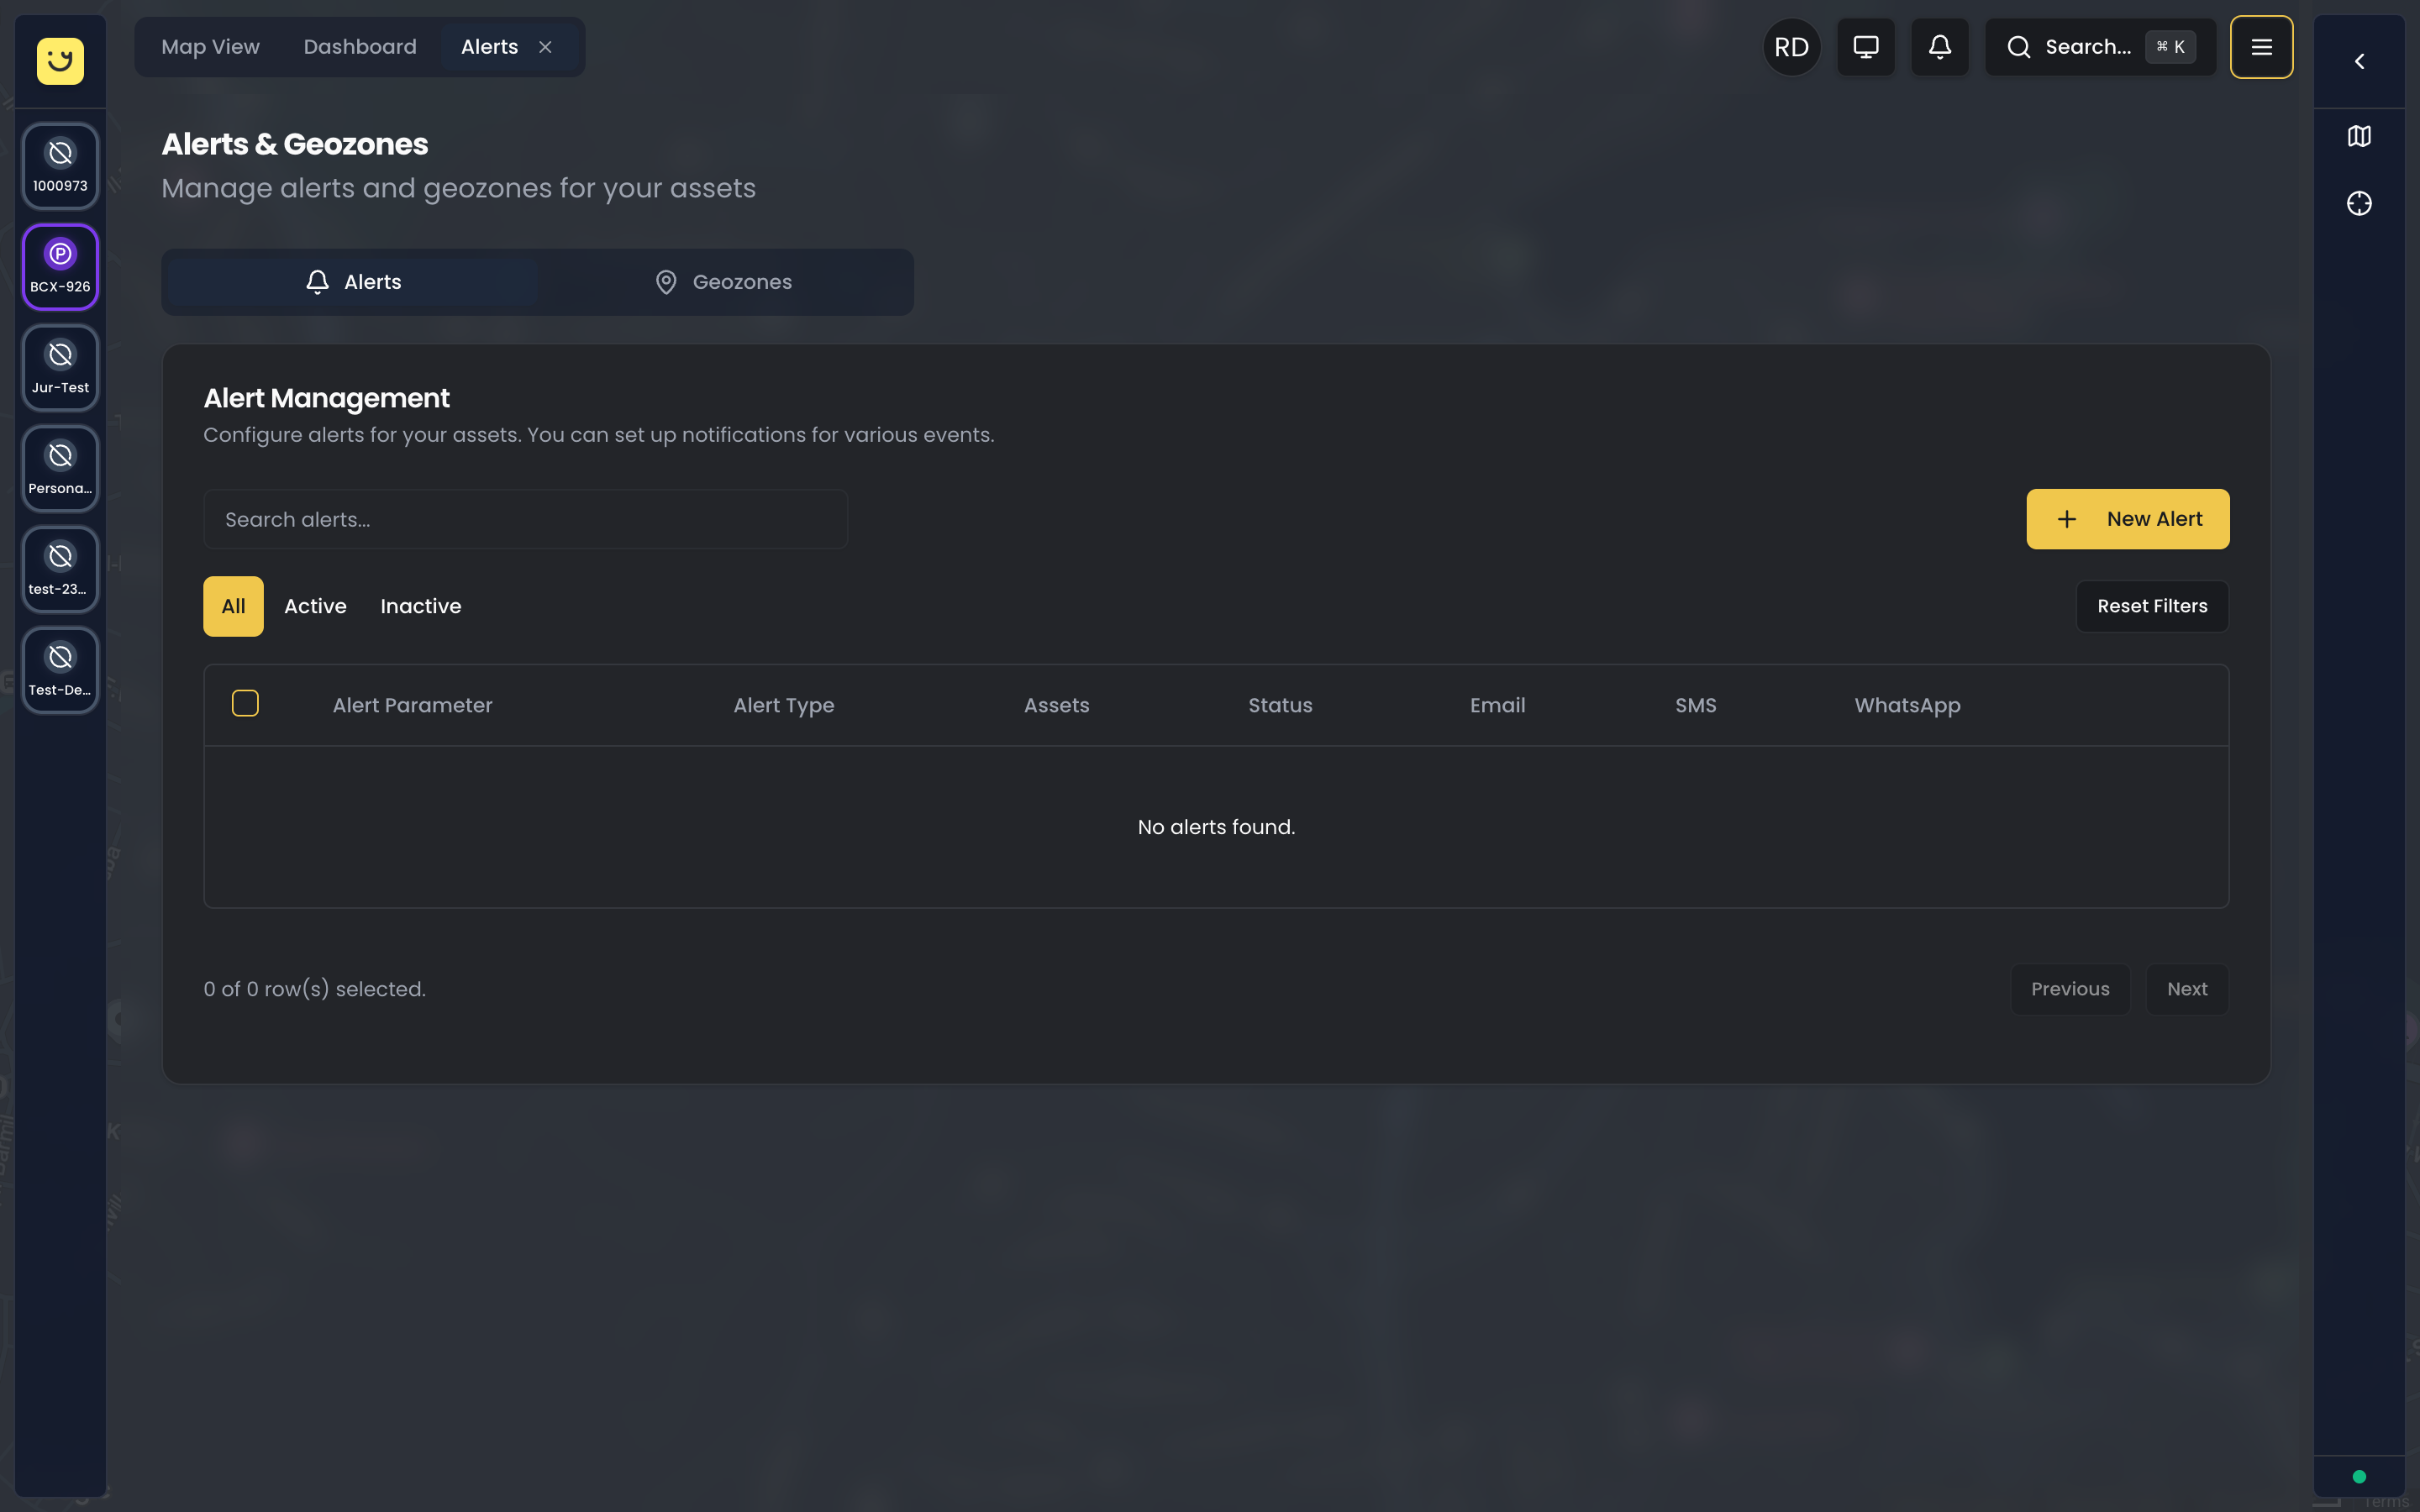
Step 1: Navigate to Alerts
Access the alerts interface by navigating to Alerts from the main operations menu. This brings you to the Alerts & Geozones page, where you can see all your existing alerts organized in a table showing alert parameters, types, assigned assets, status, and notification channels.
Click the New Alert button in the top-right corner to begin creating your alert. You can also use the filter radio buttons (All / Active / Inactive) to view specific alert statuses if you need to review existing alerts first.
Step 2: Configure the Alert
The alert configuration form presents several sections to define exactly what you're monitoring. Start with the basics and work through each section systematically.
Basic Settings:
Every alert needs a clear, descriptive name that explains its purpose at a glance. Instead of generic names like "Alert 1" or "Speed Alert," use names that specify the threshold and target, such as "Speed Alert - Highway Vehicles >120 km/h" or "Refrigerated Trucks - Temp >8°C." This makes it immediately clear what each alert monitors when you're reviewing your alert list or troubleshooting notification issues.
Choose the alert type from the comprehensive list of over 20 options we covered earlier. The alert type determines what additional configuration options appear—speed alerts require speed thresholds, temperature alerts need upper and lower limits, geofence alerts ask you to select specific zones, and so on.
Set the initial status to Active if you want the alert to begin monitoring immediately, or choose Paused if you're setting it up in advance and will enable it later. Paused alerts save your configuration but won't trigger any notifications until you reactivate them.
Trigger Settings:
The trigger settings section adapts based on the alert type you selected. This is where you define the specific conditions that cause the alert to fire.
For speed alerts, you'll enter the speed threshold in kilometers per hour. Consider the context—a 120 km/h threshold makes sense for highway vehicles but would be dangerously high for urban delivery vehicles operating in residential areas. You might also add a time buffer (alert only if speed exceeds the limit for more than 30 seconds) to avoid false positives from brief acceleration.
Temperature alerts require both upper and lower thresholds. For refrigerated goods, set the upper threshold slightly below the critical temperature—if your product must stay below 8°C, set your alert for 7°C to catch problems before they become critical. Similarly, set the lower threshold above the freezing point for products that shouldn't freeze.
Idle alerts need a time threshold in minutes. Start with conservative values—10 minutes for general vehicles, 20-30 minutes for vehicles that frequently load or unload cargo. You can always adjust these thresholds after observing real-world patterns in your alert history.
Geofence alerts prompt you to select which geofences should trigger the alert. You can choose multiple geofences, making it easy to create a single alert that monitors entry to all restricted areas or exit from all depot locations.
Asset Selection:
Decide whether the alert applies to your entire fleet or specific vehicles. The three options give you flexibility in how broadly the alert is applied:
All Assets is the simplest option—every vehicle in your fleet is monitored for this alert. This is ideal for universal policies like "no vehicle should exceed 140 km/h" or "all trackers must report health status daily."
Selected Assets allows you to handpick specific vehicles. This is useful for one-off situations or when you need to monitor a small subset of vehicles temporarily. For example, you might create a temperature alert for just three refrigerated trucks that are carrying a particularly sensitive shipment this week.
Asset Groups is the most powerful option if you've organized your fleet into groups. Create targeted alerts by applying them to groups like "Refrigerated Trucks," "Highway Fleet," or "Urban Delivery." When you add or remove vehicles from those groups, the alert automatically updates—no need to manually adjust alert configurations as your fleet changes.
Step 3: Configure Notifications
Alerts are only valuable if the right people receive them. This section lets you define who gets notified and through which channels.
Email Notifications:
Email is the default notification channel and is included free with every subscription. You can add multiple email addresses—include account users, managers, dispatchers, or even external contacts like customers or contractors who need visibility into specific events.
Email notifications include detailed context: the vehicle name, exact time, location map, speed or sensor reading, and other relevant data. This makes email ideal for alerts that require review and analysis rather than immediate action.
SMS Notifications:
SMS ensures critical alerts reach you instantly, even when you're away from your computer or email. Add phone numbers in international format (include country code, e.g., +356-99123456 for Malta).
SMS notifications are brief by necessity, containing only essential information: vehicle name, alert type, and key data like speed or location. This conciseness makes them perfect for urgent alerts that demand immediate attention. However, SMS uses notification credits from your account, so reserve SMS for genuinely critical alerts to manage costs effectively.
WhatsApp Notifications:
WhatsApp combines the immediacy of SMS with richer formatting. You can receive location links, formatted text, and more detailed summaries than SMS allows. Add WhatsApp numbers using international format, ensuring each number is registered with WhatsApp and able to receive messages.
WhatsApp is particularly useful for delivery notifications, geofence alerts with maps, or situations where you want more context than SMS provides but need faster delivery than email guarantees.
Step 4: Set Schedule (Optional)
Scheduling gives you fine-grained control over when alerts are active and when notifications are sent. This prevents unnecessary notifications during off-hours while ensuring you're notified during critical operational periods.
Active Hours:
Define specific times when the alert should monitor for events. This is particularly valuable for "untimely movement" scenarios—if your vehicles should only operate Monday through Friday from 8 AM to 6 PM, configure those active hours so movement outside that window triggers the alert.
Active hours also help with context-dependent monitoring. A speed alert might have different thresholds for daytime highway driving versus nighttime urban routes. You can create two separate alerts with different active hours to reflect these different operational contexts.
Quiet Hours:
Quiet hours suppress notifications during specific times without disabling the alert itself. The alert still monitors events and logs them in your alert history, but it won't send email, SMS, or WhatsApp notifications.
This is essential for maintaining work-life balance and avoiding alert fatigue. Configure quiet hours from 10 PM to 7 AM so your team isn't woken by non-critical alerts overnight. You'll still have a complete record of what happened, but the notifications will wait until morning.
Step 5: Save and Activate
Once you've configured all settings, click Save to create the alert. If you set the status to Active, the alert begins monitoring immediately—there's no delay or approval process. Within seconds, your fleet is being watched for the conditions you defined.
You can return to edit the alert at any time. Changes take effect immediately for future events, though they won't retroactively affect already-triggered alerts in your history.
Managing Alerts
As your fleet operations evolve, you'll need to adjust alert configurations, pause alerts temporarily, or remove outdated alerts entirely. The Alerts interface provides all the tools you need to maintain an effective alert strategy.
Viewing Active Alerts
The main Alerts page displays all your configured alerts in a comprehensive table. Each row shows the alert parameter (what it monitors), alert type, which assets it applies to, current status (Active or Paused), and which notification channels are enabled (Email, SMS, WhatsApp columns with checkmarks).
Additional information includes how many times each alert has triggered and when it last fired. This metadata helps you evaluate alert effectiveness—if an alert has never triggered, you might have set the threshold too conservatively. If it triggers dozens of times daily, the threshold might be too sensitive or the underlying behavior needs attention.
Use the filter buttons at the top of the table (All / Active / Inactive) to focus on specific alert statuses. This is particularly helpful when you have many alerts and need to review only those currently active or troubleshoot paused alerts you might have forgotten to reactivate.
Editing Alerts
To modify an existing alert, click on its name in the alerts table. This opens the same configuration form you used when creating the alert, pre-populated with current settings.
Make whatever changes are needed—adjust thresholds, add notification recipients, change asset selection, modify schedules. When you're satisfied with the changes, click Save. Changes apply immediately to future events, so the alert begins using the new configuration within seconds. However, edits don't affect historical alert events already recorded in your alert history—those remain as they were originally triggered.
This immediate application means you can quickly respond to changing conditions. If you notice speed alerts firing too frequently during a particular shift, you can increase the threshold immediately without waiting for maintenance windows or approvals.
Pausing Alerts
Sometimes you need to temporarily disable an alert without losing its configuration. Perhaps you're running a special promotion with extended hours and don't want "untimely movement" alerts firing all weekend. Or maybe you're testing a new tracker installation and want to suppress false positives until the hardware is properly configured.
To pause an alert, open its settings, toggle the Status field to Paused, and save. The alert stops monitoring and won't generate any new notifications or log events. However, all your configuration—thresholds, notification settings, schedules—remains intact.
When you're ready to reactivate monitoring, simply toggle the status back to Active and save. The alert resumes monitoring exactly as it was configured before you paused it.
Deleting Alerts
When an alert is no longer needed—perhaps because you've reorganized your fleet structure or the vehicles it monitored have been retired—you can delete it permanently.
Open the alert settings and click Delete. You'll be asked to confirm the deletion since this action is irreversible. Once confirmed, the alert configuration is removed from your account.
Importantly, historical alert events are preserved in your alert history even after deletion. This ensures you maintain a complete audit trail of fleet events, even for alerts that no longer exist. You can still generate reports and review past events triggered by the deleted alert.
Alert History
While alerts notify you in real-time as events occur, the alert history provides a comprehensive record of every alert that has triggered across your fleet. This historical view is invaluable for identifying patterns, evaluating driver performance, investigating incidents, and demonstrating compliance with operational policies.
To access alert history, navigate to Alerts > History from the operations interface. You'll see a chronological list of all triggered alerts with timestamps, vehicle names, alert types, and key details like speed, location, or sensor readings at the time of the event.
The filtering tools help you narrow down this potentially large dataset to find exactly what you're looking for:
Date range filters let you focus on specific time periods. Review last week's speed violations, analyze temperature alerts during yesterday's heat wave, or investigate a specific delivery window where problems occurred.
Alert type filters show only specific categories. If you're preparing a report on geofence compliance, filter for just entry and exit alerts. If you're investigating driver behavior, isolate speed and harsh braking alerts.
Vehicle filters let you view the alert history for individual assets. When coaching a driver or troubleshooting a specific vehicle, this filter provides a complete timeline of alerts for that asset alone.
Acknowledged status separates reviewed alerts from those still requiring attention. This helps you track which events your team has investigated and which might need follow-up.
Click any alert event in the history to see full details: exact GPS coordinates, map view of the location, sensor readings, time of day, and any notes added during acknowledgment.
Acknowledging Alerts
Alert acknowledgment transforms your alert history from a passive log into an active workflow management tool. When you acknowledge an alert, you're marking it as reviewed and optionally documenting what action was taken or what was discovered during investigation.
To acknowledge an alert:
- Open the specific alert event from your alert history
- Click the Acknowledge button
- Optionally add a note explaining what you found or what action was taken
Notes might document context like "Driver was overtaking on highway - within policy" or "Followed up with driver - counseled about speed compliance" or "False positive - GPS glitch during tunnel exit." These notes create an audit trail showing that your team actively monitors and responds to alerts rather than simply collecting data.
The acknowledged status appears in your alert history filters, making it easy to see at a glance which alerts have been reviewed and which still need attention. This is particularly valuable for teams where multiple people monitor alerts—acknowledgment prevents duplicate investigation and ensures nothing falls through the cracks.
Alert Best Practices
Start with Essential Alerts
Begin with critical alerts:
- Speed violations
- Geofence breaches (restricted areas)
- Power disconnection
- Daily health check
Add more alerts as you understand your fleet's patterns.
Set Appropriate Thresholds
Speed alerts:
- Highway vehicles: 120 km/h
- Urban delivery: 60 km/h
- Consider local speed limits
Idle alerts:
- Loading/unloading vehicles: 15-30 minutes
- Standard vehicles: 5-10 minutes
Temperature alerts:
- Cold chain: Set per product requirements
- Add buffer (alert before critical temperature)
Avoid Alert Fatigue
Too many alerts leads to ignored alerts:
- Be selective about what triggers notifications
- Use email for detailed alerts, SMS for urgent ones
- Review and refine thresholds based on actual events
- Consider using quiet hours overnight
Use Asset Groups
Create targeted alerts:
- "Refrigerated Trucks" → Temperature alerts
- "Highway Fleet" → Speed alerts
- "City Delivery" → Geofence alerts
Review Alert Effectiveness
Monthly, review:
- Which alerts trigger most frequently
- False positive rate
- Whether thresholds need adjustment
- If new alert types are needed
Speed Alert Configuration
Speed alerts are among the most common. Here's how to configure them effectively:
Single Threshold
Set one speed limit for the alert:
- Example: Alert when speed exceeds 100 km/h
Multiple Thresholds (Tiered Alerts)
Create separate alerts for different severity:
- Warning: Speed over 100 km/h
- Critical: Speed over 120 km/h
- Severe: Speed over 140 km/h
Road-Specific Limits
Some trackers support road-type speed limits:
- Highway limit: 120 km/h
- Urban limit: 50 km/h
- Configure based on actual location
Temperature Alert Configuration
For cold chain and temperature-sensitive cargo:
Setting Thresholds
Above threshold (cooling failure):
- Fresh produce: 8°C
- Frozen goods: -15°C
- Pharmaceuticals: Per product spec
Below threshold (freeze protection):
- Beverages: 2°C
- Electronics: 5°C
Best Practices
- Set alerts before critical temperatures
- Use both above and below thresholds
- Monitor temperature reports for patterns
- Test sensor accuracy regularly
Daily Health Check
The Daily Health Check is a unique alert type that differs from event-driven alerts. Instead of triggering when a specific condition is met, it's a scheduled summary report delivered at a specific time each day. This proactive overview helps you spot tracker issues, connectivity problems, and fleet health trends before they impact operations.
What It Includes
The daily health check aggregates data from across your entire fleet to provide a comprehensive snapshot of tracker and device status. Rather than receiving individual alerts for each offline tracker or GPS issue, you get a single consolidated email that highlights:
Trackers that went offline during the past 24 hours, showing which vehicles lost connectivity and when. This helps you identify patterns—perhaps certain vehicles lose signal in specific geographic areas, or tracker batteries need replacement.
Devices with low signal strength, indicating potential antenna issues, obstructions, or poor cellular coverage in frequently visited areas. Proactively addressing signal issues prevents tracking gaps and ensures reliable monitoring.
Power disconnection events, which could indicate tracker tampering, loose wiring, battery problems, or intentional disconnection. Regular power issues on specific vehicles warrant physical inspection.
GPS issues like prolonged signal loss, position accuracy problems, or satellite fix failures. These might point to hardware malfunctions, environmental interference, or installation problems that need correction.
Overall fleet health score, providing a high-level metric that shows whether your tracking infrastructure is operating optimally. A declining health score over several days signals systemic issues requiring investigation.
Configuration
Setting up the Daily Health Check is straightforward and takes just a minute:
- Navigate to Alerts from the operations menu
- Find or create a new alert of type Daily Health Check
- Set the delivery time—most fleet managers prefer early morning (7:00 AM) so they can review fleet health before operations begin for the day
- Add email recipients—typically fleet managers, dispatchers, or technical staff responsible for tracker maintenance
- Save the alert
Once configured, you'll receive the summary email automatically every day at your specified time. No further action is needed—the system generates and delivers the report regardless of whether any issues were detected. On days with perfect fleet health, you'll receive confirmation that everything is operating normally, providing peace of mind rather than uncertainty.
Troubleshooting Alerts
Alert not triggering
Check these items:
- Alert is set to Active status
- Asset is included in alert scope
- Schedule allows triggering at current time
- Threshold is correctly configured
- Tracker is online and sending data
Receiving too many alerts
Solutions:
- Increase threshold values
- Add time delays (e.g., speed over limit for 30 seconds)
- Exclude certain assets or time periods
- Use tiered alerts instead of single threshold
Not receiving notifications
Check:
- Email address is correct
- Phone number includes country code
- Check spam/junk folder for emails
- Verify SMS credits are available
- WhatsApp number is registered and active
Notification Credits
Understanding how notification credits work helps you manage costs while ensuring critical alerts still reach you through the most appropriate channels.
Email notifications are unlimited and included free with every subscription tier. Send as many email alerts as you need without worrying about additional charges. This makes email the ideal default channel for most alerts, especially those that require detailed information or don't demand immediate action.
SMS and WhatsApp notifications consume credits from your account balance. Each message sent—whether SMS or WhatsApp—deducts a small number of credits. The exact cost varies by destination country, but typically ranges from 1-3 credits per message.
Check your current credit balance by navigating to Settings > Billing. The billing dashboard shows your remaining credits, recent usage, and a history of credit purchases and consumption. You'll also see projections based on your current usage patterns, helping you anticipate when you'll need to purchase additional credits.
Purchase credits through the billing interface in bundles sized to match your needs—small fleets might buy a few hundred credits at a time, while large operations with many SMS-enabled alerts might purchase thousands. Credits never expire, so you can buy in bulk to take advantage of volume discounts without worrying about wasted credits.
To optimize credit usage, reserve SMS and WhatsApp for genuinely urgent alerts where immediate notification is critical—speed violations, geofence breaches, power disconnections, temperature excursions. Use email for informational alerts, daily summaries, and situations where a few minutes' delay doesn't impact your response capability. This strategy ensures you stay informed about everything while managing costs effectively.
What's Next?
- Geofencing — Create virtual boundaries that trigger entry, exit, and dwell-time alerts automatically
- Reports — Generate alert history, driver behavior, and event summary reports
- Dashboard — Monitor fleet-wide alert activity and key metrics at a glance
- Public Tracking Links — Share live vehicle positions with customers and set arrival-based alert expiry
Was this page helpful?