Public Tracking Links
Share vehicle locations with customers and partners
Public Tracking Links
Public tracking links are one of the most powerful customer-facing features in Yipii IoT. They let you create shareable URLs that display live vehicle locations to anyone you choose — customers tracking their delivery, parents watching their child's school bus, or clients seeing when a technician is arriving — all without requiring them to create an account, download an app, or remember a password. The viewer simply clicks the link and sees a live map immediately.
This feature transforms GPS tracking from an internal operations tool into a customer experience enhancement. When your customers can see exactly where their delivery is, they spend less time calling to ask "where is my order?" and more time preparing to receive it. When parents can watch a school bus approach their street corner, they gain peace of mind and avoid waiting in the cold unnecessarily.
Common Use Cases
Delivery tracking is the most popular application. Send a tracking link with every order confirmation email so customers can watch their delivery approach in real-time. Links can automatically expire when the vehicle reaches the destination, showing a "Delivery Complete" message instead of continuing to broadcast the driver's next stops.
School bus tracking helps parents know exactly when to send their children to the bus stop. Create one link per route that always shows whichever bus is assigned to that route today, so parents bookmark the same URL and use it every morning without needing new links.
Tour and shuttle services benefit from sending links to all participants in advance. Whether it's an airport shuttle, a wine tour, or an event transport service, guests can see where the vehicle is and plan accordingly.
Field service operations improve customer satisfaction by sending a tracking link when the technician leaves the previous job site. Customers see the technician approaching and can prepare workspace, locate keys, or clear a driveway.
Event transport coordination becomes simpler when all guests have a link showing shuttle bus positions. No more "when's the next bus?" conversations — everyone can see the fleet on their own phone.
Free Tier and Pricing
Every Yipii IoT account includes 3 free public tracking links — no billing setup, no credit card, no time limit. These free links have full functionality: all access modes, all expiration options, all scheduling features, contact information, and real-time updates. There are no feature restrictions on free links compared to paid ones.
The free tier is designed to let you experience the full power of public tracking before committing. Create a delivery tracking link for your best customer, set up a school bus route link, or test the arrival-based expiry with a field service technician — all at no cost.
What Happens at 3 Links
The Sharing page displays a progress indicator showing how many of your 3 free links you've used. When you approach the limit, you'll see a prompt to upgrade.
Once you have 3 active links and try to create a fourth, you'll need to either:
- Upgrade to a sharing package from your Billing settings — tiered pricing based on the number of shared assets per month
- Contact our sales team at support@yipii.com for custom pricing or enterprise arrangements
- Disable or delete an existing link to free up a slot within the free tier
Sharing Packages
Paid sharing packages use tiered pricing based on the total number of unique assets shared across all your active links:
| Shared Assets | Price per Asset/Month |
|---|---|
| Up to 49 | Starting from the base rate |
| 50 - 99 | Reduced rate |
| 100 - 199 | Further reduced |
| 200+ | Best value rate |
Once you exceed the free 3-link limit, all shared assets are billed — not just the excess beyond 3. This means if you have 4 links sharing 10 assets total, all 10 assets count toward your sharing billing. The pricing is designed to reward scale: the more assets you share, the lower the per-asset cost.
Sharing billing is added as an item on your existing Stripe subscription. You'll see it itemized on your monthly invoice alongside your IoT asset tracking charges. Changes are prorated automatically — if you add more shared links mid-cycle, you only pay the difference for the remaining days.
Tip: If you're evaluating whether paid sharing is right for your business, use all 3 free links first. Track customer engagement through Access Logs to measure the ROI before upgrading. Most businesses find that even one successful delivery tracking link pays for itself by reducing "where is my order?" support calls.
Creating a Tracking Link
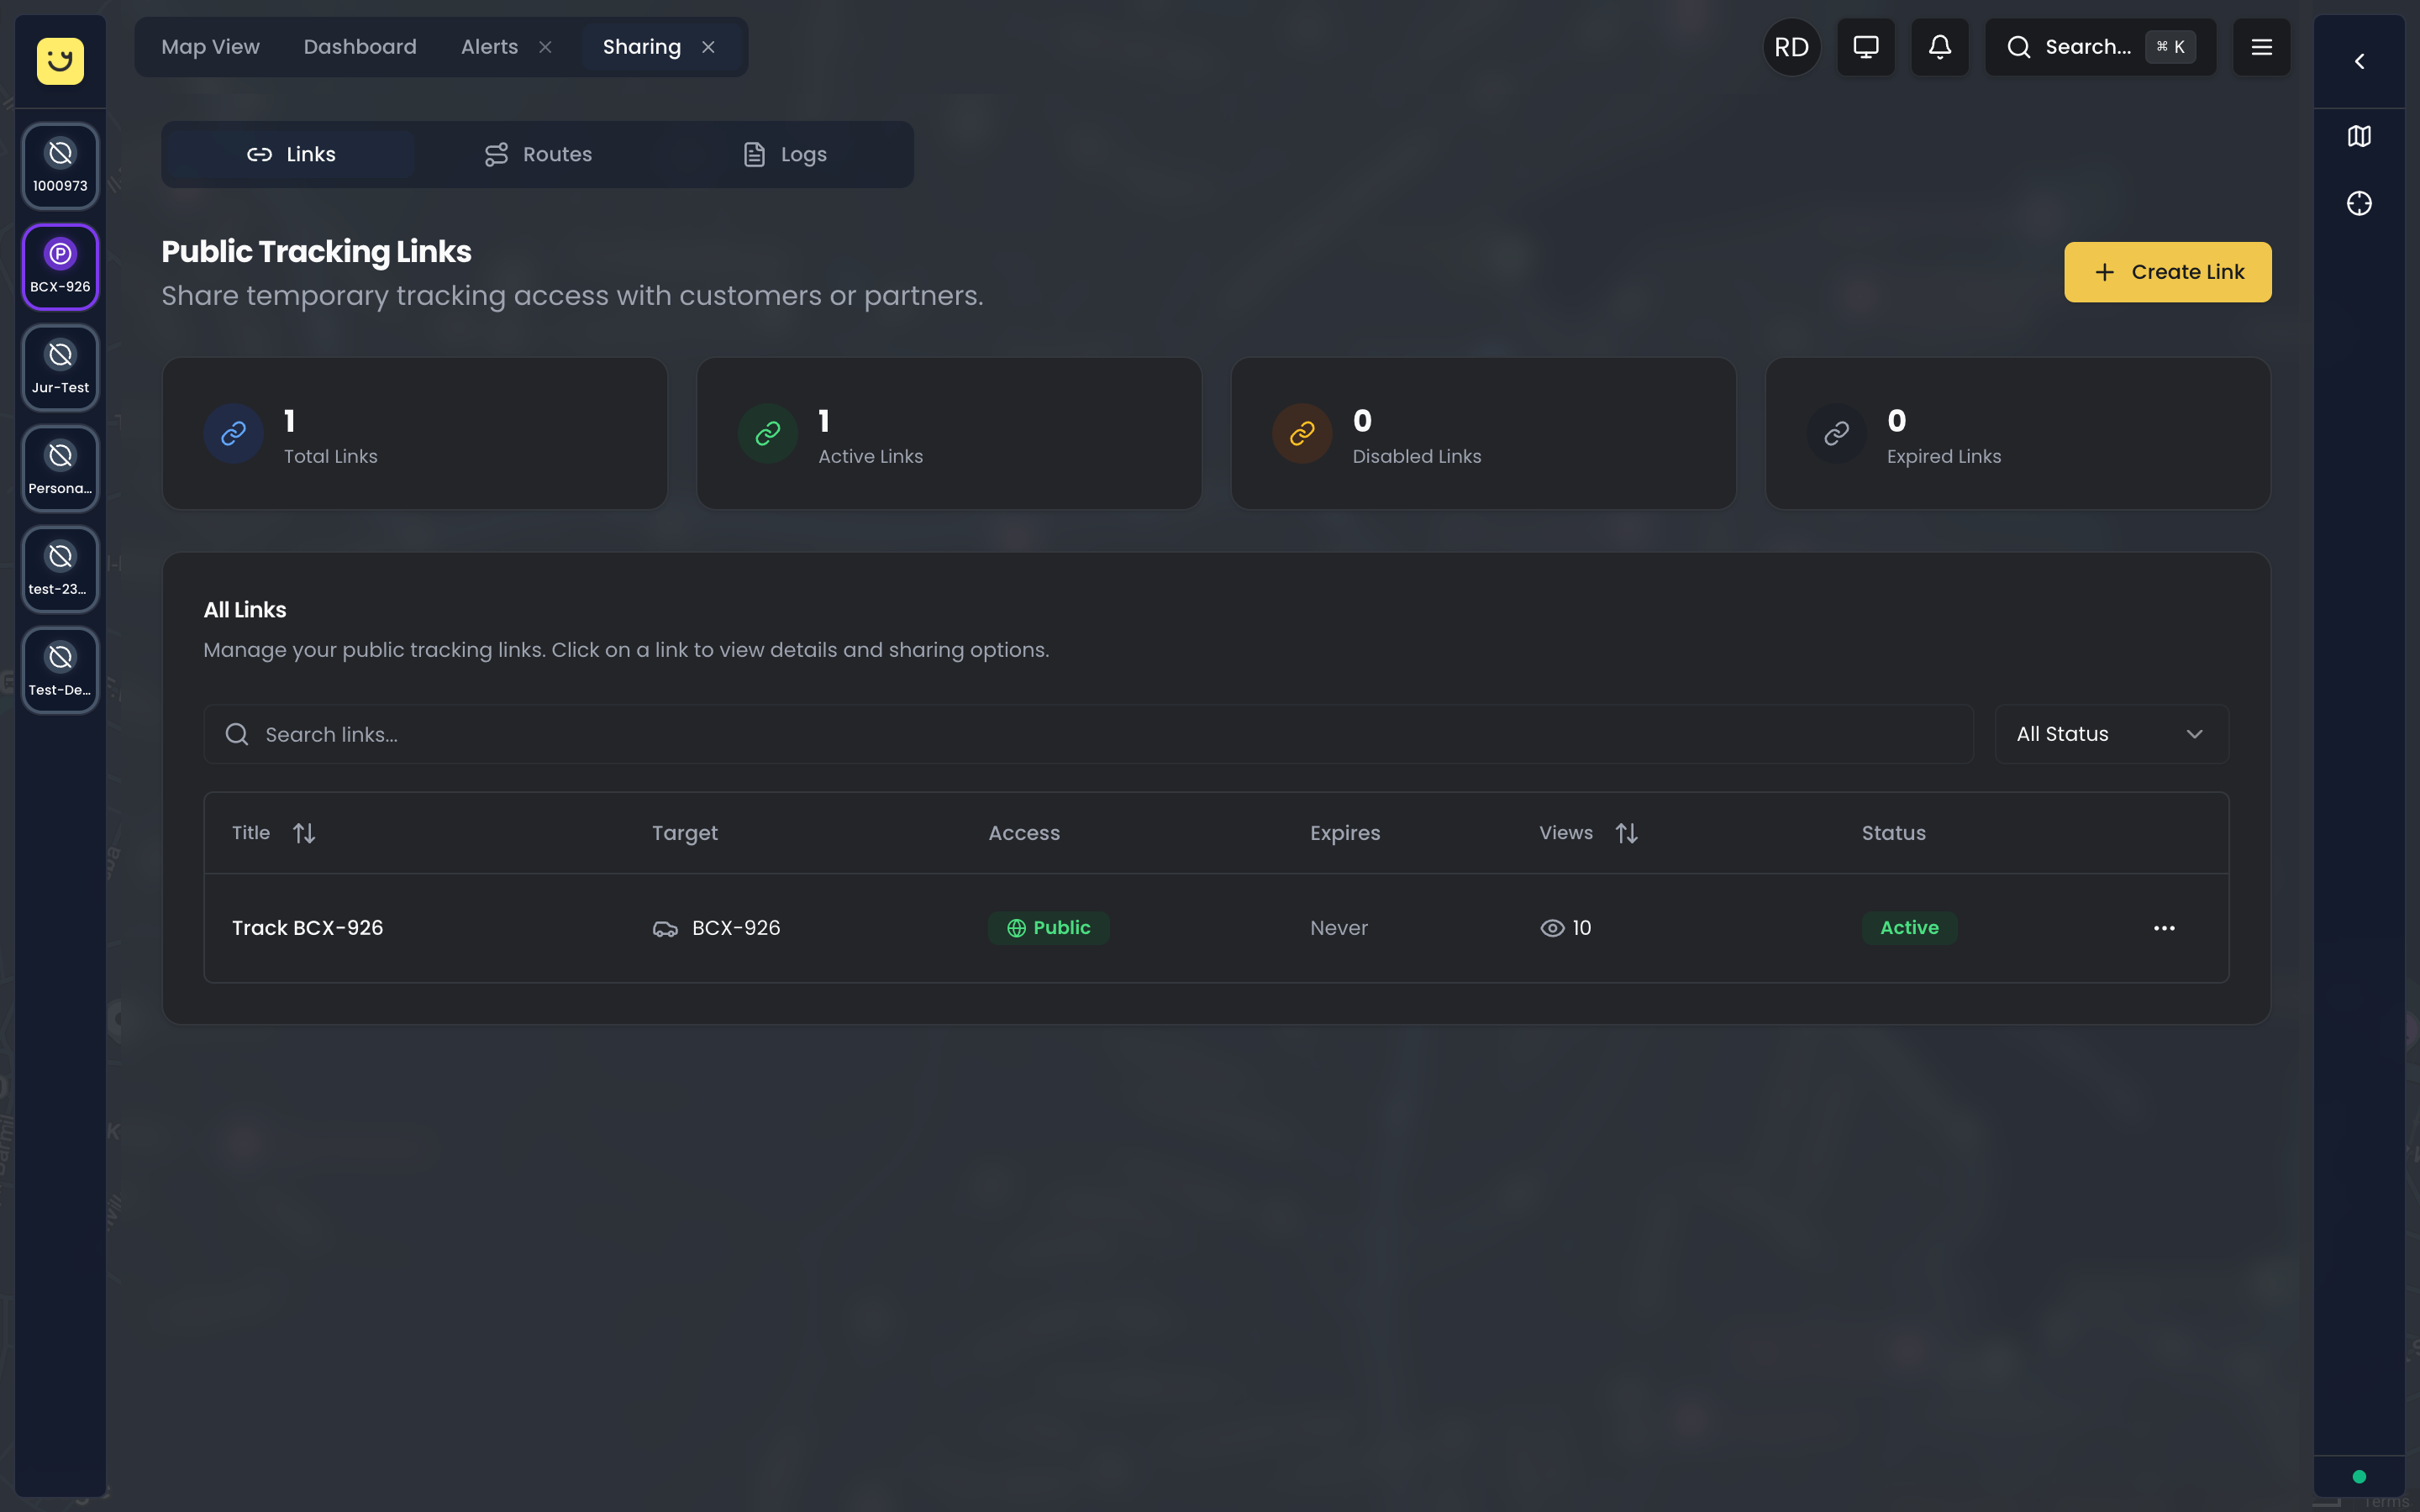
To create a new tracking link, open the Sharing tab from the Operations view using the navigation menu. The Sharing page contains three sub-tabs: Links, Routes, and Logs. Start on the Links tab and click the Create Link button at the top.
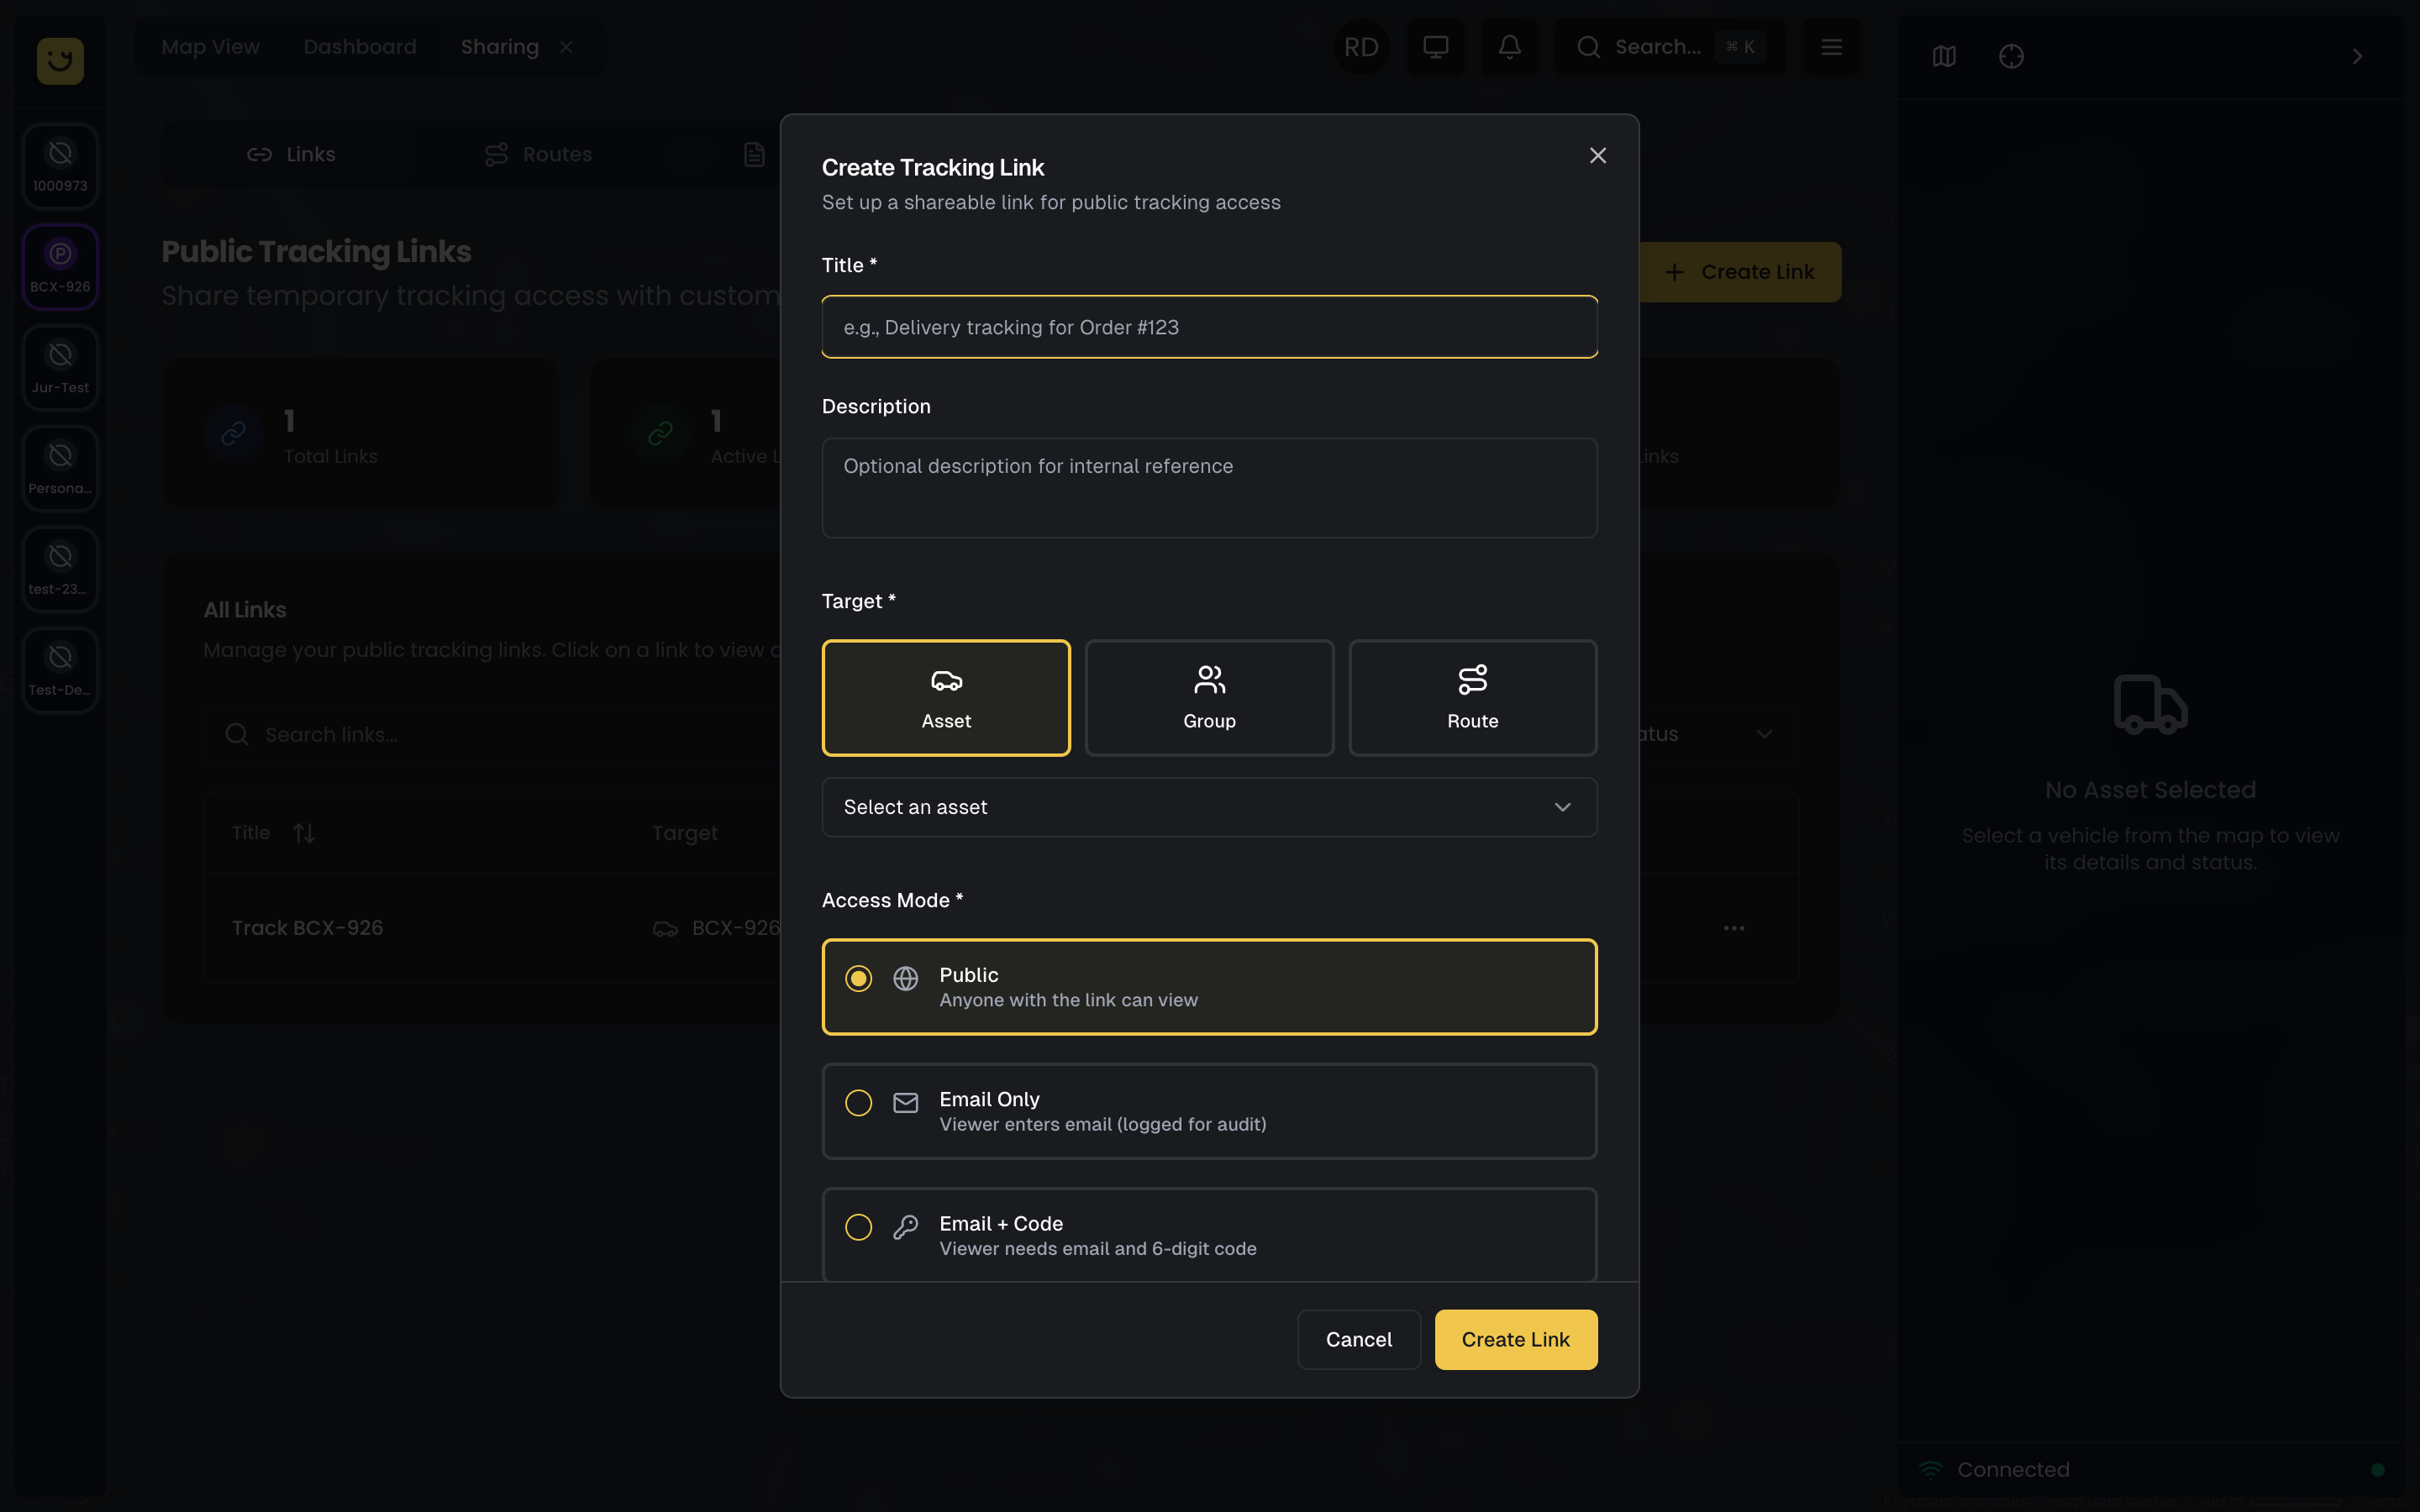
You'll see a configuration form with several sections. At minimum, you need to provide an internal name (for your reference, not shown to viewers) and select what asset or assets the link will display. Once you click Create, Yipii generates a unique URL that you can copy and share immediately via email, SMS, website embed, or even as a printed QR code.
The URL looks something like https://iot.yipii.io/t/abc123xyz — short, clean, and easy to share. The same link stays valid until you disable it, delete it, or it reaches its configured expiration condition.
Link Configuration Options
Basic Settings
The name field is purely for your internal organization. Use something descriptive like "Bakery Delivery 2026-02-07" or "Route 14 Morning Bus" so you can identify the link later when reviewing your list of dozens of active links.
For asset selection, you have three choices. Single Asset is the simplest — the link shows one specific vehicle. This works well for dedicated delivery trucks or field service vans. Asset Group lets you display multiple vehicles on one map, useful for showing your entire shuttle fleet or all delivery vehicles in a region. Route is a special option designed for school transport scenarios where different vehicles are dynamically assigned to the same route each day (more on this in the Routes section below).
Access Mode
Access mode controls who can view the link and what information you collect about viewers. This is a critical security and marketing decision.
Public access is the simplest option — anyone who has the link can open it and see the vehicle's live location, no login or verification needed. This is ideal for general sharing scenarios like embedding QR codes on delivery confirmation emails or posting links on your company website for customers to track their orders. There's no friction for the viewer, but you don't collect any information about who is watching.
Email Capture adds a single step before the map appears: viewers must enter their email address. Once they submit it, they see the live map normally. This mode is excellent for lead generation and marketing — you build a list of potential customers who were interested enough in your service to track a delivery. You can later export these emails for follow-up campaigns.
Email + Code provides an extra security layer. Viewers enter their email address, and Yipii immediately sends them a 6-digit verification code. They must enter this code to access the map. This ensures the viewer controls the email address they provided and prevents link sharing beyond intended recipients. Use this for sensitive shipments like pharmaceuticals, legal documents, or high-value goods where you need verified access.
Authorized Only is the most restrictive option. You maintain a whitelist of approved email addresses, and only those exact addresses can view the link. This is perfect for VIP customers, executive transport, or any scenario where you're contractually obligated to limit tracking visibility to specific individuals.
Expiration
Controlling when a link stops working is essential for security and customer experience. Expired links show a friendly message instead of continuing to broadcast vehicle positions after they're no longer relevant.
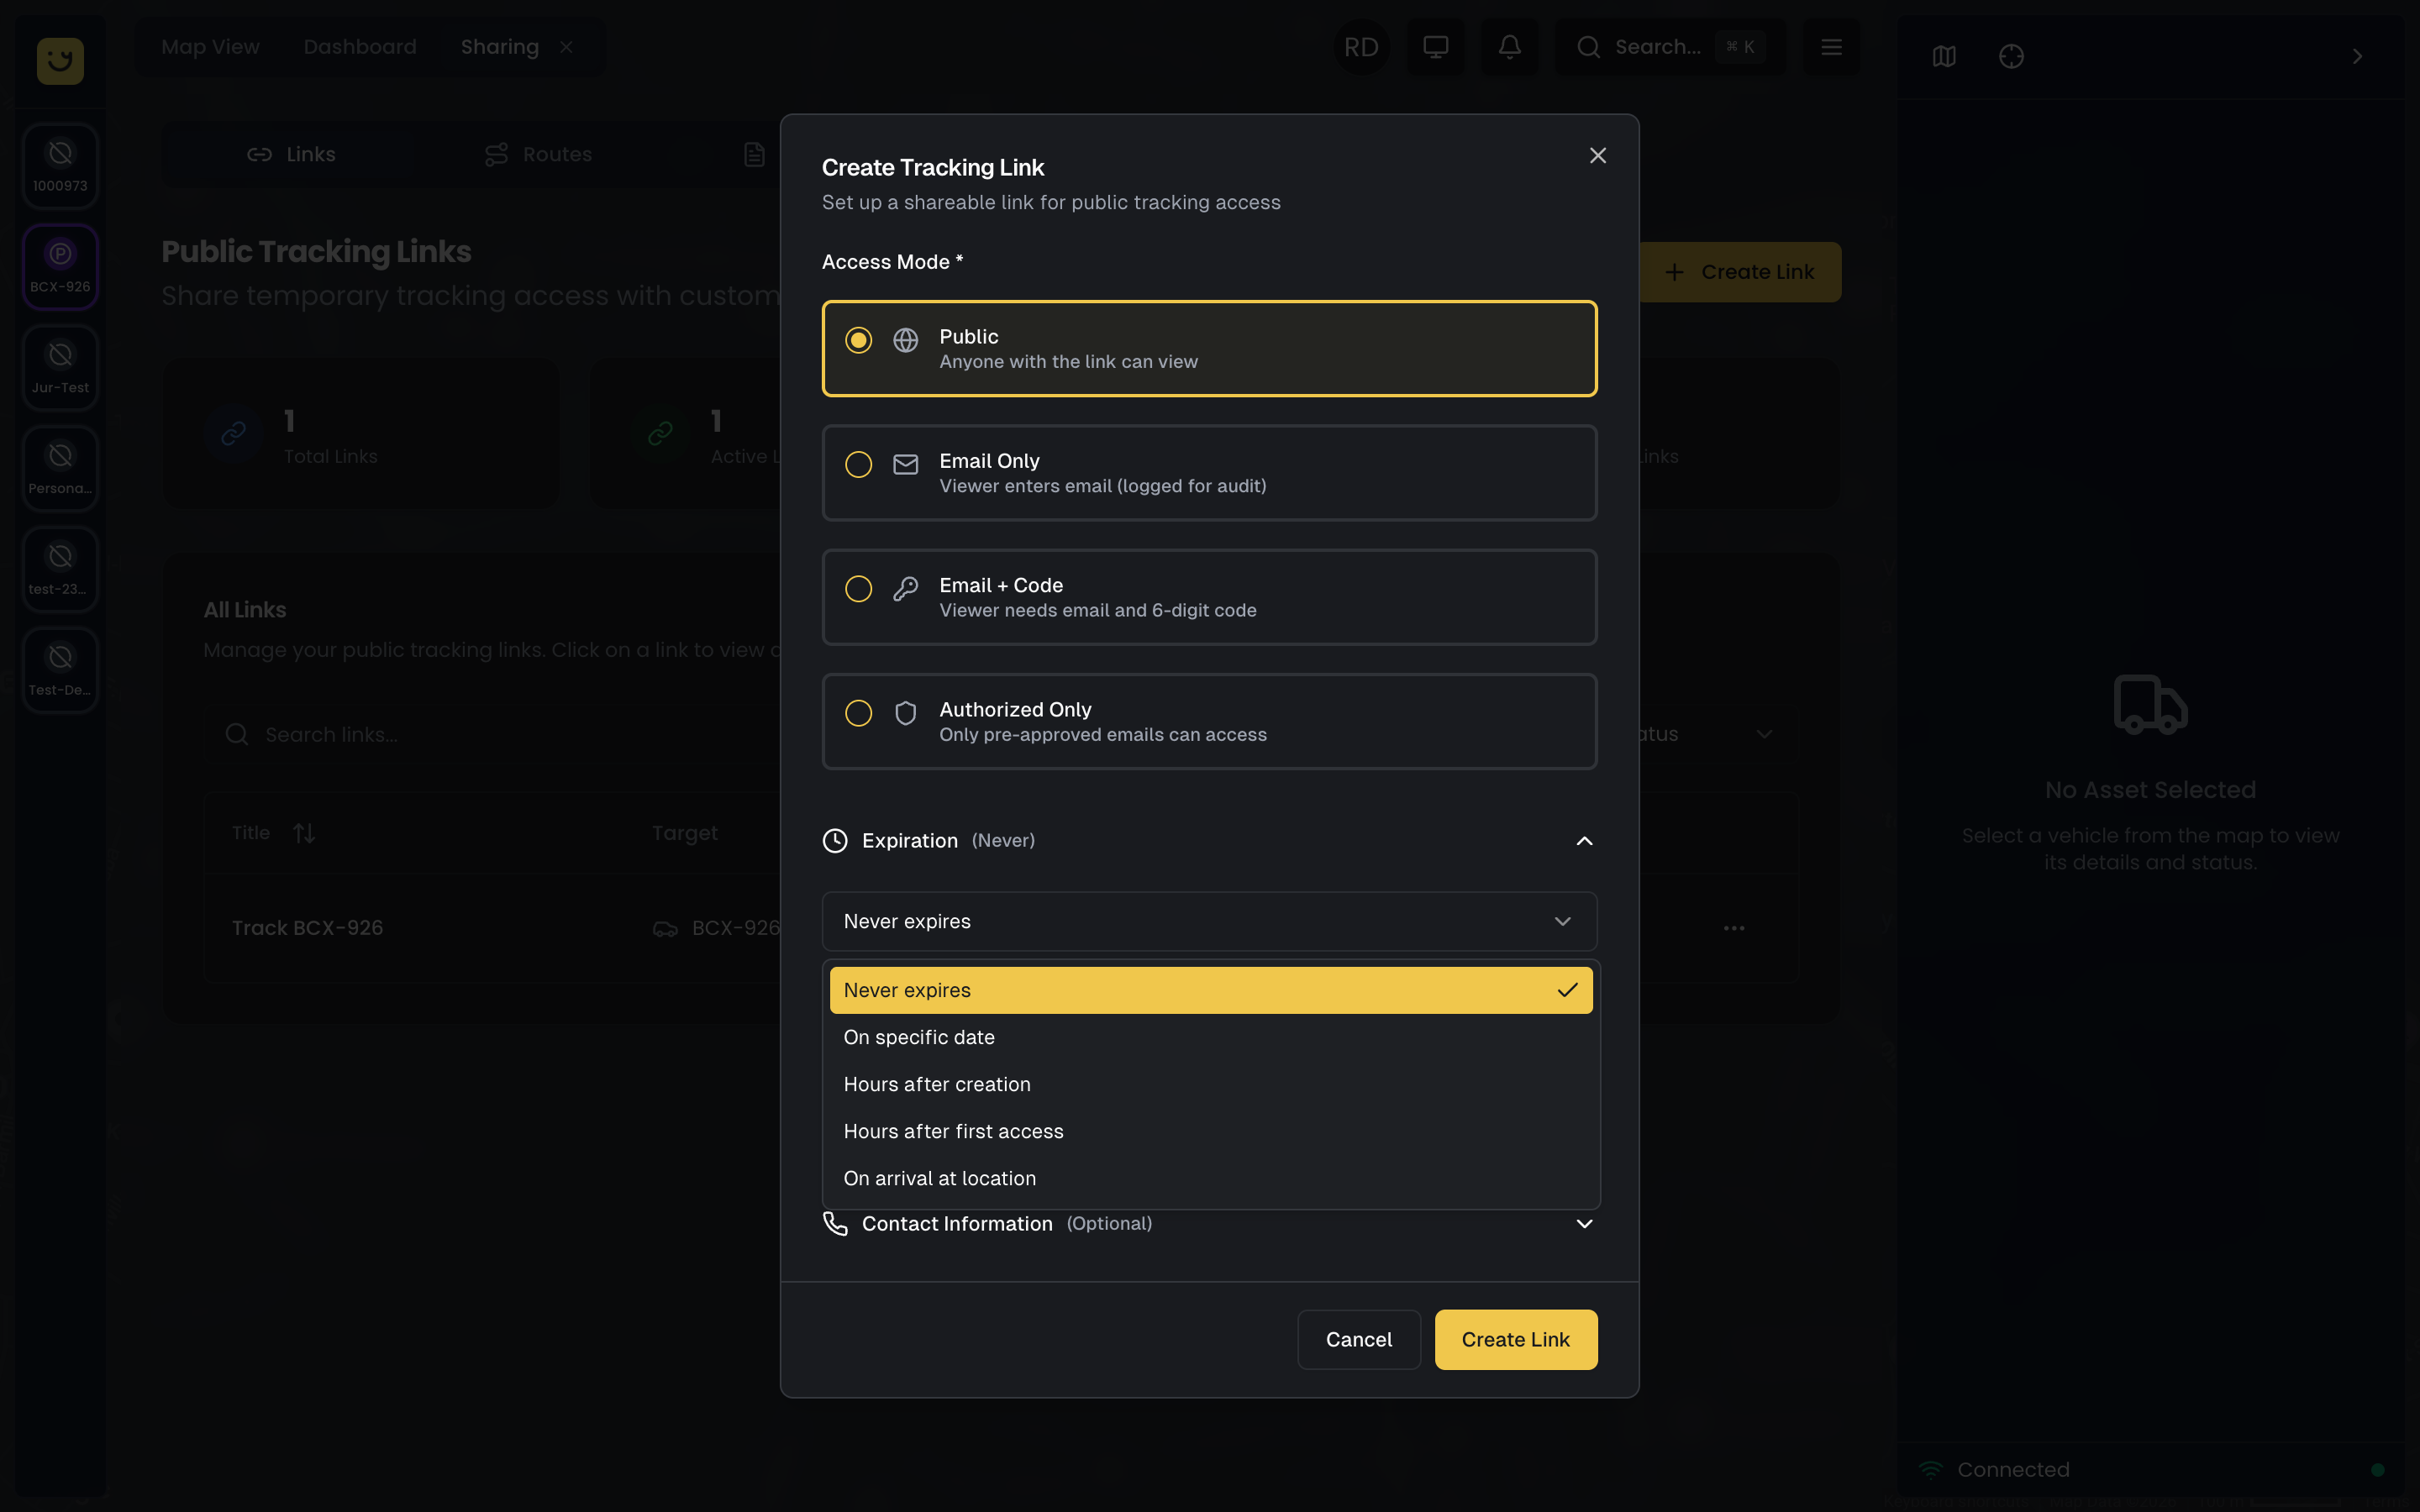
Fixed Date/Time expiration is straightforward — you set a specific moment when the link becomes invalid. For example, "Expires February 7, 2026 at 6:00 PM" works well when you know exactly when a delivery window or event ends.
Hours After Creation counts from the moment you create the link. If you set "24 hours from now," the link expires 24 hours later regardless of when someone first views it. This is useful for same-day delivery links you generate each morning.
Hours After First Access is more sophisticated — the countdown starts when the first viewer opens the link, not when you create it. A "4 hours from first view" link might be valid for days if nobody clicks it, but once someone opens it, the 4-hour countdown begins. This is ideal for delivery windows where you send the link hours before the scheduled arrival, but you want it to remain valid for a set period after the customer first checks it.
On Arrival is the most intelligent option and usually provides the best customer experience. You specify a destination location and radius (e.g., "123 Main Street, within 100 meters"), and the link automatically expires when the vehicle enters that zone. The customer sees the delivery approach, watches it arrive, and then sees a "Delivery Complete" message. The link stops working at the perfect moment — when the vehicle reaches the destination — without requiring manual intervention or time-based guessing. This requires you to set up a geofence for the arrival location, which you can do through the Geofencing interface.
Schedule
Scheduling controls when the link is accessible during its overall lifetime. This is different from expiration — a scheduled link might be valid for a month but only accessible during certain hours each day.
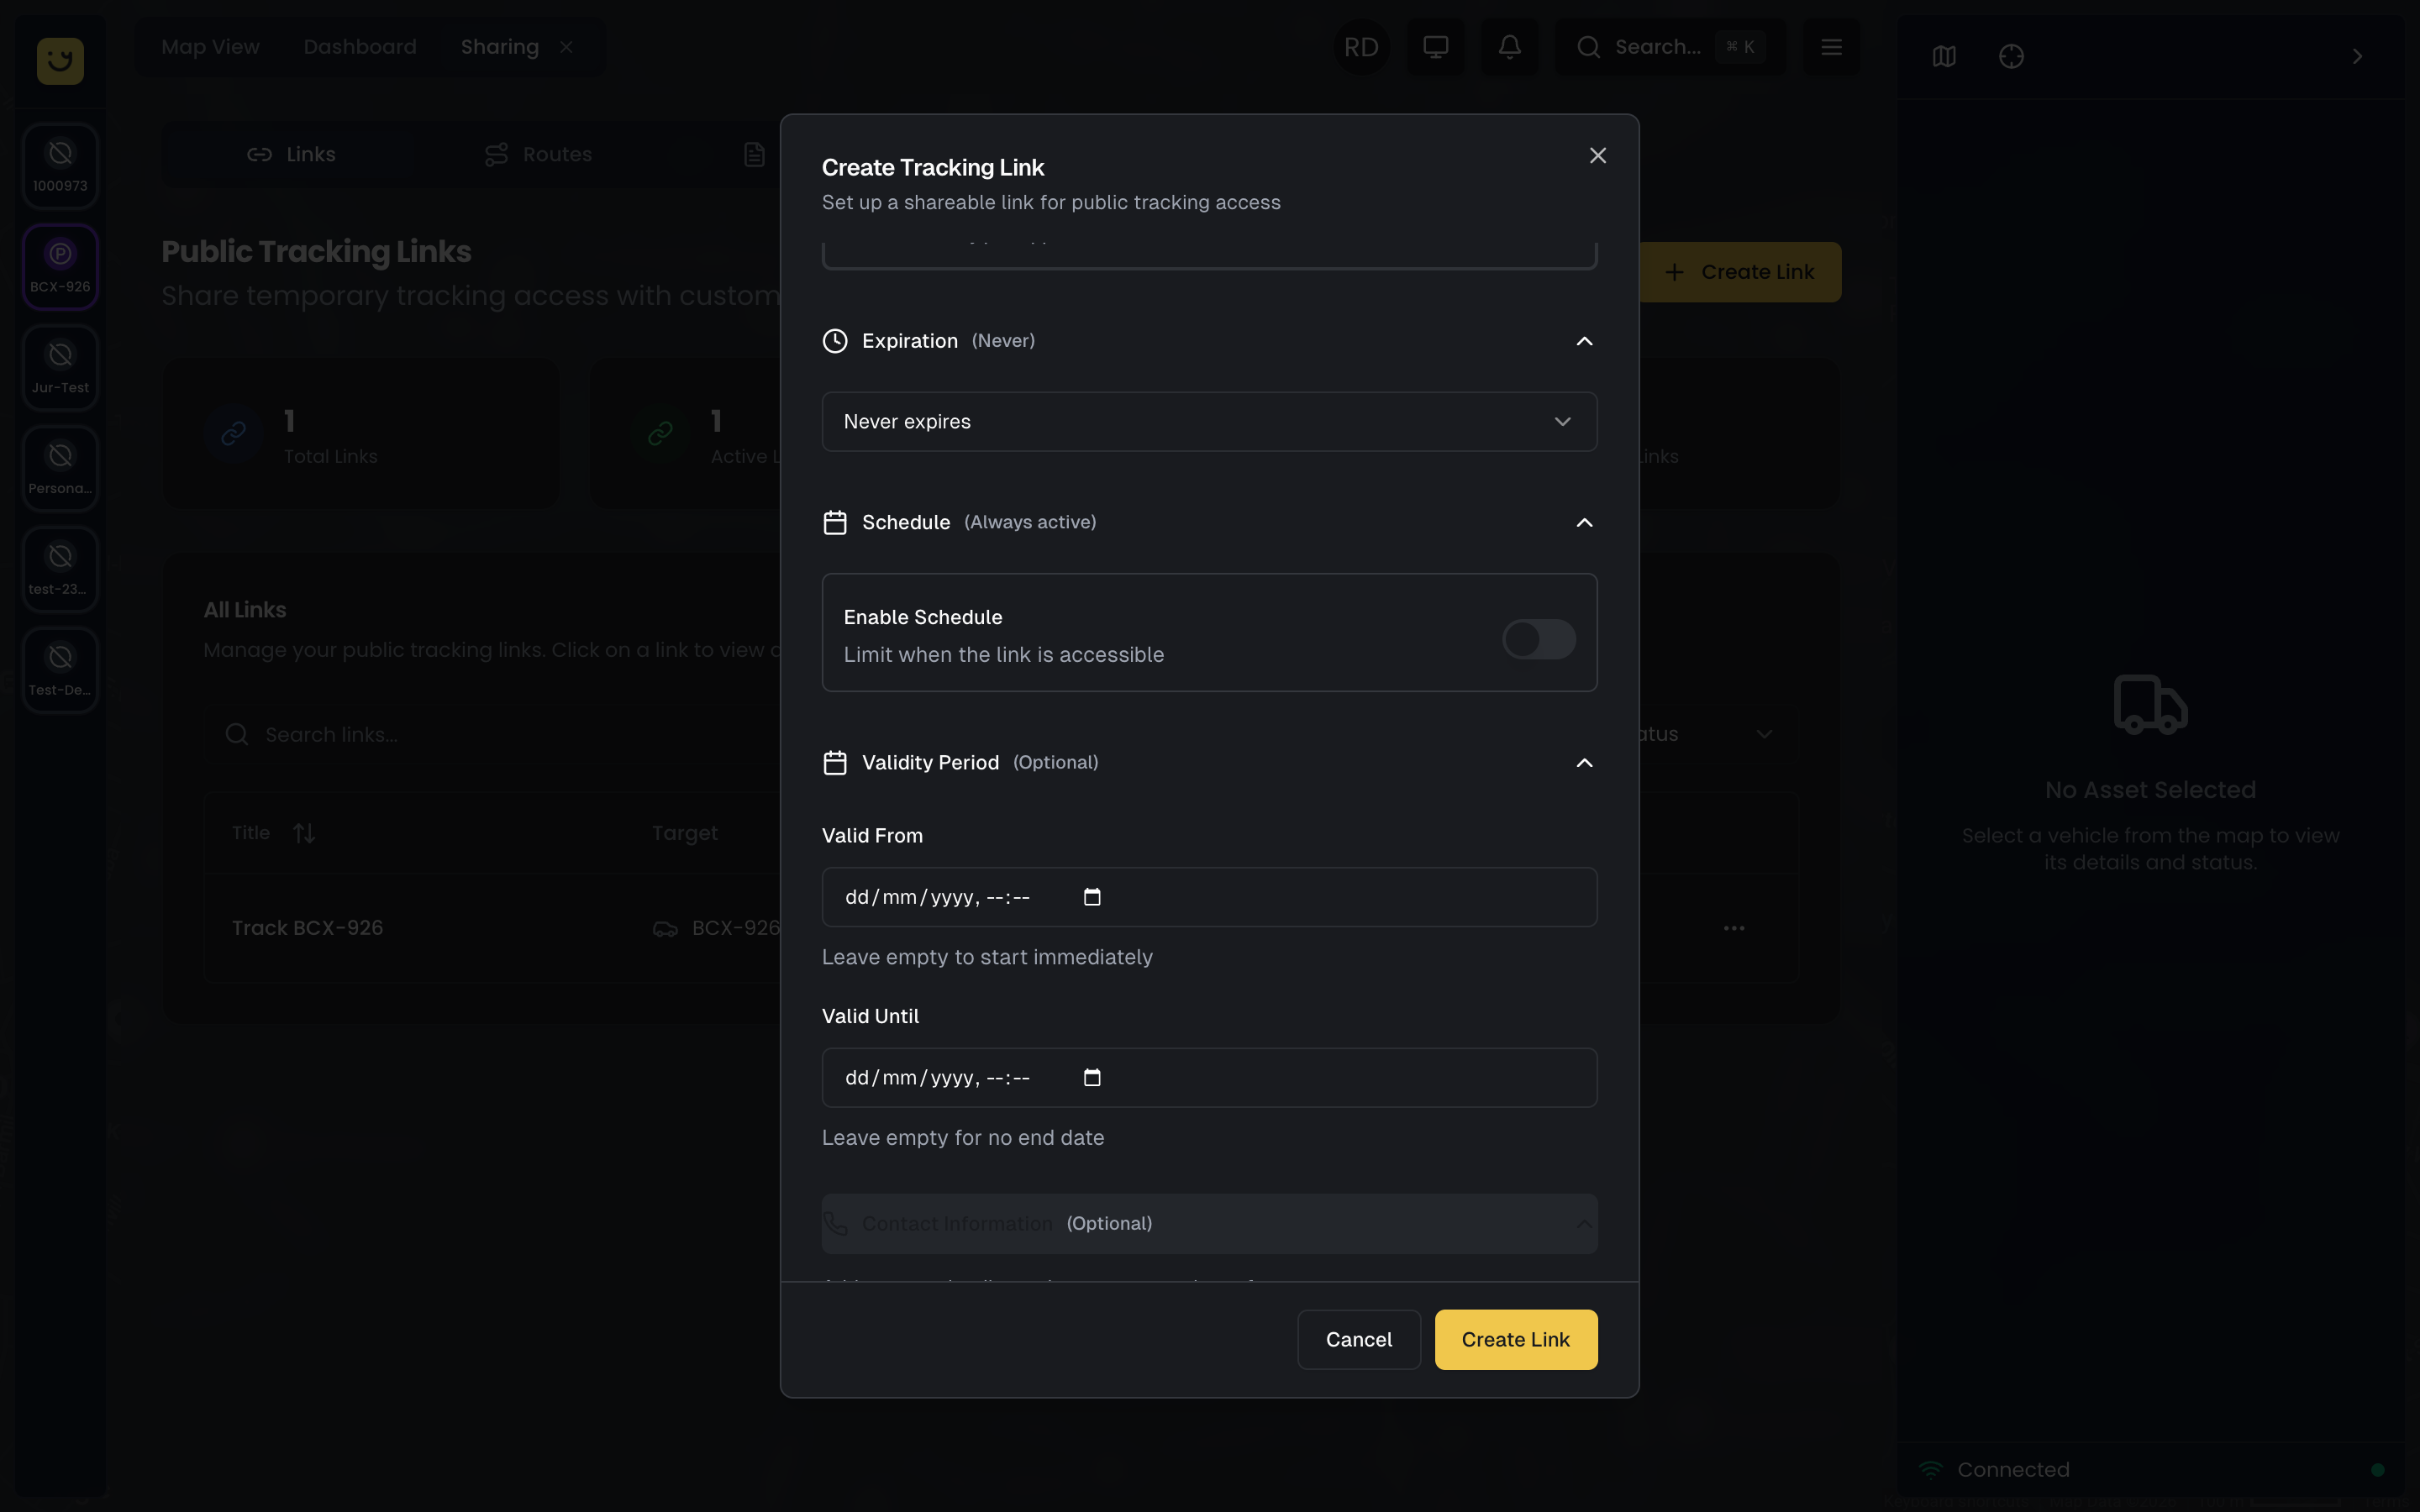
Always Available means the link works 24/7 whenever it hasn't expired yet. This is the default and works for most scenarios.
Time Windows let you restrict access to certain hours. For example, you might set "8 AM - 6 PM, Monday-Friday" for a business delivery service. If someone tries to access the link on Saturday or at 9 PM on Wednesday, they see a "Not available right now" message. This prevents customers from seeing vehicles parked at drivers' homes overnight or traveling to personal errands outside business hours.
Multiple Windows extends this concept with different hours on different days. You can set weekday hours, weekend hours, or specific per-day schedules. A school bus link, for example, might be accessible "7-9 AM and 2-4 PM on Monday-Friday only" to match pickup and dropoff times.
Contact Information
The tracking page can display contact details at the bottom so viewers can reach you if needed. You can provide a name (e.g., "Customer Service" or "Driver John"), a phone number that becomes a clickable call link on mobile devices, a WhatsApp number that opens a WhatsApp chat, and an email address that opens the viewer's email app.
If you leave these fields blank, the system uses your account's default contact information from your Branding settings. For most links, the account default is fine, but you might override it for specific links — for example, showing the dispatcher's direct line for VIP customers or a specific driver's WhatsApp for a dedicated route.
Managing Your Links
The Sharing tab from the Operations view displays all your tracking links in a sortable, searchable table. Each row shows the link's name, current status, which asset or route it's assigned to, the access mode, when it expires, and how many times it's been viewed.

Editing a Link
To modify a link's settings, click its name in the list to open the configuration panel. Make your changes and click Save. Here's the important part: the URL stays the same. If you've already shared the link with customers, they don't need a new URL — your changes apply immediately to the existing link. This lets you extend expiration dates, change access modes, or reassign assets without invalidating distributed links.
Disabling and Enabling
Sometimes you need to temporarily turn a link off without deleting it. Toggle a link's status between Active and Disabled using the switch in the link list. An active link works normally. A disabled link shows viewers an "unavailable" message. This is useful for suspending links during lunch breaks, maintenance windows, or unexpected delays without losing the link configuration.
Deleting a Link
If a link is no longer needed, click the delete icon in the link list and confirm the deletion. Deleted links cannot be recovered, and the URL becomes permanently invalid. Anyone who tries to access it will see a "Link not found" message. Delete links for completed one-time deliveries or expired campaigns, but consider keeping historical links for record-keeping and access log analysis.
Access Logs
Every tracking link maintains a detailed log of who accessed it and when. To view logs, click a link name to open its details, then switch to the Access Logs tab. You'll see a chronological record showing viewer email addresses (if email capture was enabled), access timestamps, how long each viewer stayed on the page, and device/browser information.
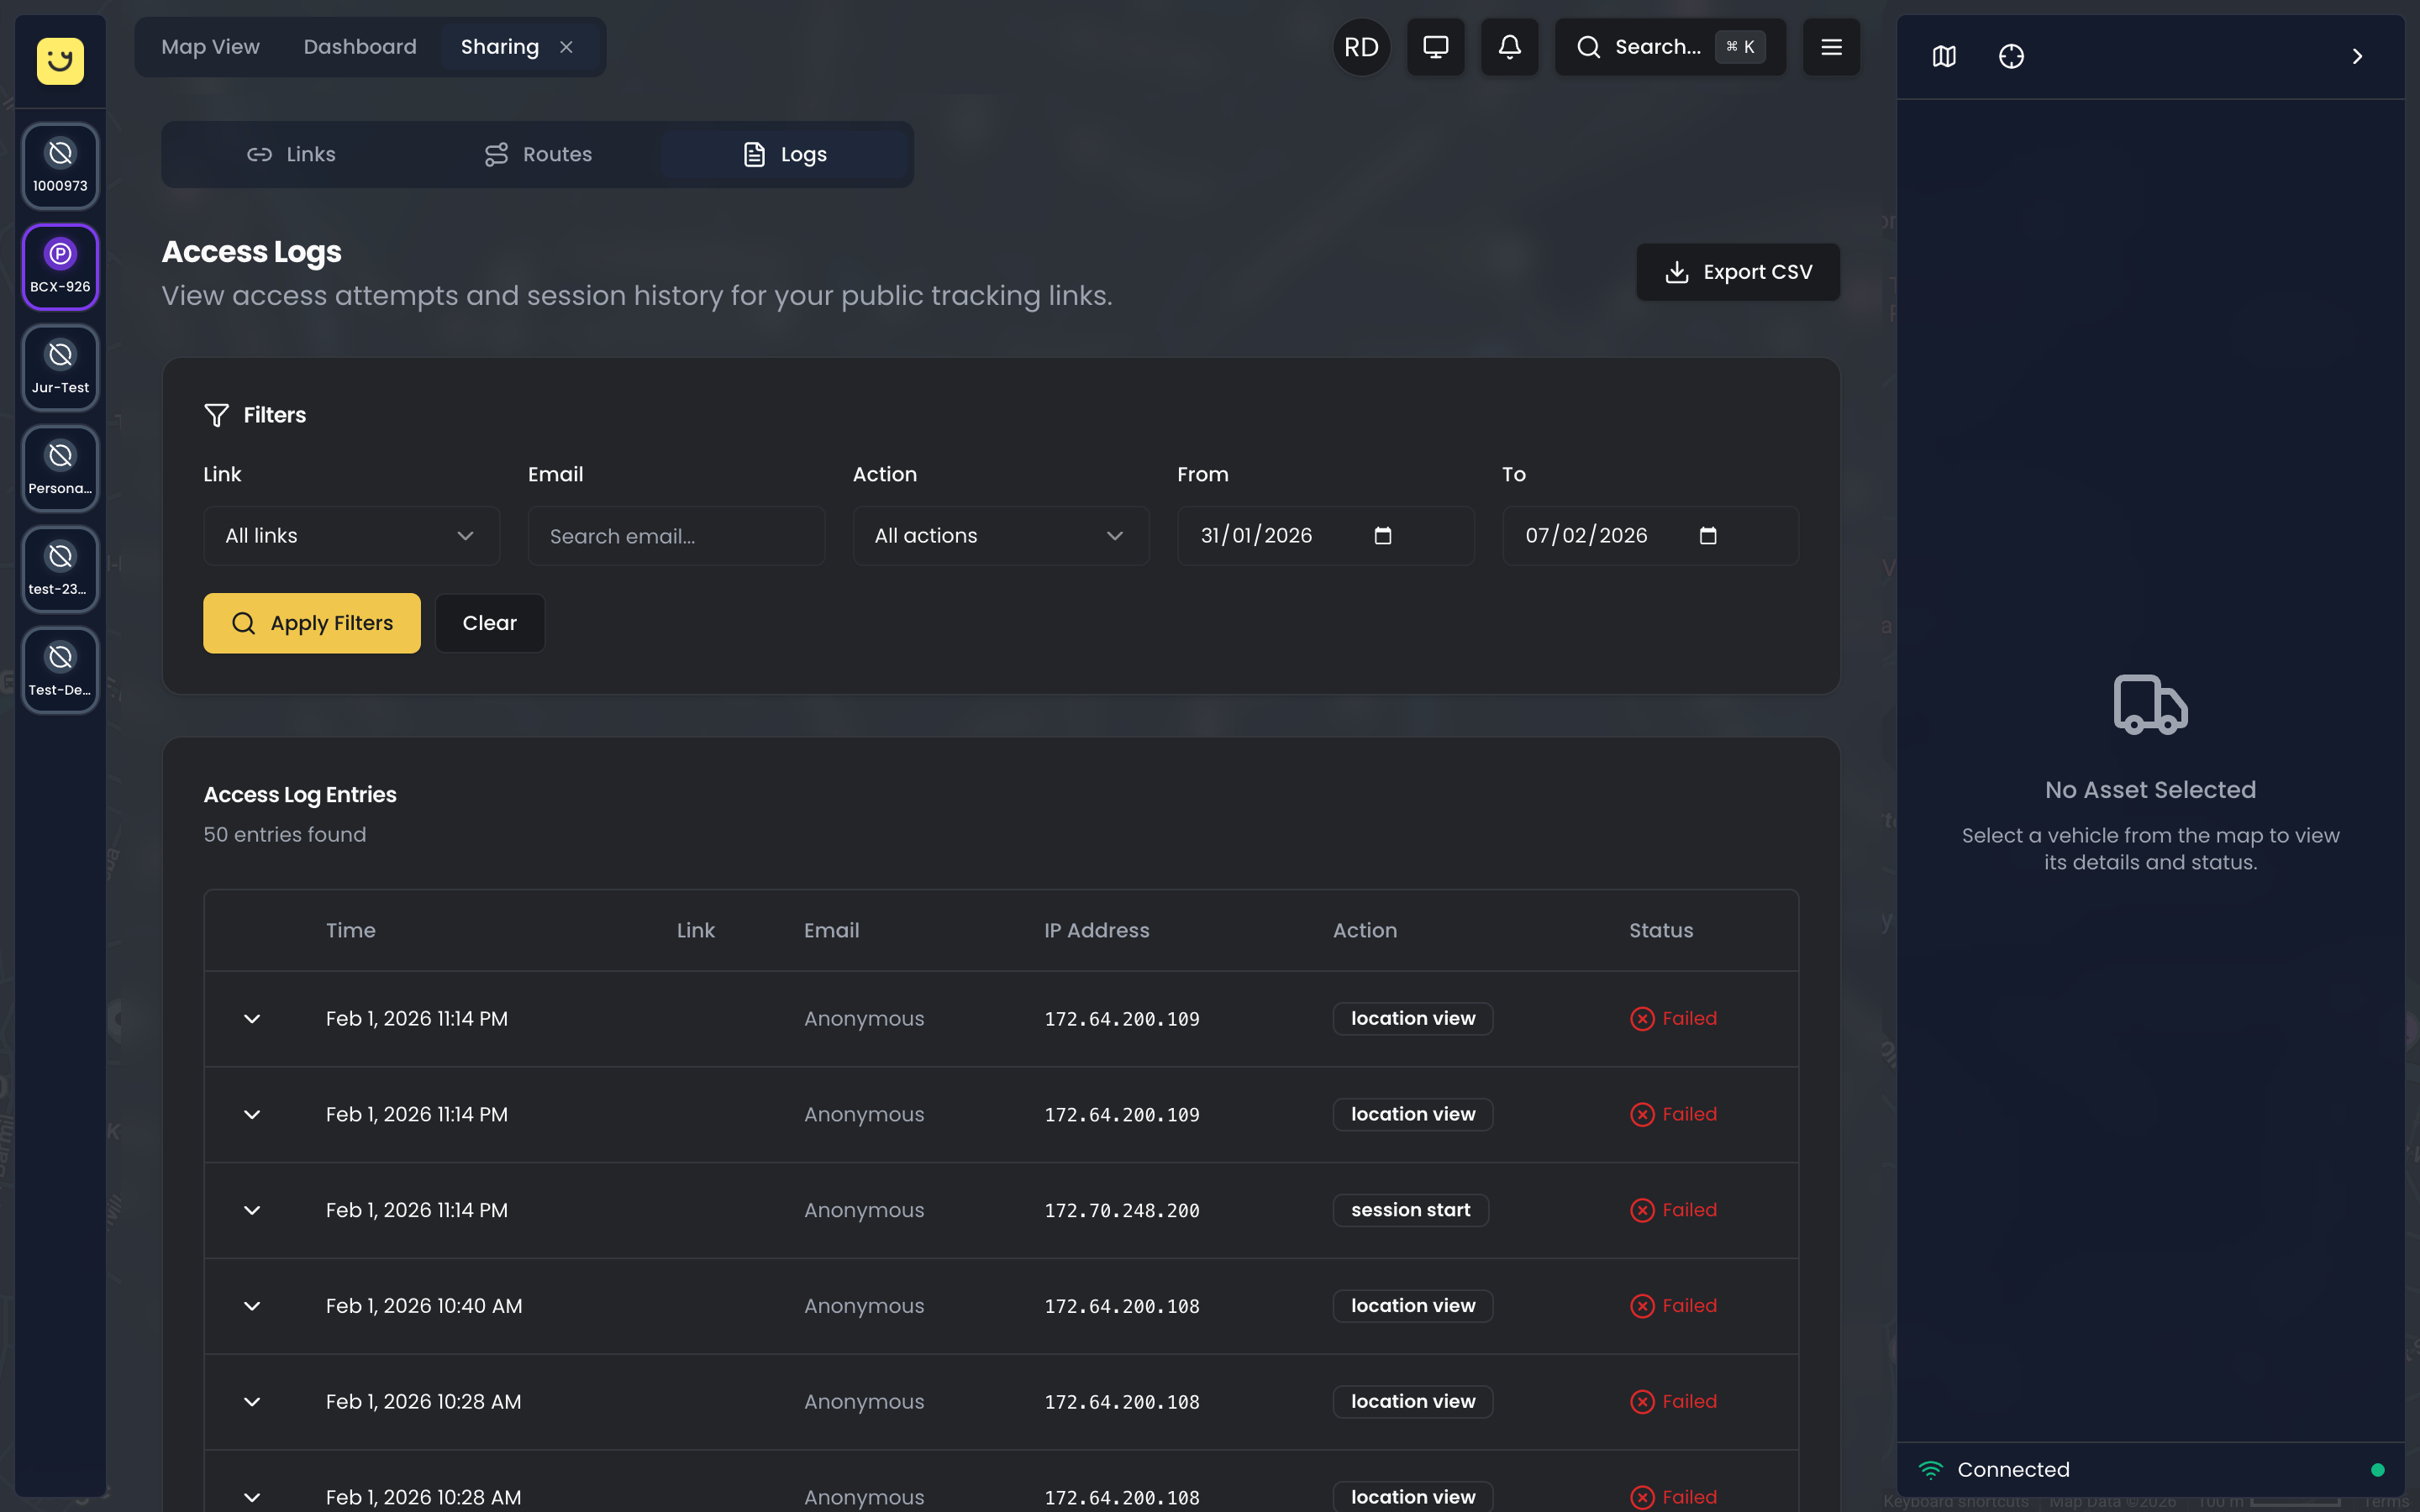
This data is valuable for several purposes. For marketing, you can see how many people opened your delivery tracking links and export those emails for follow-up campaigns. For security, you can verify who accessed links to sensitive shipments and investigate any suspicious access patterns. For operations, you can identify technical issues — if customers report not seeing the tracking page, you can check whether they accessed the link at all and what error they might have encountered.
Exporting Logs
Click the Export button on the Access Logs tab to download a CSV file containing the full log history. This file includes all viewer information and is suitable for importing into CRM systems, spreadsheet analysis, or compliance record-keeping.
Routes for School Transport
School transport operations have a unique challenge: the same route number is served by different buses on different days due to maintenance, driver availability, or vehicle swaps. Parents don't care which physical bus is assigned to Route 14 today — they just want to track Route 14.
Yipii IoT solves this with the Routes feature. Instead of creating tracking links tied to specific vehicles, you create a route as a trackable entity. Then you assign whichever vehicle is operating that route today. Parents use the same link every morning, and it always shows the current vehicle for their route.
To set this up, open the Sharing tab from the Operations view and switch to the Routes sub-tab. Create a new route (e.g., "Route 7" or "Morning Route - East"), then use the vehicle assignment dropdown to select which bus is running that route today. Update this assignment daily or as needed.
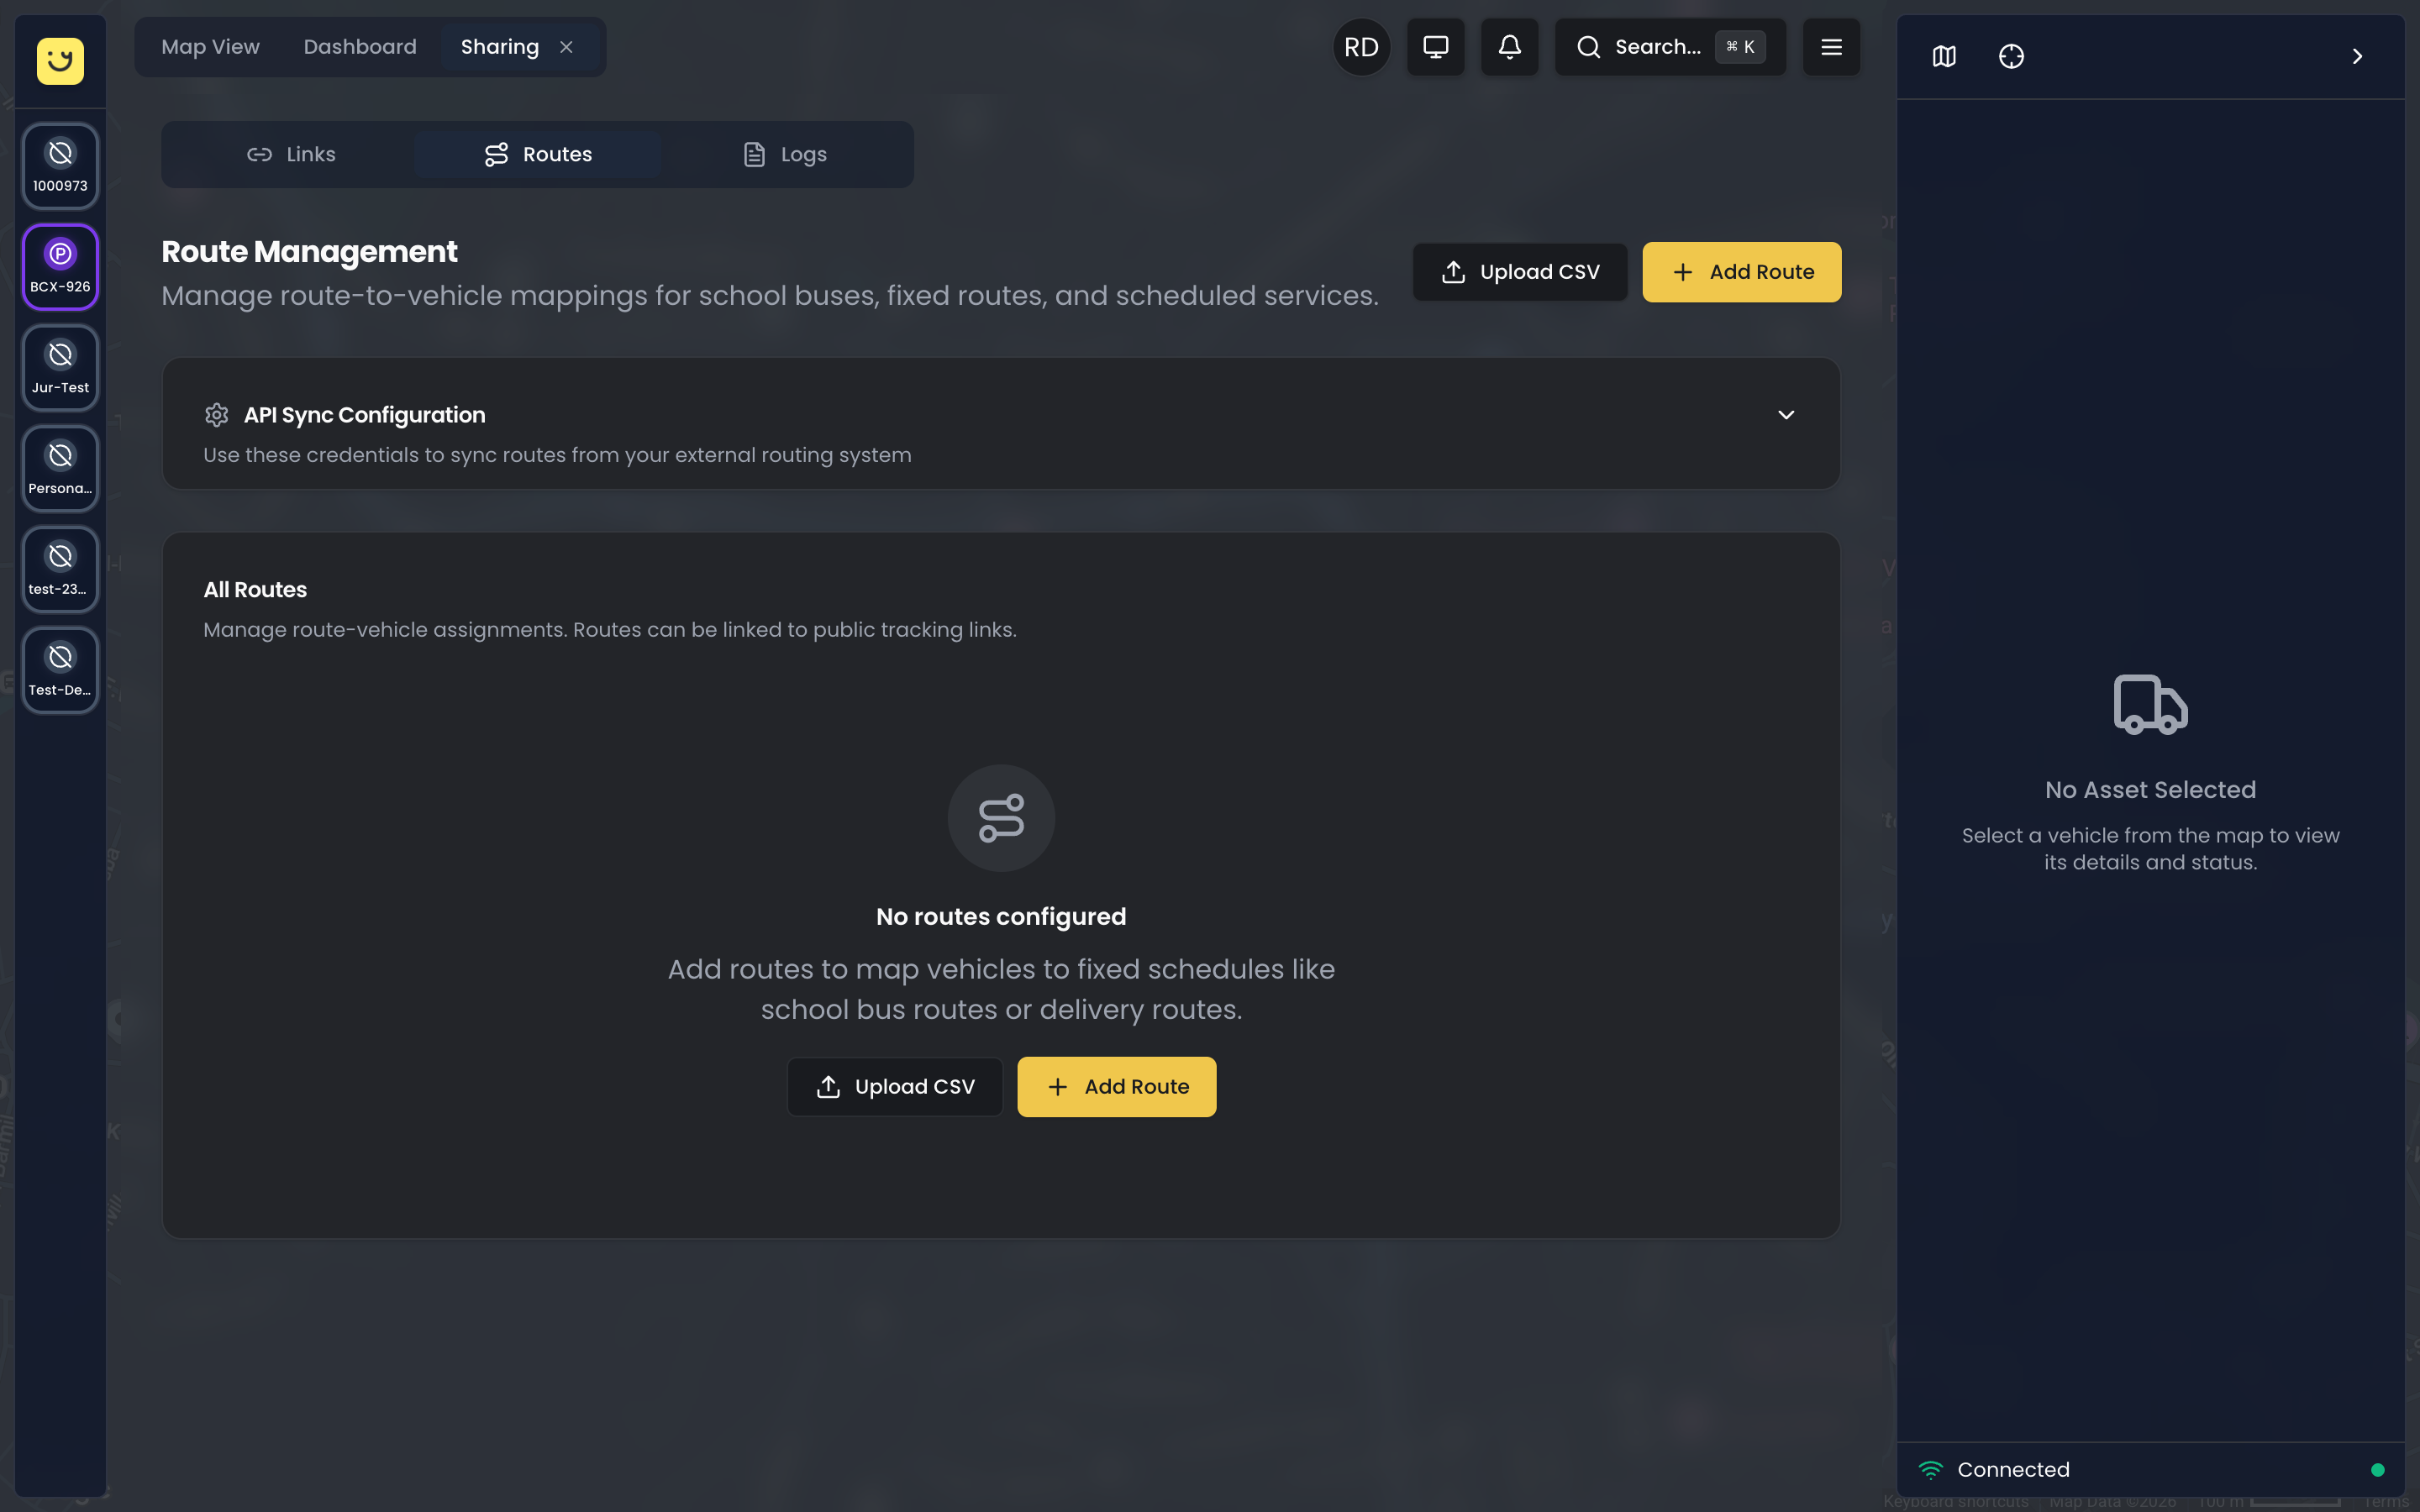
When you create a tracking link, choose "Route" as the asset selection type instead of "Single Asset." The link displays whichever vehicle is currently assigned to that route. This is significantly more convenient than sending new tracking links to dozens of parents every time a bus changes.
Managing Routes
You can create routes one by one through the interface, or you can upload a CSV file with route numbers to bulk-create many routes at once. This is essential for school districts with dozens of routes. Once routes exist, daily vehicle assignments are managed via the dropdown menus in the Routes list or through bulk assignment tools.
Best Practices
Security Considerations
Always set expiration dates or conditions on tracking links. A link that never expires continues broadcasting vehicle positions indefinitely, which is both a privacy risk and a security concern. Even for long-term routes like school buses, use scheduling to restrict access to pickup and dropoff hours only.
Choose the access mode appropriate to your use case. Public links are convenient but provide no viewer verification. If you're tracking high-value shipments or sensitive deliveries, use Email + Code or Authorized Only access modes to ensure only intended recipients can view the link.
Review your access logs periodically to identify any unusual access patterns. If a link intended for one customer has been accessed by dozens of different IP addresses, it may have been shared beyond your intended audience. This could indicate a need for stricter access modes.
Disable or delete links you no longer need. A long list of active links is harder to manage and monitor. Clean up completed delivery links, expired event transport links, and obsolete test links regularly.
User Experience
Use descriptive internal names so you can find links quickly when customers call with questions. "Mrs. Johnson Delivery - 123 Main St" is far more useful than "Delivery 47" when you're searching through 50 active links.
Always include contact information on tracking pages. When customers see a map, their next question is often "How do I contact the driver?" or "What if I need to reschedule?" Pre-emptively provide this information at the bottom of the tracking page.
Set reasonable time windows that match customer expectations. If your business operates 8 AM to 6 PM, don't let tracking links broadcast vehicle positions outside those hours. Customers seeing your fleet parked at personal residences overnight creates unnecessary questions and privacy concerns.
Test every link before sharing it, especially if you're using advanced features like arrival-based expiry or scheduled access windows. Open the link in an incognito browser window to see exactly what your customers will see. Verify that contact information displays correctly, the map centers on the vehicle, and position updates appear.
Performance and Reliability
Yipii IoT's tracking links are designed to handle many concurrent viewers with no practical limit. Real-time updates occur every 10-30 seconds depending on the tracker's configuration and GPS signal strength. The pages work seamlessly on mobile devices, tablets, and desktop browsers without requiring any app installation.
Links load quickly even on slow mobile connections because the pages are highly optimized with minimal JavaScript and efficient map rendering. This is critical for customer-facing features — every second of load time increases the likelihood that a customer gives up and calls you instead.
The Public Tracking Page
When a viewer opens a tracking link, they see a clean, branded page with a live map centered on the vehicle's current position. The page shows the vehicle name, current speed, and trip information. If you've configured contact details, they appear at the bottom for easy access.
![]()
On mobile devices, the tracking page adapts to a full-screen map experience optimized for touch interaction. Viewers can pinch to zoom, tap the vehicle marker for details, and call your support number with a single tap.
What's Next?
- Branding — Upload your logo and set brand colors so tracking pages look like your company, not ours. Enterprise accounts get fully white-labeled pages with no Yipii branding at all.
- Geofencing — Create arrival geofences that auto-expire tracking links when vehicles reach their destination, providing the best possible customer experience with zero manual intervention.
- Assets — Manage the vehicles and asset groups that can be shared through tracking links. Proper asset organization makes link creation faster and more consistent.
- Alerts — Configure notifications for tracking link events and delivery arrivals so your team stays informed about customer-facing tracking activity.
Frequently Asked Questions
Do customers need to download an app?
No. Tracking links open in any web browser on any device — phone, tablet, or desktop. There is nothing to install, no app store approval required, and no version compatibility issues to worry about. Customers simply click the link you send them and see a live map immediately. This zero-friction experience is intentional — every additional step you add (download this, create an account, verify your email) dramatically increases the percentage of customers who give up and call you instead of using the self-service tracking.
Can I customize what customers see on the tracking page?
Yes. Upload your logo and set your brand color in Branding settings to make the tracking page match your company identity. The page displays your logo at the top, uses your brand color for accent elements, and includes your contact information at the bottom. Enterprise accounts get fully white-labeled pages where Yipii branding is completely removed — customers see only your company's identity.
You can also control which contact details appear on each link. Some businesses show different phone numbers for different types of deliveries (e.g., customer service for standard deliveries, driver direct line for VIP customers). Each link can override the account default contact information with link-specific details.
What happens when a tracking link expires?
Expired links show a friendly "Tracking Complete" or "Link Expired" message instead of the live map. Customers can no longer see the vehicle's position, and the page explains that tracking has ended. The exact message depends on the expiration type — arrival-based expiry shows "Delivery Complete" with the arrival timestamp, while time-based expiry shows when the link expired.
If you used arrival-based expiry with a geofence, the link expires automatically when the vehicle reaches the destination. This provides the perfect customer experience: they watch the vehicle approach, see it arrive, and then get a completion message. No manual intervention required, and you don't accidentally broadcast the driver's position after leaving the customer's location.
How many people can view a tracking link at the same time?
There is no practical limit. Tracking links are designed to handle many concurrent viewers with real-time updates every 10-30 seconds. The system uses efficient map rendering and data streaming to support simultaneous viewers without performance degradation. This makes tracking links suitable for high-traffic scenarios like school bus routes where dozens of parents may be watching the same vehicle simultaneously, or event shuttles where hundreds of guests might check the link at once.
Can I track how many people viewed my link?
Yes. Each tracking link has an Access Logs tab that records viewer email addresses (if email capture is enabled), access timestamps, session duration, and device information. This data is valuable for multiple purposes: marketing teams use it to identify potential leads, operations teams use it to verify customers received their tracking information, and customer service teams use it to troubleshoot customer reports of "the link didn't work."
You can export this data as CSV for analysis or record keeping. For example, if you send tracking links to 100 customers per week, you can analyze what percentage actually opened the link, how long they spent watching, and whether certain times of day have higher engagement. This helps you optimize your communication strategy — if only 30% of customers open tracking links, maybe your email subject line needs improvement.
How does the free tier work?
Every account gets 3 free public tracking links with full functionality — all access modes, expiration options, scheduling, and real-time updates. There are no feature limitations on free links. The free tier never expires; you can use your 3 free links indefinitely. If you disable or delete a link, that slot becomes available again. Only active, non-expired links count toward the free tier limit.
What happens if I need more than 3 links?
When you reach the 3-link limit, you'll see an upgrade prompt on the Sharing page. You can either upgrade to a paid sharing package from your Billing settings or contact support@yipii.com for custom pricing. Paid sharing uses tiered pricing based on the number of shared assets — the more you share, the lower the per-asset cost.
Do disabled links count toward the free tier?
No. Only active, non-expired links count toward your free 3-link limit. If you disable or delete a link, that slot becomes available for a new link. Expired links also don't count. This means you can create a link for a one-time delivery, let it expire on arrival, and that slot opens up again automatically.
Was this page helpful?