GPS Trackers
Supported GPS trackers, setup guides, and device management
GPS Trackers
![]()
GPS trackers are the hardware devices that transmit real-time location data to Yipii IoT. Our platform supports multiple tracker manufacturers and models, each offering different features for various use cases.
Supported Tracker Manufacturers
Yipii IoT supports trackers from multiple GPS hardware manufacturers. Not all features are available across every brand — some capabilities such as remote commands, firmware updates, and BLE sensor support depend on the tracker manufacturer and protocol.
Teltonika
Teltonika is our primary supported manufacturer with the broadest feature set:
- Over-the-Air (FOTA) firmware updates
- Remote configuration via SMS and TCP
- BLE (Bluetooth Low Energy) sensor support
- Temperature sensor connectivity
- Full remote command support (reset, diagnostics, parameter read/write)
| Model | Type | Best For |
|---|---|---|
| FMB003 | Basic | Entry-level fleet tracking, cost-effective deployments |
| FMB120 | Standard | General fleet management, small to medium fleets |
| FMC003 | Advanced | Enhanced connectivity, additional I/O ports |
| FMC130 | Premium | 4G LTE connectivity, high-data applications |
Cellocator (Pointer)
Yipii IoT also supports the Cellocator protocol, used by Pointer devices:
- Industrial-grade GPS trackers
- Heavy machinery and construction equipment
- Long-haul transport applications
Cellocator limitations compared to Teltonika:
| Feature | Teltonika | Cellocator |
|---|---|---|
| Device reset | TCP and SMS | TCP only (device must be online) |
| Diagnostic commands (getver, getstatus, etc.) | Supported | Not supported |
| Configuration commands (getparam, setparam) | Supported | Not supported |
| FOTA firmware updates | Automatic | Not available |
| BLE beacon scanning | Supported | Not available |
| Temperature sensor toggle | Supported | Not available |
| SMS fallback when offline | Supported | Not available |
Adding a Tracker
Adding a tracker to your account uses a guided multi-step wizard. The wizard walks you through scanning (or entering) the IMEI, reviewing the tracker's status, setting up the vehicle assignment, optionally capturing photos, and confirming the result.
What You Need
- The tracker's 15-digit IMEI number (printed on the device label or its QR code)
- A SIM card with an active data plan (or a Yipii-provided SIM)
- The tracker installed and powered on (unless you are pre-registering before installation)
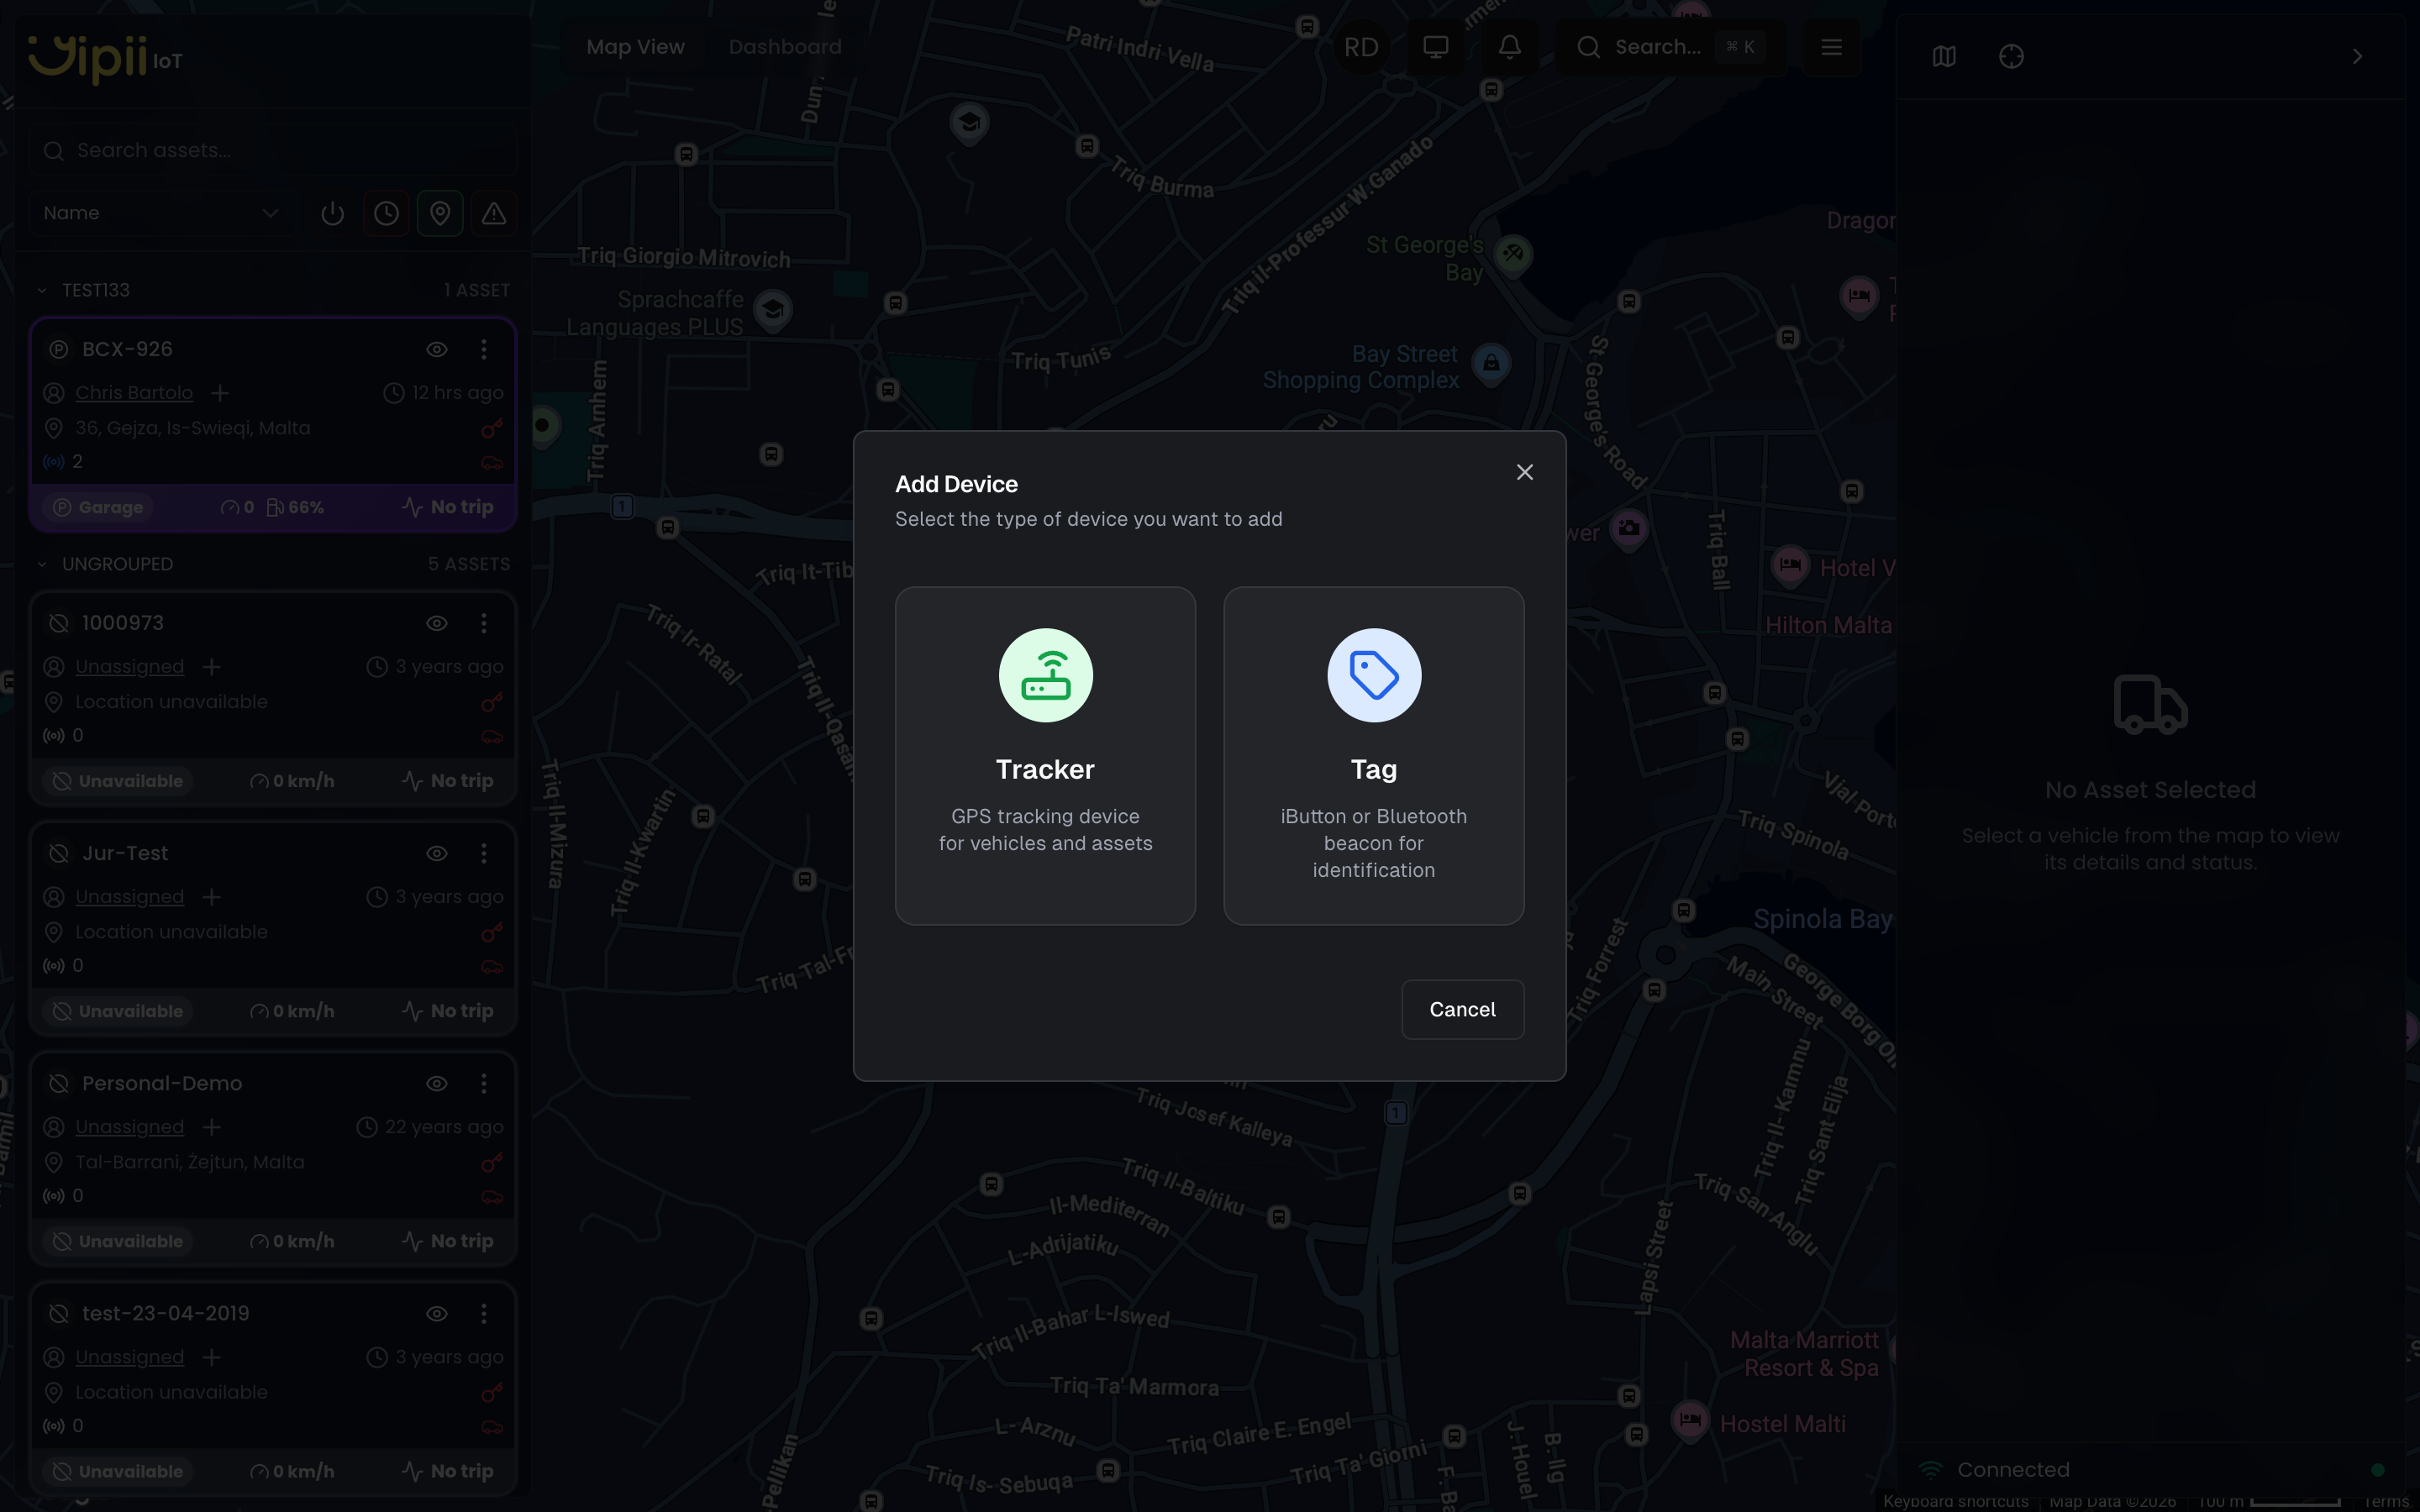
Step 1: Open the Add Device Dialog
From the map view, hover over the left sidebar header and click the Add Device button (scan icon).
You will see a device type selection screen. Choose Tracker to add a GPS tracking device, or Tag to add an iButton or Bluetooth beacon. Selecting Tracker opens the QR Scanner wizard.
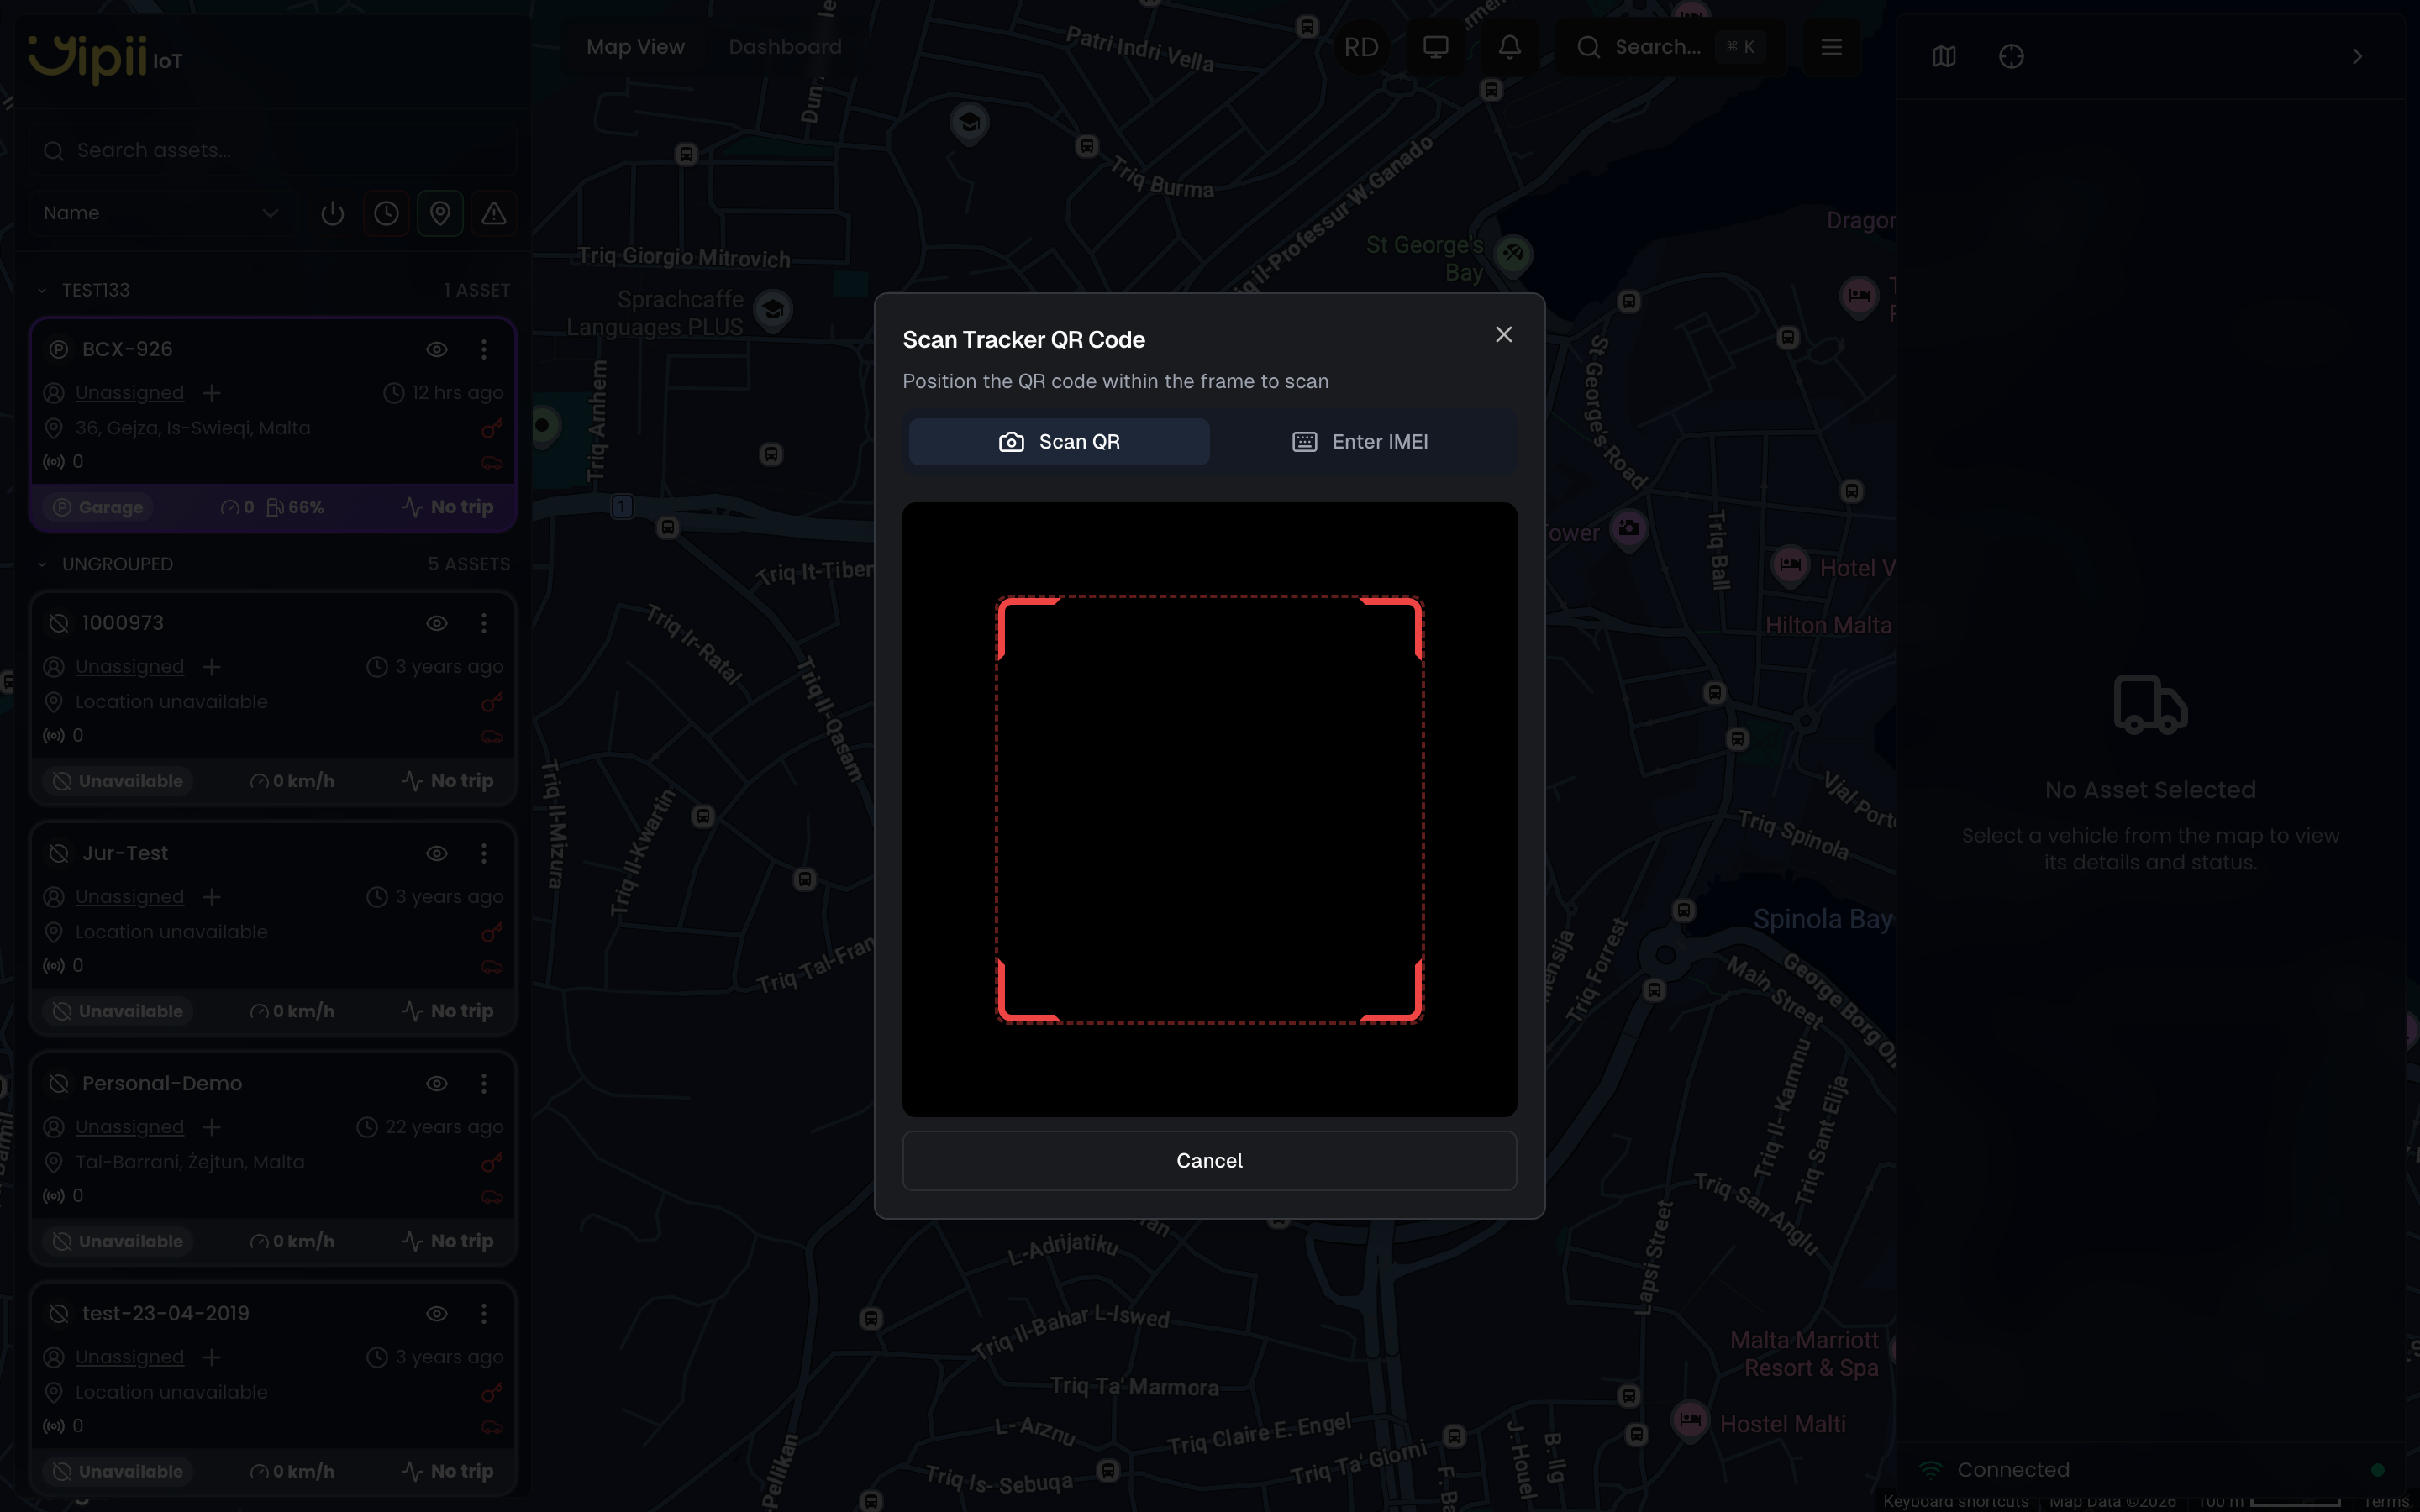
Step 2: Scan or Enter the IMEI
The wizard opens to the Scan step with two input modes, toggled at the top of the dialog:
QR Scanner (Recommended)
Point your device camera at the QR code on the tracker label. The scanner reads the IMEI automatically, captures a snapshot of the QR scan as a reference photo, and proceeds to the review step.
The QR parser supports multiple formats: raw IMEI strings, JSON-encoded payloads (with imei or serial fields), and URL-encoded QR codes where the IMEI is embedded in the path or query parameters. You can also scan the shorter FOTA device ID (5-8 digits) printed on some Teltonika labels.
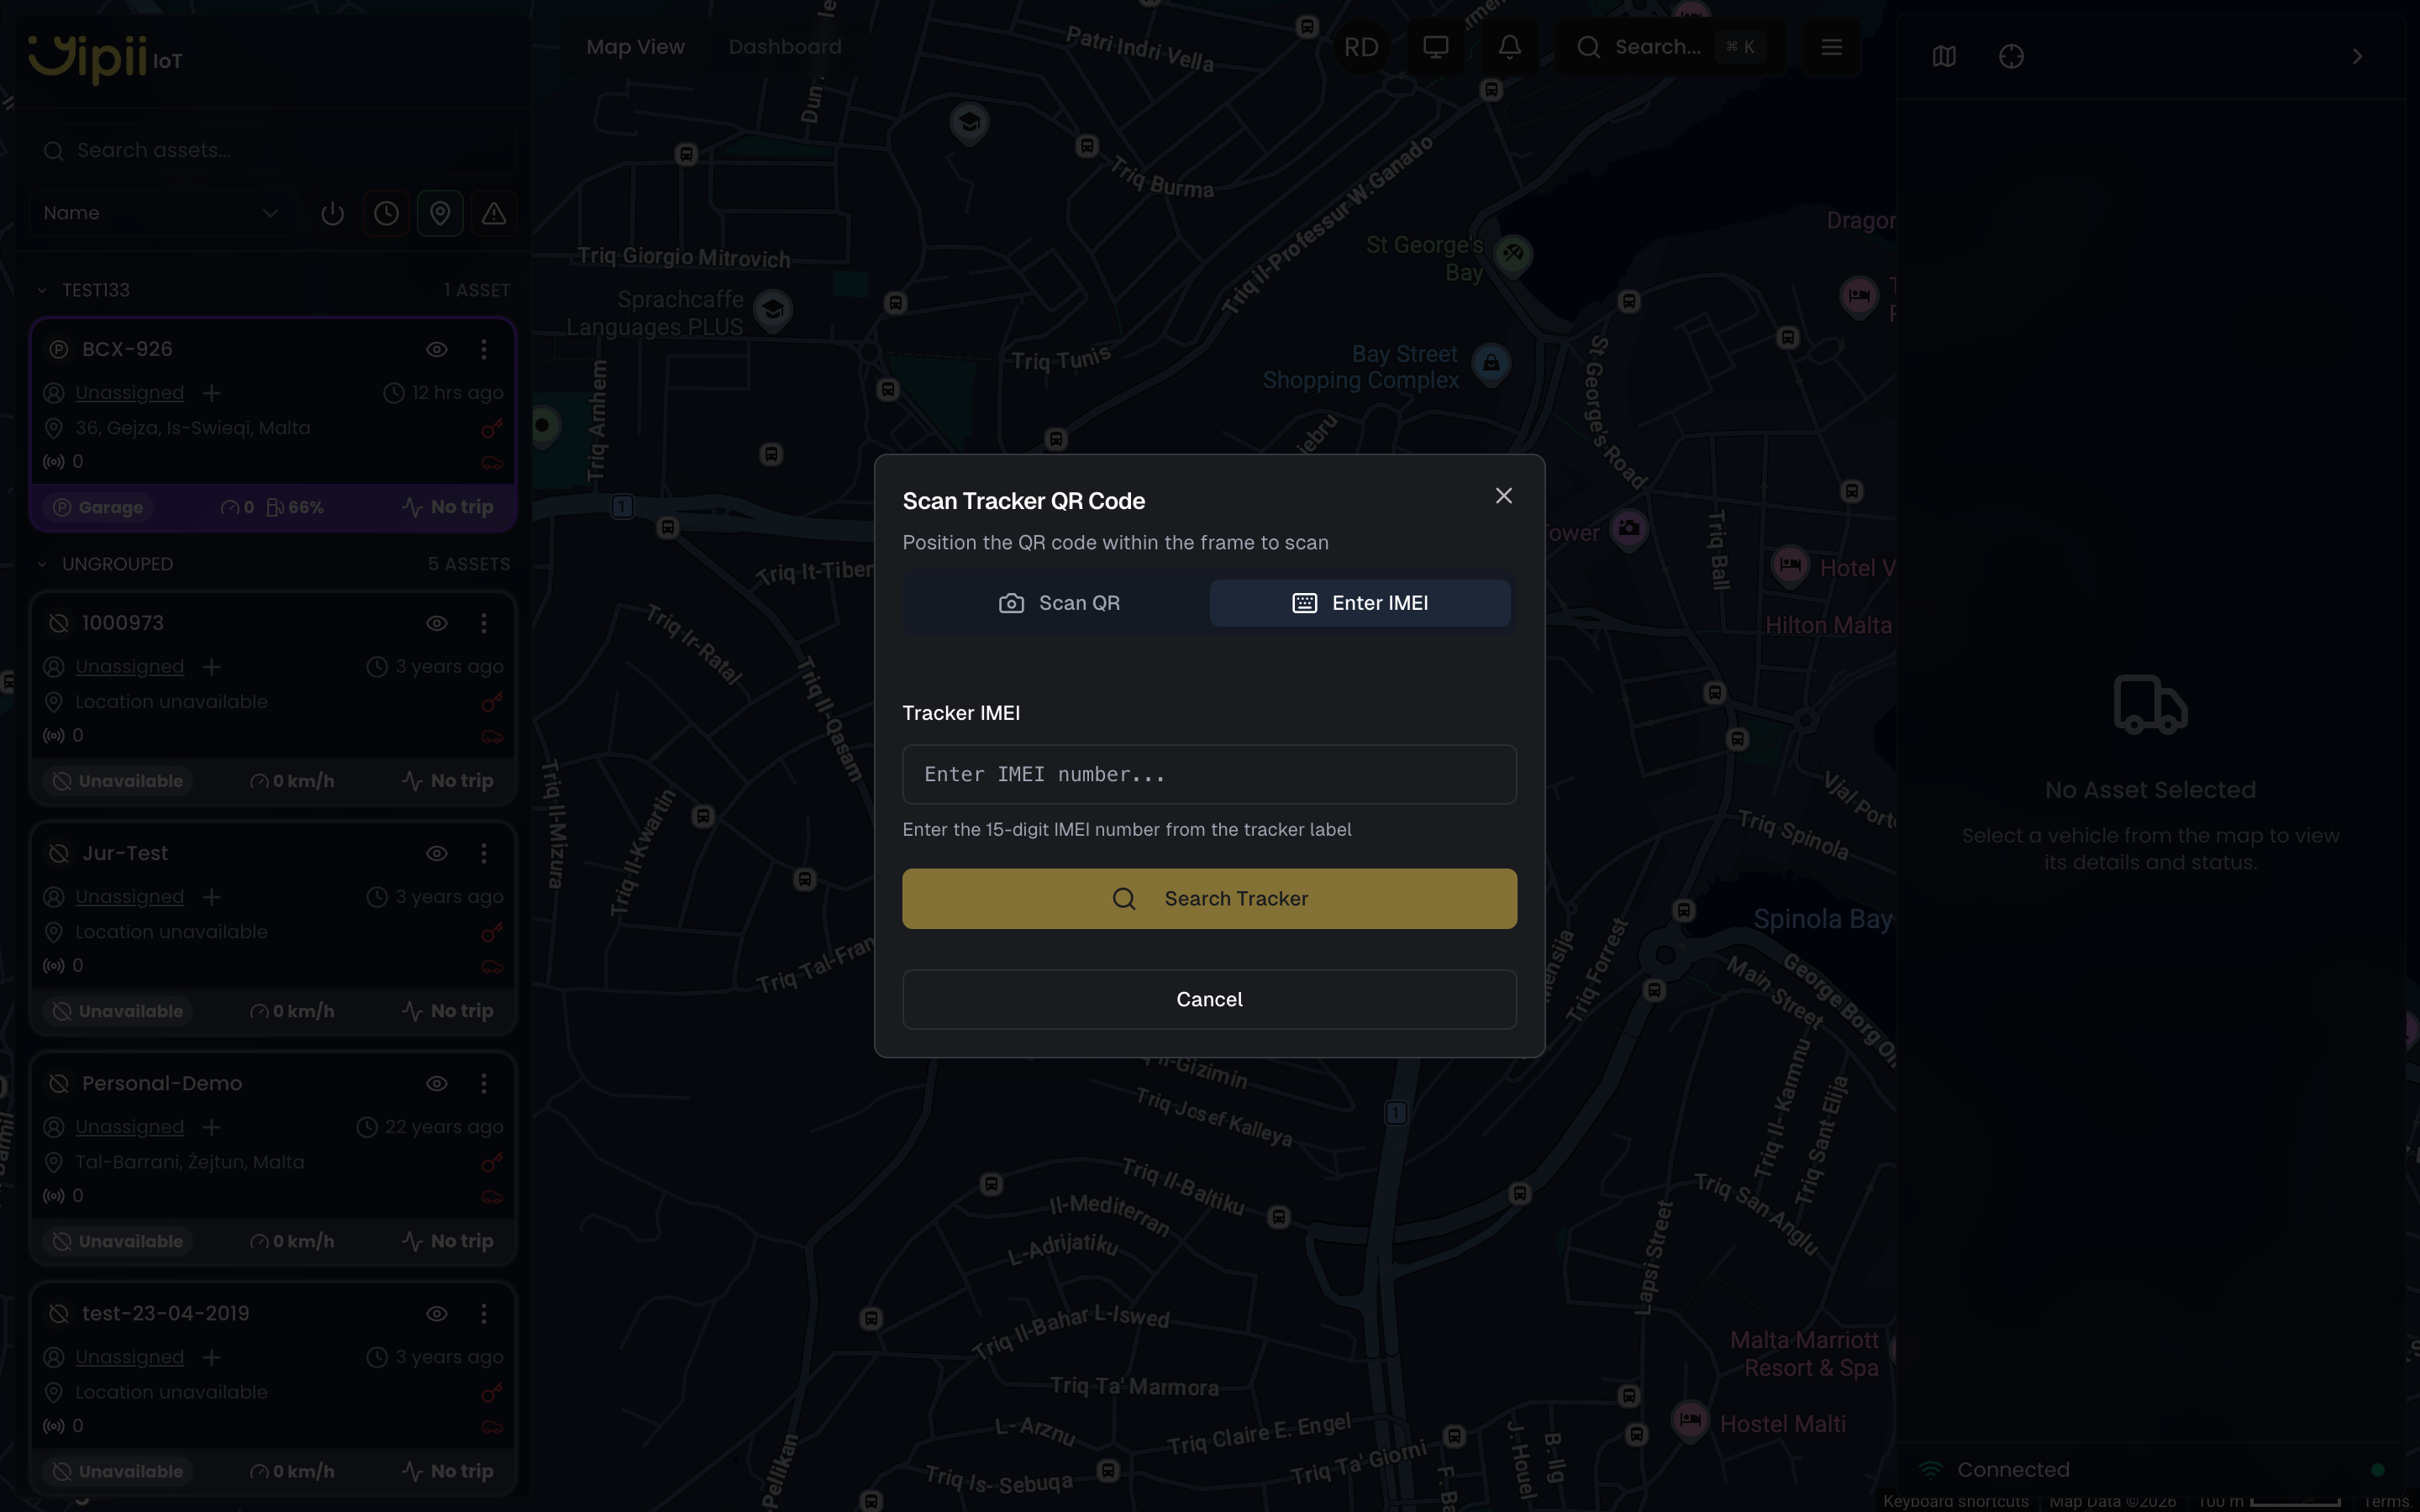
Manual IMEI Entry
If you do not have the QR code or the camera is unavailable:
- Switch to the Enter IMEI tab
- Type the 15-digit IMEI number exactly as shown on the device label (or the 5-8 digit FOTA ID)
- Click Search Tracker to look up the device in our system
Step 3: Review the Lookup Result
After scanning or entering an IMEI, the system looks up the tracker and shows one of five possible outcomes. Each outcome offers different actions to proceed.
Available
The tracker exists in our system and is not assigned to any vehicle. You will see the tracker details including IMEI, model, and hardware information with an "Available" badge.
Actions:
- Link to Existing Vehicle — proceed to select an existing vehicle from your fleet
- Create New Vehicle — proceed to create a new vehicle and link the tracker to it
Already Linked
The tracker is currently assigned to another vehicle in your account. You will see the tracker details with an "Already Linked" badge and the name of the vehicle it is currently assigned to. A warning message explains that moving the tracker will unlink it from its current vehicle.
Actions:
- Move to Existing Vehicle — unlink from the current vehicle and assign to a different one
- Move & Create New Vehicle — unlink from the current vehicle, create a new one, and assign the tracker
![]()
On Another Account
The tracker belongs to a different account. You will see the tracker details with an "On Another Account" badge. A notice explains that proceeding will transfer the tracker to your account.
Actions:
- Move & Link to Existing Vehicle — transfer the tracker to your account and assign it to one of your vehicles
- Move & Create New Vehicle — transfer the tracker, create a new vehicle, and assign it
Not Found
The IMEI is not recognized by our system. This typically means the tracker has never connected to our servers. You will see a "Tracker Not Found" message with the scanned identifier.
Actions:
- Try Reserving It — if the identifier is a valid numeric IMEI, you can attempt to pre-register it (see Pre-Registration below)
- Try a different IMEI — enter a corrected IMEI in the inline field and search again
Reserved (Pending)
You have already pre-registered this tracker. It shows a "Reserved" badge and confirms the tracker will automatically link to your account (and optionally to a specific vehicle) when it first comes online. No further action is needed.
Step 4: Set Up the Vehicle
Depending on which action you chose in the review step, the setup step offers two modes:
Link to Existing Vehicle
A dropdown list shows all vehicles in your account. Select a vehicle to link the tracker to it. The selected vehicle's details (name, type, status) are shown for confirmation. If the vehicle already has a tracker assigned, a note warns you.
![]()
Create New Vehicle
Fill in the following fields to create a new vehicle:
- Vehicle Name / Licence Plate (required) — the display name for the vehicle on the map, in reports, and throughout the platform
- Group (optional) — select an existing asset group from the dropdown, or choose Create New Group to add a new one inline
- Vehicle Type (required) — select from your account's vehicle types (e.g., Car, Van, Truck), or choose Create New Type to define a new one inline
The tracker is automatically linked to the new vehicle once created.
![]()
Step 5: Capture Photos (Optional)
After the tracker is linked, the wizard moves to the Photos step. This is optional but recommended, especially during field installations, to document the setup.
You can capture or upload photos in three categories:
- Vehicle — a photo of the vehicle itself
- Tracker — a photo of the physical tracker device
- Installation — a photo showing where and how the tracker was installed
Use the Take Photo button to open the camera, or Upload to select images from your device. All photos are previewed in a grid before being uploaded. You can remove any photo before proceeding.
The QR scan snapshot captured during step 2 is automatically included as a reference photo.
Step 6: Confirmation
The final Done step shows a confirmation screen with a summary of what was set up:
- The vehicle name (if assigned or created)
- The tracker IMEI and model
- The number of photos uploaded
Click Done to close the wizard and return to the map. The vehicle will appear on the live map as soon as the tracker sends its first position.
Pre-Registration
For new trackers that have not connected to the network yet, Yipii IoT offers pre-registration. When you scan or enter an IMEI that has never been seen by our servers, the review step shows a "Not Yet Connected" status with a blue information banner explaining that reserving the tracker will automatically link it to your account when it first connects.
![]()
Three pre-registration options are available:
- Reserve & Link to Existing Vehicle — select a vehicle now; when the tracker first connects, it automatically starts reporting under that vehicle
- Reserve & Create New Vehicle — create a new vehicle and link the tracker in one step; data flows to the correct vehicle as soon as the device comes online
- Reserve Only (no vehicle) — register the IMEI in your account without assigning to a vehicle yet; you can assign it later
Pre-registration is especially useful when you are setting up trackers in bulk before installation. Register all your devices, assign them to vehicles, and when the installer powers each one on, data flows to the correct vehicle automatically.
A pre-registered tracker shows as "Reserved" if you scan it again before it has connected. Once the physical device connects for the first time, the reservation is fulfilled and the tracker becomes fully active.
Tracker Reassignment
If a tracker is already assigned to a vehicle and you need to move it to a different one, there are two approaches:
Scan the Tracker Again
The simplest method is to scan the tracker's QR code (or enter its IMEI) through the Add Device wizard again. The system detects that the tracker is "Already Linked" and offers to move it to a different vehicle. This handles everything in one flow: unlinking from the old vehicle, optionally transferring between accounts, and linking to the new vehicle.
From the Assets Page
- Open the Assets page from the hamburger menu
- Find the vehicle with the tracker you want to reassign
- Use the context menu (three dots) or open the vehicle's Diagnostics tab
- Reassign the tracker to a different vehicle
When a tracker is reassigned:
- The old vehicle loses its tracker link and stops showing on the live map
- The new vehicle inherits the tracker and begins showing live data
- All historical data remains associated with the original vehicle for the period it was linked
Device Information and Diagnostics
The sidebar Diagnostics tab is the central place for viewing device details and health status. When you select an asset on the map, open the Diagnostics tab to see all device-level information.
Device Identifiers
The Device Identifiers section displays key hardware information with copy buttons for each value:
- IMEI — The tracker's unique 15-digit identifier
- SIM — The SIM card number (if available)
- Model — Hardware model name (e.g., FMB120, FMC130)
- Firmware — Current firmware version (e.g., "04.01.00.Rev.13")
- Protocol — The communication protocol used by the tracker (e.g., "Teltonika", "Cellocator")
The protocol field tells you which manufacturer's communication standard the tracker uses, which determines what remote commands and configuration options are available.
Device Health
The Device Health section runs server-side diagnostics and displays findings about your tracker's connectivity and data flow. It checks three data sources and compares them:
- WebSocket — The most recent live event received from the tracker
- AVL REST — The latest position from the tracking server, including TCP connection status
- DB row — The most recent record written to the database, with server lag measurement
An overall verdict (green, yellow, or red) summarizes the tracker's health at a glance. Individual findings highlight specific issues such as offline status, data lag, GPS signal problems, or frozen connections.
The diagnostics section polls the backend every 15 seconds while open, giving you a near real-time view of data flow through the entire pipeline.
Device Settings
The Device Settings section provides configuration toggles that are sent to the tracker via FOTA (Firmware Over-The-Air). These settings are only available for Teltonika trackers:
- BLE Beacons — Enable or disable Bluetooth Low Energy beacon scanning
- Temperature — Enable or disable temperature sensor reporting
For non-Teltonika trackers (such as Cellocator), a notice is shown indicating that device configuration is not available for that protocol.
Tracker Health Status
Yipii IoT continuously monitors tracker health. Each device shows one of these statuses:
| Status | Meaning | Action Needed |
|---|---|---|
| OK | Device is operating normally, sending data regularly | None |
| Offline | No data received in the last 30 minutes | Check power and SIM |
| Low Signal | GPS or cellular signal is weak | Reposition antenna/device |
| Location Unavailable | GPS cannot get a fix | Move to open sky area |
| Power Low | External power disconnected or battery low | Check vehicle power |
| Issue Detected | Hardware or configuration problem | Review device diagnostics |
| No Movement | Tracker hasn't moved for extended period | Normal for parked vehicles |
| Not Used | Tracker is not assigned to any asset | Assign to an asset |
Daily Health Checks
Every 24 hours, Yipii IoT runs automated health checks and can send you a summary email including:
- Trackers that went offline
- Devices with low signal quality
- Power disconnection events
- GPS signal issues
Enable this in Settings > Alerts > Daily Health Check.
Assigning to Assets
Trackers and vehicles are linked through a one-to-one relationship: each tracker can be assigned to one vehicle at a time, and each vehicle can have one tracker.
From the Add Device Wizard
The recommended approach is to use the Add Device wizard described above. It handles all scenarios in a single flow: available trackers, already-assigned trackers, trackers on other accounts, and pre-registration of new devices.
From the Asset
- Open the asset details page by selecting it on the map
- In the Diagnostics tab, use the tracker assignment controls
- Scan the tracker's QR code or enter its IMEI
- The tracker is linked to this vehicle
What Happens When a Tracker is Assigned
When a tracker is assigned to a vehicle:
- Live location data appears on the vehicle's position on the map
- The vehicle shows on the live map with real-time updates
- Alerts configured for this vehicle begin triggering
- Reports include this vehicle's trips, mileage, and driver behavior
- The vehicle appears in fleet-wide statistics and dashboards
Tracker Features
BLE (Bluetooth Low Energy)
Enable or disable Bluetooth functionality on supported Teltonika trackers:
- Open the asset on the map and go to the Diagnostics tab
- In the Device Settings section, find the BLE Beacons toggle
- Switch on/off as needed
The change is applied via FOTA and may take a few minutes to reach the device.
BLE settings are only available for Teltonika trackers. Cellocator and other protocols do not support BLE configuration through the platform.
BLE is used for:
- Driver identification (iButton or BLE tags)
- Portable beacon detection
- Temperature sensor readings
- Cargo/asset proximity detection
Temperature Monitoring
For Teltonika trackers with temperature sensor support:
- Connect a compatible temperature probe to the tracker
- Enable temperature monitoring in the Device Settings section of the Diagnostics tab
- Set alert thresholds in Alerts > Temperature
Temperature data appears in:
- Real-time asset status
- Temperature reports
- Alert notifications when thresholds are exceeded
Remote Commands
Send commands to your tracker remotely. The available commands depend on the tracker's protocol.
Teltonika Trackers
Teltonika devices support the full range of remote commands:
| Command | Description | Transport |
|---|---|---|
| Reset Device | Remotely restart the tracker | TCP or SMS |
| Get Version | Retrieve firmware version information | TCP or SMS |
| Get Status | Retrieve device diagnostic information | TCP or SMS |
When the device is online, commands are sent via TCP for instant delivery. If the device is offline, commands fall back to SMS delivery, which may take a few minutes.
Staff users have access to additional diagnostic commands including parameter read/write, GPS queries, I/O readout, and OBD information.
Cellocator Trackers
Cellocator devices have limited command support:
| Command | Description | Transport |
|---|---|---|
| Reset Device | Remotely restart the tracker | TCP only |
Cellocator trackers do not support SMS-based commands. The device must be online (TCP connected) for a reset command to be delivered. If the device is offline, the reset button will be disabled with a message explaining that SMS is not available for Cellocator trackers.
Diagnostic commands such as Get Version, Get Status, and configuration commands are Teltonika-specific and are not available for Cellocator devices.
Sending a Command
To send a command:
- Open the asset on the map and go to the Diagnostics tab
- Click the Reset Device button (or use the command form if you have staff access)
- The system automatically selects the best transport method based on device connectivity and protocol
- View the response in the Command History section
Command History
The Command History section in the Diagnostics tab shows a log of all commands sent to the tracker, including:
- Command type and parameters
- Transport method used (TCP or SMS)
- Timestamp
- Response status (Accepted, Pending, Failed)
- Response data from the device
For Teltonika trackers, staff users also see an inline form for sending custom commands directly.
Replacing a Tracker
When you need to swap trackers on a vehicle (for example, replacing a faulty device or upgrading hardware):
- Open the Add Device wizard and scan the new tracker's QR code (or enter its IMEI)
- In the setup step, select the vehicle that currently has the old tracker
- The system automatically detaches the old tracker and links the new one
Alternatively, scan the old tracker's QR code first. The wizard shows it as "Already Linked" and lets you move it to a different vehicle or detach it, freeing the vehicle for a new tracker.
Important: Historical data stays with the vehicle. The old tracker is unassigned and available for reuse on another vehicle.
Firmware Updates (FOTA)
Teltonika trackers receive automatic firmware updates through our FOTA (Firmware Over The Air) system.
Updates happen automatically when:
- The tracker is connected to the network
- Vehicle is stationary
- Battery level is sufficient
- Update is compatible with your configuration
Check the current firmware version in the Device Identifiers section of the Diagnostics tab.
FOTA firmware updates are only available for Teltonika trackers. Cellocator devices must be updated through their own manufacturer tools.
SIM Card Management
Yipii-Provided SIMs
We offer pre-configured SIM cards that include:
- Automatic activation when inserted
- Multi-network roaming (works across borders)
- Data usage monitoring in your dashboard
- No separate billing or contracts
Using Your Own SIM
You can use your own SIM cards:
- Ensure data plan is active and has credit
- Configure APN settings on the tracker
- Verify the SIM supports 2G/3G/4G as needed by your tracker model
Troubleshooting
Tracker won't appear in my account
Check these items:
- IMEI is exactly 15 digits and correctly entered
- Tracker is powered on (check LED indicators)
- SIM card is inserted correctly and has data
- Wait 5-10 minutes for first connection
No location updates
Possible causes:
- Tracker is indoors or has no GPS sky view
- SIM data is exhausted
- Device needs firmware update
- Antenna connection is loose
Try:
- Move vehicle to open area with clear sky
- Send a "Reset Device" command from the Diagnostics tab
- Check SIM status in your dashboard
- Review the Device Health section in the Diagnostics tab for specific findings
- Contact support for firmware check
Commands not working for Cellocator trackers
If you see a message that commands are not supported or the reset button is disabled:
- "Device must be online" — Cellocator trackers only support TCP commands. Wait for the device to reconnect, then try again.
- "Commands not supported" — Only the reset command is available for Cellocator. Diagnostic commands like Get Version and Get Status are Teltonika-specific.
- Configuration toggles greyed out — BLE and temperature settings are managed via Teltonika FOTA and are not available for Cellocator devices.
Inaccurate GPS positions
GPS accuracy depends on:
- Clear view of the sky (trees and buildings reduce accuracy)
- Number of satellites visible
- Quality of GPS antenna installation
For best accuracy:
- Mount tracker with antenna facing up
- Avoid metal enclosures that block signals
- Install away from other electronic devices
Battery draining quickly
Reduce power consumption:
- Increase reporting interval when stationary
- Disable BLE if not using beacons (Teltonika only)
- Check for firmware updates with power optimizations
- Replace battery if device is old (2+ years)
Checking data flow with diagnostics
If you suspect data is delayed or missing, open the Device Health section in the Diagnostics tab. Compare the three data source timestamps:
- If WebSocket shows recent data but AVL REST is stale, there may be a server-side caching issue
- If AVL REST shows "TCP down", the device has lost its connection to the tracking server
- If DB row shows high server lag, there may be a processing delay
The overall verdict provides a quick summary, while individual findings give actionable recommendations.
Need Help?
If you're having trouble with your tracker, start by checking the Device Health section in the Diagnostics tab for detailed findings and reviewing Command History for communication issues. If the problem persists, contact support@yipii.com with your IMEI number and a description of the issue.
What's Next?
- Assets — Link your trackers to vehicles and organize your fleet
- Beacons & Tags — Pair Bluetooth beacons and iButtons with trackers for driver identification and portable asset tracking
- Alerts — Set up notifications for tracker events like ignition, speed, and geofence triggers
- Live Map — See your trackers reporting live positions on the fleet map
Was this page helpful?