Assets
Add, organize, and manage your tracked vehicles and equipment in Yipii IoT. Assign GPS trackers, group assets, share view access, transfer ownership, and view detailed trip history.
Assets
In Yipii IoT, an "asset" is anything you track — a delivery van, a construction excavator, a company car, or a portable generator. Assets are the central building block of the platform. Every trip, alert, report, and geofence event is tied to an asset, which is why proper setup and organization of your assets directly impacts how useful the rest of the system is for your operations.
Whether you're managing a small fleet of five vehicles or a large operation with hundreds of tracked items, the Assets page gives you a single place to add new vehicles, assign GPS trackers, organize your fleet into groups, and access each vehicle's full history.
Asset List
The asset list appears as a sidebar on the left side of the Operations view. Each asset card in the list displays the following information at a glance:
- Asset name and photo icon
- Context menu (three-dot icon) for quick actions
- Driver assignment dropdown — shows the currently assigned driver or "Unassigned", and lets you assign or change drivers directly inline without opening the asset detail panel
- Notification badge — displays a count of active notifications for the asset
- Time since last update — shown as a relative timestamp (e.g., "2 min ago")
- Address — the asset's current or last known street address
- Status badge — the vehicle's current state (Parked, Moving, Idling, Unknown, etc.)
- Speed — current speed reading
- Trip status — indicates whether the vehicle is currently on a trip
Search, Sort, and Filter
At the top of the asset list, a search bar lets you find vehicles by name. Next to it, sort options allow you to order assets by name or other criteria, and filter buttons let you narrow the list by status or other attributes.
Asset Groups in the List
Assets in the sidebar are organized into collapsible Asset Group sections. Each group header displays the group name and the number of assets it contains. Click a group header to expand or collapse its assets. This grouping provides an immediate visual overview of your fleet's organizational structure without leaving the map view.
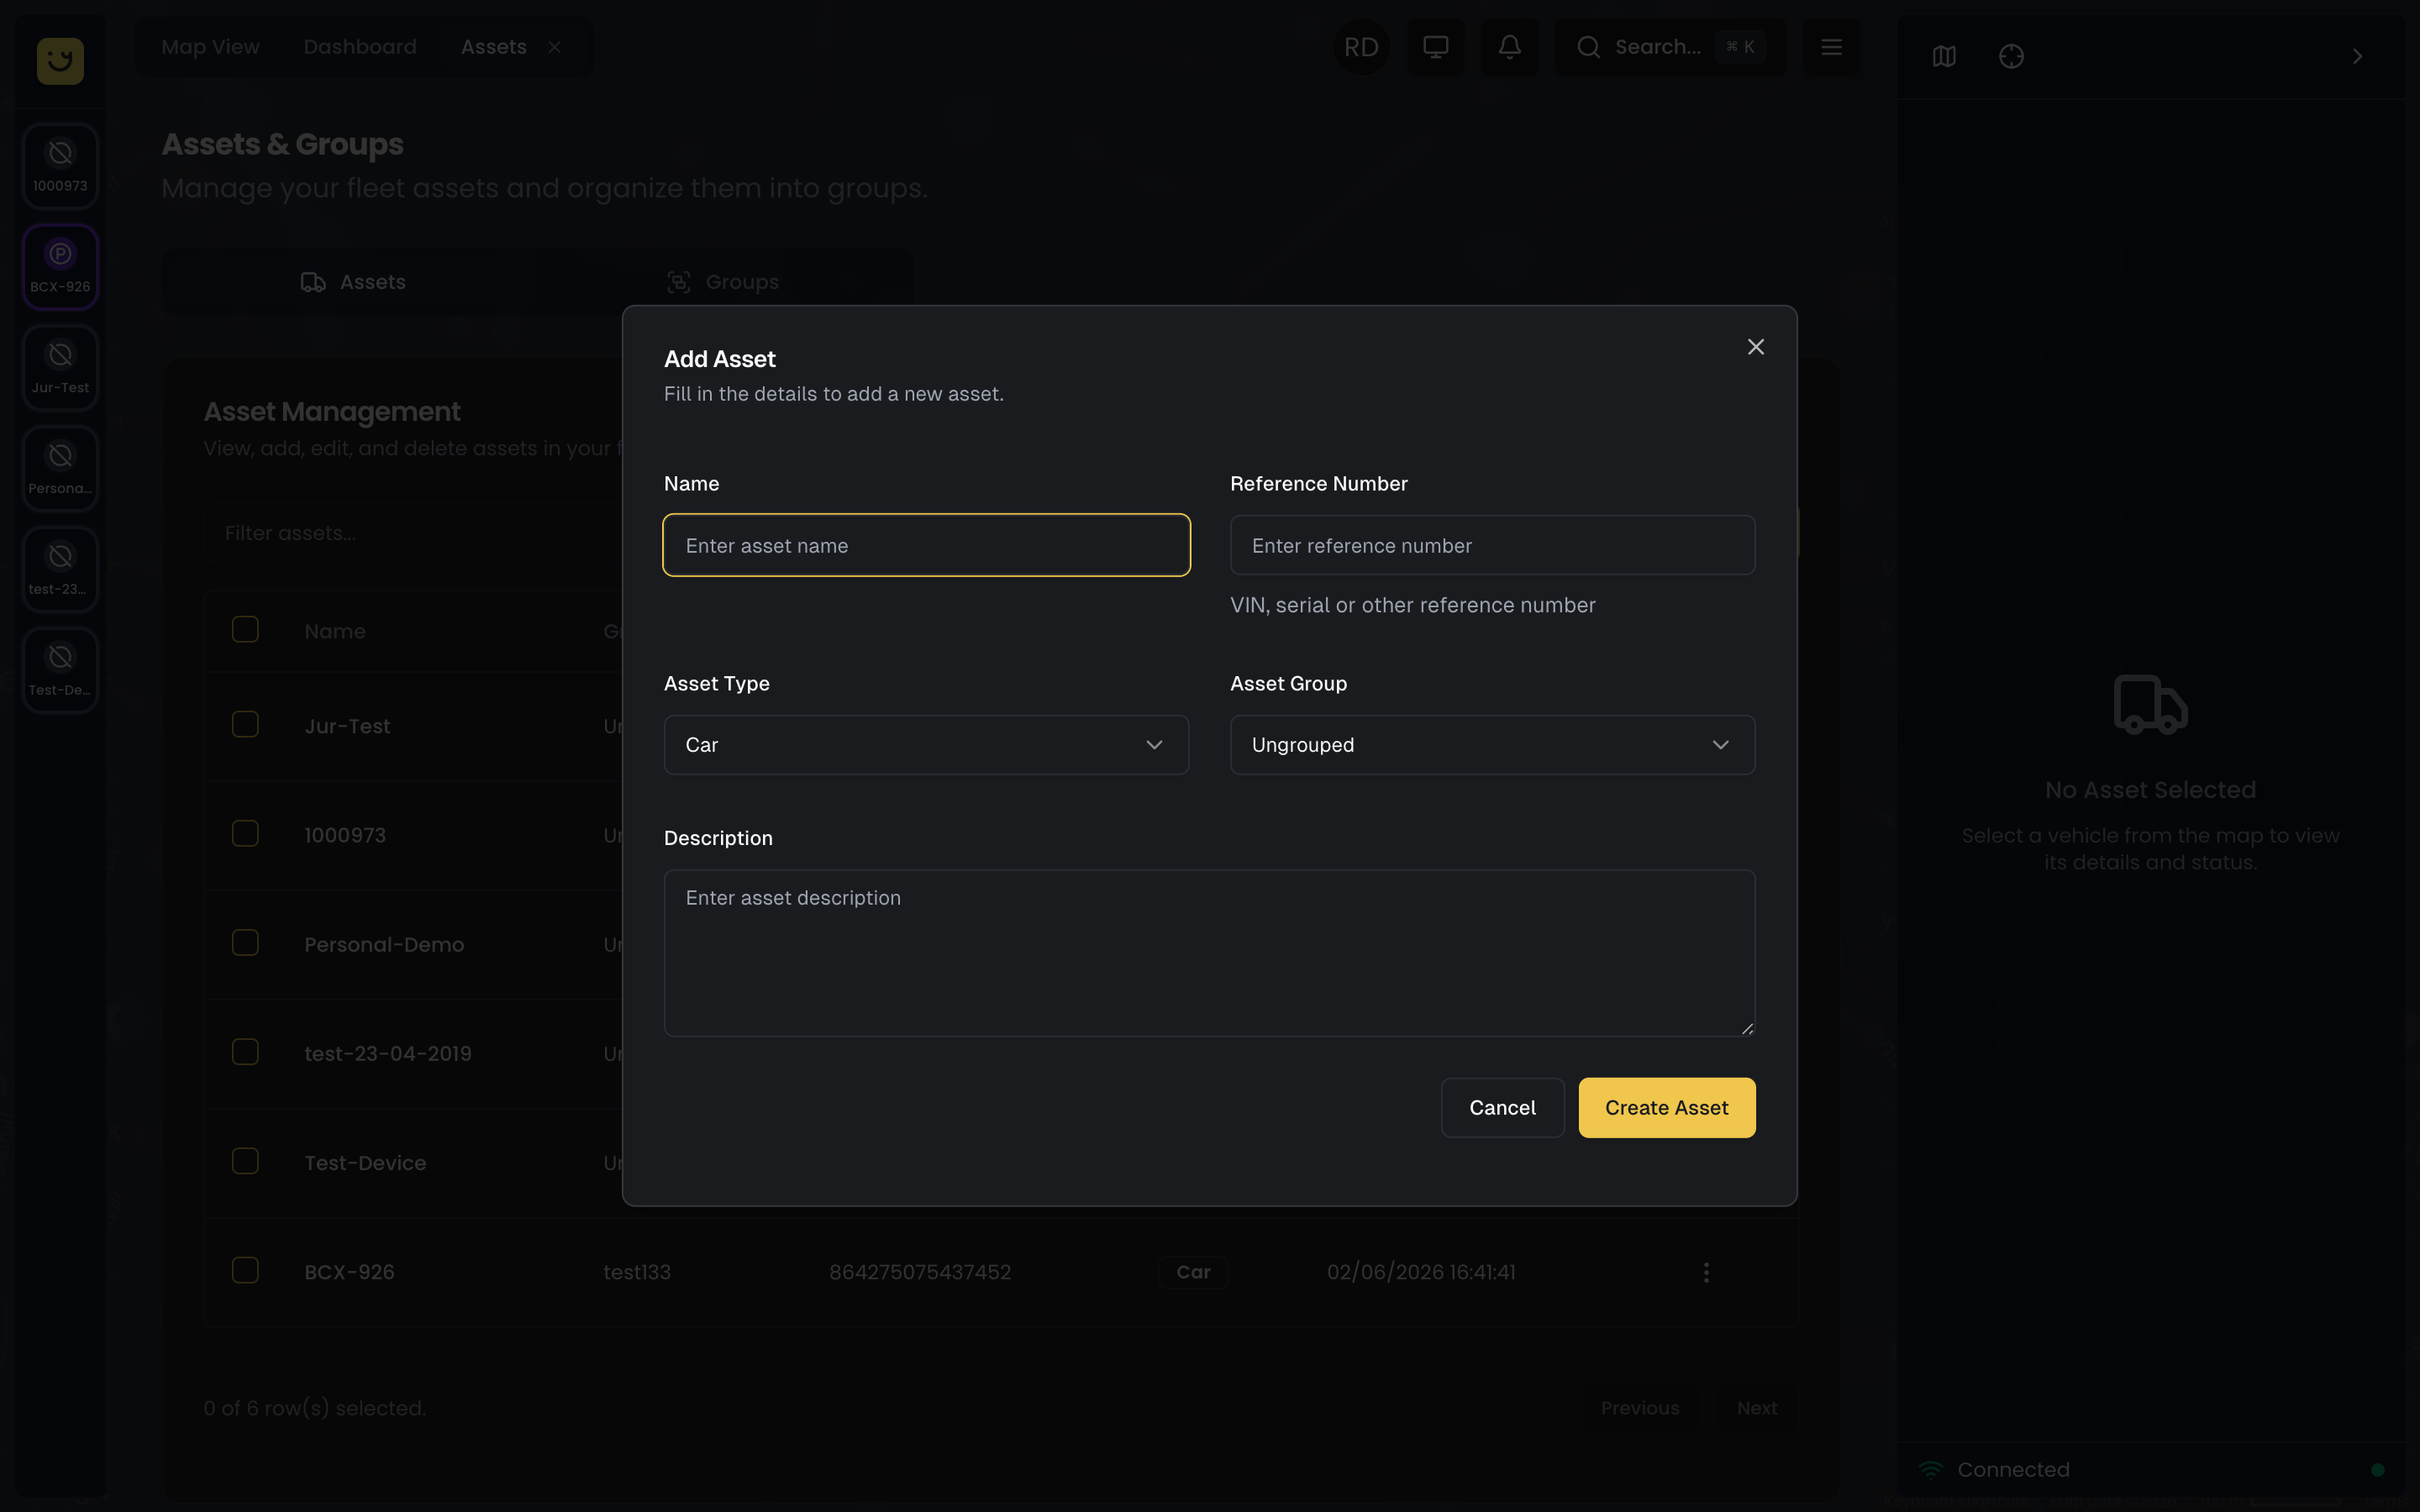
Creating an Asset
Adding a new vehicle or piece of equipment to Yipii IoT is straightforward. Before you begin, have the vehicle's registration number and basic details on hand.
- Click the Add Asset button at the top of the Assets page
- Fill in the vehicle details:
- Name — a unique, descriptive identifier (e.g., "Delivery Van 01" or "Sales Car - John")
- Registration — the license plate or internal ID number
- Type — select the vehicle category (car, truck, van, motorcycle, bus, trailer, equipment, etc.)
- Make/Model — manufacturer and model (e.g., "Ford Transit Custom")
- Year — manufacturing year, useful for maintenance planning
- Color — helps with visual identification
- Click Save
The asset is now created but won't show any location data until you assign a GPS tracker to it.
Naming tip: Use a consistent naming convention across your fleet. Something like "Department - Vehicle Type - Number" (e.g., "Sales - Sedan - 03") makes filtering and reporting much more manageable as your fleet grows.
Assigning a Tracker
Once you've created an asset, the next step is to connect it to a physical GPS tracker. This is what enables real-time location tracking, trip recording, and all the alerts and reports that depend on position data.
- Open the asset's detail panel by clicking its name in the list
- Click Assign Tracker
- Enter the tracker's IMEI number (printed on the device label) or use the QR scanner to scan the tracker's code
- Click Assign
Within minutes, the asset will begin showing live location data on the Live Map and contributing to your Dashboard statistics. If the tracker was already installed in the vehicle, you should see the current position immediately.
You can reassign a tracker to a different asset at any time — for example, if you move a tracker from a retired vehicle to a new one. The historical data stays with the original asset, while new data is recorded under the new assignment.
Tip: You can also create an asset and assign a tracker in a single step using the Add Device flow. See GPS Trackers for the full walkthrough including QR scanning, IMEI lookup, and pre-registration.
Asset Detail Sidebar
Click any asset in the sidebar list or on the map to open its detail panel on the right side of the screen. The detail panel is organized into four tabs across the top: Details, Diagnostics, Beacons, and Photos.
Quick-Action Buttons
Above the asset name and tabs, the right sidebar displays a row of quick-action buttons that provide fast access to map controls:
- Expand/Collapse — toggles the sidebar between wide and narrow mode, giving you more or less room for the map
- Map Layers and Style — opens the map layers panel where you can configure overlays, points of interest, and map styling
- Roadmap/Satellite toggle — switches the map base layer between road map and satellite imagery
- Traffic toggle — shows or hides real-time traffic conditions on the map
- Fit All — zooms the map to fit all visible assets in the current view
- Zoom controls — quick zoom in and out buttons
These buttons let you adjust the map display without opening the full layers panel or navigating to Settings.
Details Tab
The Details tab is the primary view when you open an asset. It contains the following sections from top to bottom:
Street View
A Google Street View image of the asset's current location is displayed at the top of the panel, giving you a visual reference for where the vehicle is parked or located.
Share Button
A Share button appears near the top of the panel. Click it to generate a public tracking link for this asset that you can send to customers, partners, or anyone who needs to follow the vehicle's location in real time.
Asset Name
The asset's name is displayed prominently and is clickable for inline editing. Click on the name to rename the asset directly without opening a separate form. Press Enter or click away to save the change.
Vehicle Type
An inline vehicle type dropdown lets you change the asset's type (Car, Van, Truck, Bus, etc.) directly from the sidebar. Changing the type also updates the asset's map marker icon immediately.
Vehicle Details
Key vehicle information is shown directly in the sidebar, including VIN (Vehicle Identification Number), make, model, and year. These fields give you quick access to vehicle data without navigating away from the map.
Live Status
A real-time status section showing the vehicle's current state:
- Engine — on or off
- Speed — current speed reading
- GPS Signal — signal quality indicator
- Power Voltage — the tracker's power supply voltage
See Understanding Statuses for details on each indicator.
Location
The vehicle's current position details:
- Address — full street address of the current or last known position
- Coordinates — latitude and longitude, with a clickable link that opens the location in Google Maps
- Updated — timestamp of the last position update
- Last Moved — timestamp of when the vehicle last changed position
- Ignition Changed — timestamp of the last ignition on/off event
A Show relative button at the bottom of the Location section toggles all timestamps between absolute format (e.g., "12 Apr 2026, 14:32") and relative format (e.g., "5 minutes ago"). This is useful for quickly understanding how recent each event was.
Diagnostics Tab
The Diagnostics tab consolidates all technical and device-related information for the asset's assigned GPS tracker:
- Asset and Tracker Info — details about the assigned tracker including IMEI, model, firmware version, and SIM information
- Reset Device — send a restart command to the GPS tracker
- Tracker Settings — toggle settings for the assigned tracker, such as BLE (Bluetooth) status
- Command History — a log of remote commands sent to the tracker and their responses
Beacons Tab
The Beacons tab shows Bluetooth beacon detections associated with this asset. If the tracker supports BLE scanning, any detected beacons (driver identification iButtons, portable asset beacons, etc.) are listed here.
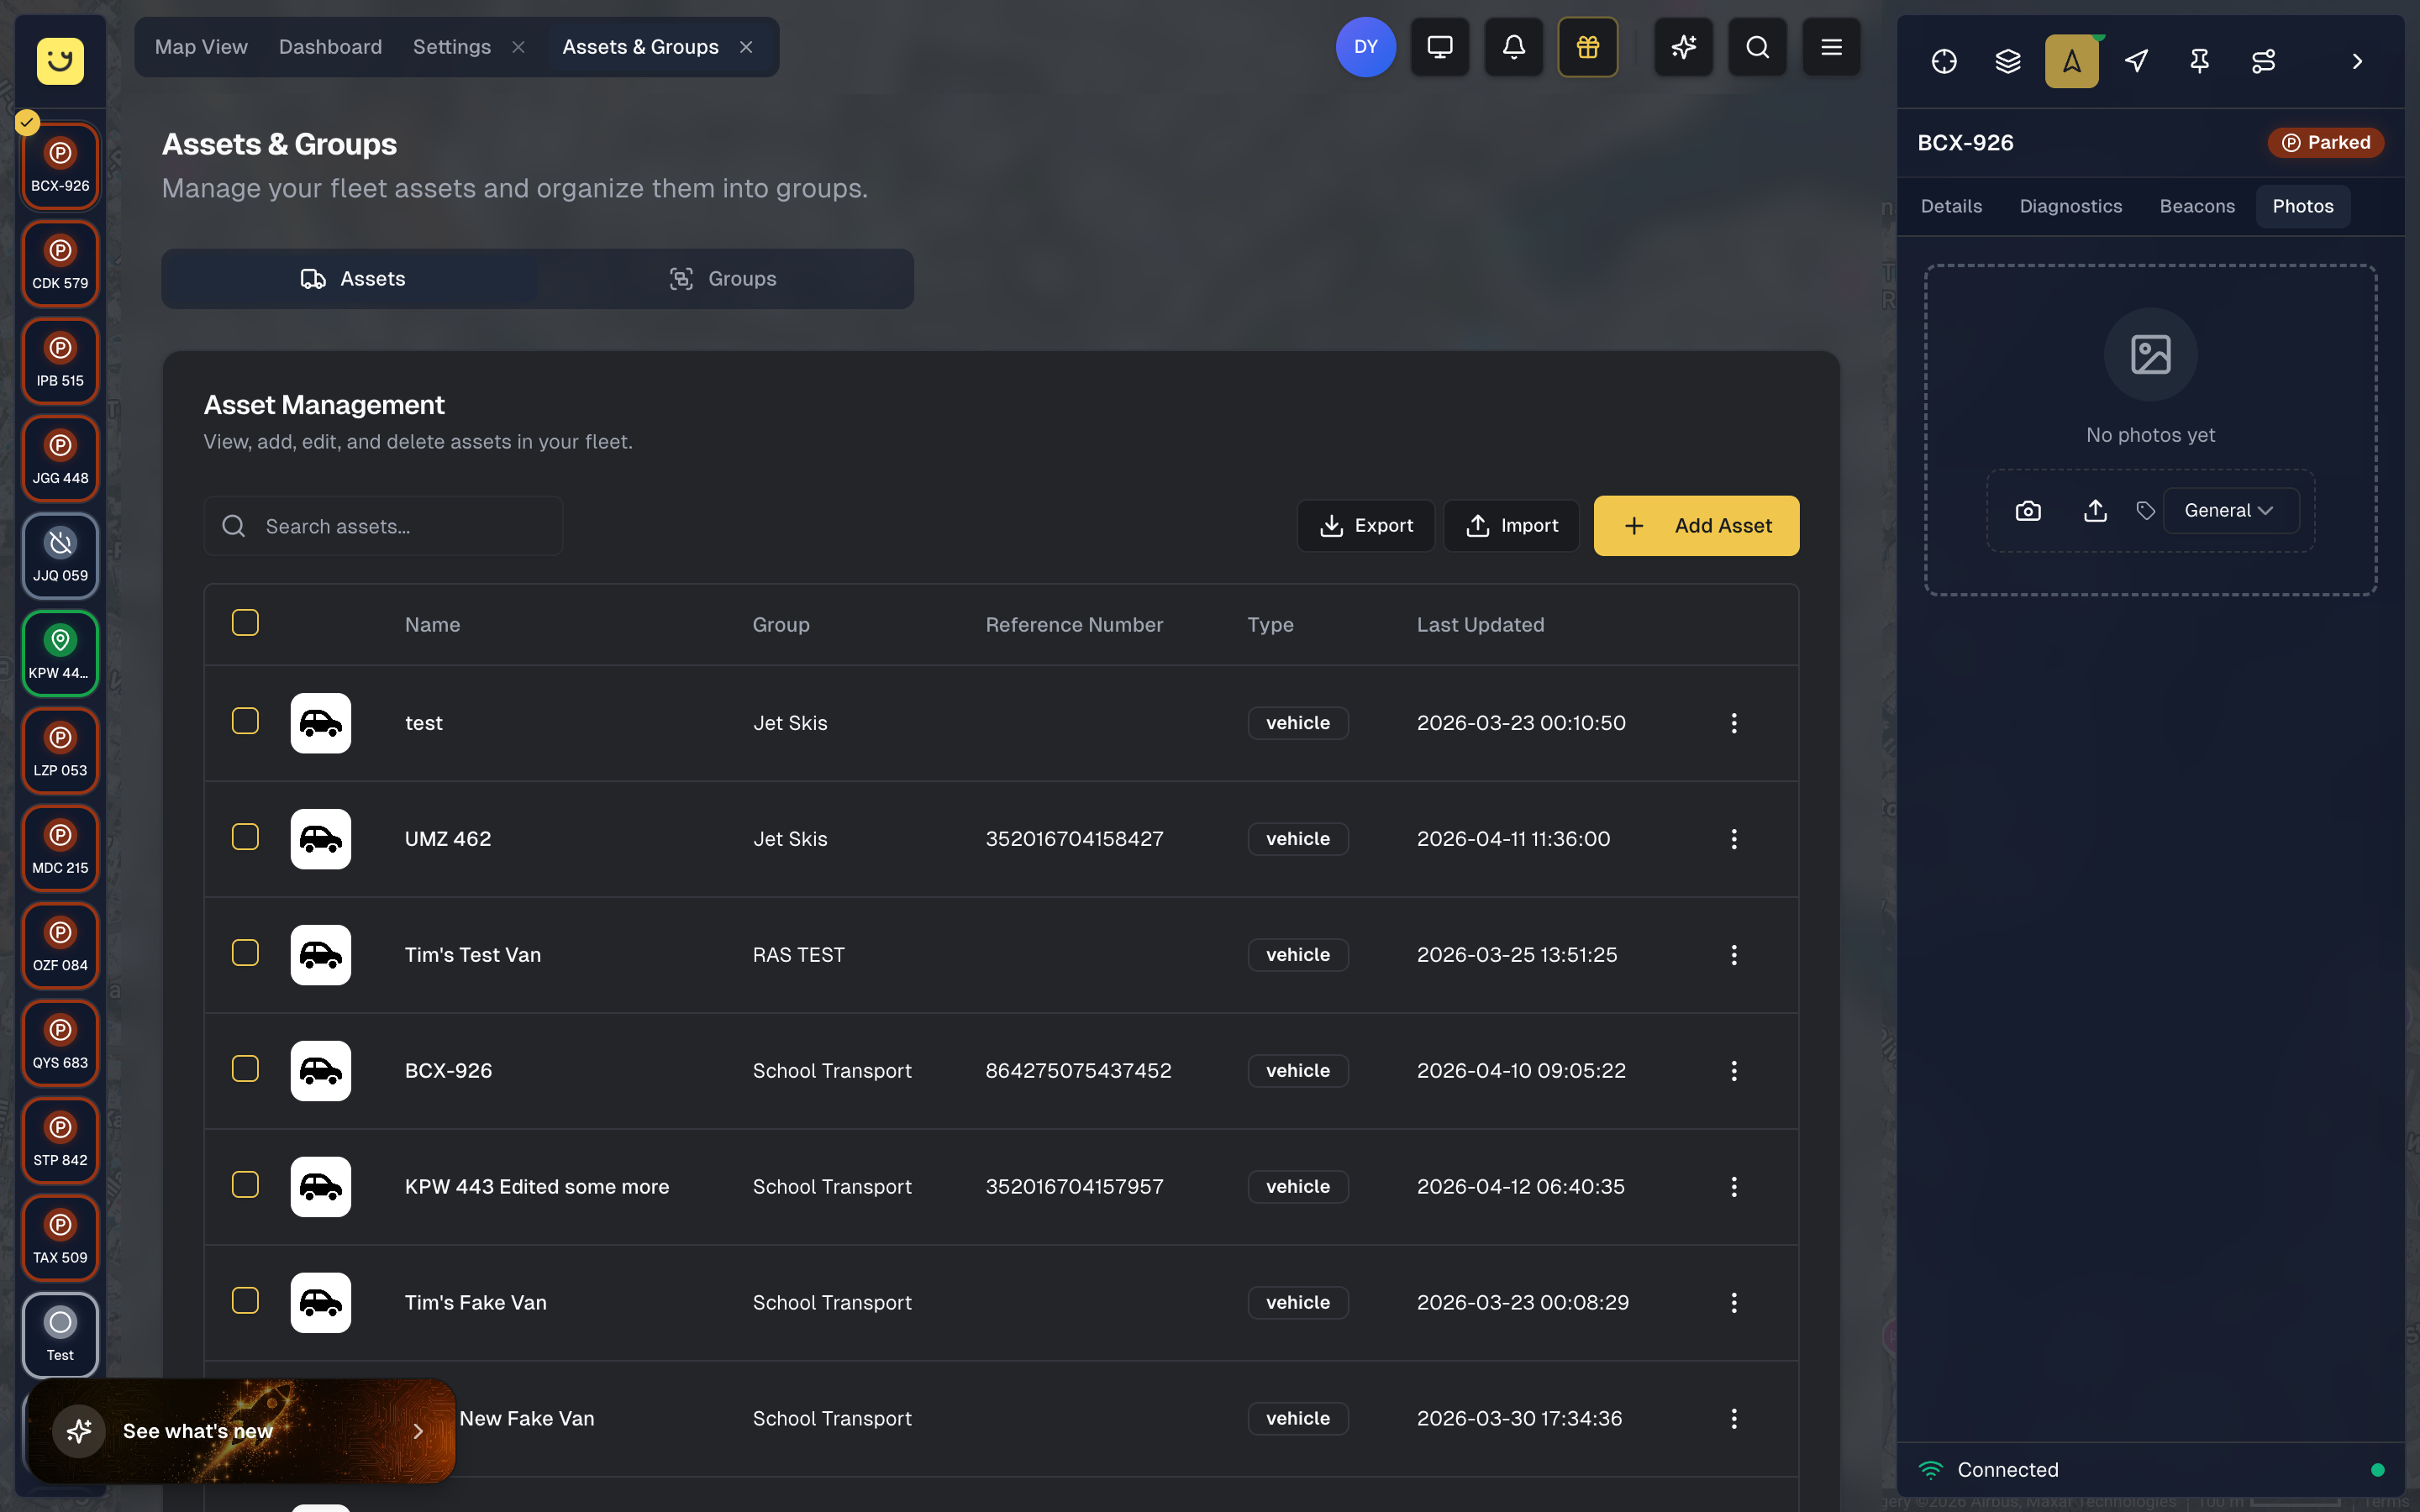
Photos Tab
The Photos tab lets you capture and manage images of the vehicle, its tracker installation, and related documentation.
When no photos have been uploaded yet, the tab shows an empty state with "No photos yet" and two action buttons: Take Photo (opens the camera) and Upload Photos (selects from files).
A category dropdown at the top of the tab defaults to "General" and offers the following options:
- General — any other relevant photos
- Vehicle — exterior and interior shots of the vehicle
- Tracker Device — photos of the GPS tracker hardware
- Installation — images showing how the tracker was installed
- QR Scan — scanned QR codes from tracker labels
- Document — photos of documents related to the asset
- Damage — photos documenting vehicle damage for insurance or maintenance records
When photos exist, they are displayed as a grid of thumbnails organized by category. Click any photo to open it in a full-screen lightbox viewer where you can zoom in and browse through images.
Default Asset Photo
Each photo can be set as the default asset photo. The default photo appears on asset cards in the sidebar list and on map popups when the Vehicle Photos preference is enabled (see Settings > Preferences). This gives your team a quick visual reference for each vehicle without opening its detail panel.
Taking a Photo
If you are on a mobile device or laptop with a camera:
- Open the asset's Photos tab
- Tap Camera
- Allow camera access when prompted
- Frame the shot and tap Capture
- Select the photo category (Vehicle, Tracker Device, Installation, QR Scan, or General)
- Tap Upload
The photo is automatically compressed before uploading to save bandwidth and storage.
Uploading a Photo
To upload an existing image from your device:
- Open the asset's Photos tab
- Tap Upload
- Select an image from your files
- Choose the appropriate category
- Confirm the upload
Deleting a Photo
Click the delete button on any photo thumbnail to remove it. This action cannot be undone.
Editing an Asset
Asset details can be edited in multiple ways depending on the field:
Inline Editing
Several fields support inline editing directly in the Details tab of the asset sidebar, without opening a separate dialog:
- Asset name — click the name to edit it in place
- Vehicle type — use the dropdown to change the type instantly
Edit Details Dialog
For a full edit of the vehicle's information, open the asset's detail panel and click the Edit Details option from the context menu (three-dot icon). This opens the Edit Asset dialog where you can change the following fields:
Reference (Name)
The asset's primary display name shown across the platform — on the Live Map, in reports, and in alert notifications. Use a descriptive, consistent name (e.g., "Delivery Van 01" or "FT-VAN-012").
Nickname
An optional short label for the asset. Useful when the reference name is long — the nickname can serve as a quick identifier in tight spaces like the map sidebar.
Asset Type
The vehicle category determines which map marker icon is displayed for this asset on the Live Map. Selecting the correct type ensures your fleet is visually distinguishable at a glance. See Asset Types & Map Icons below for the full list of types and their corresponding icons.
Asset Group
Assign the vehicle to an asset group for easier fleet organization and filtering.
Saving Changes
Click Save to apply your changes. Updates take effect immediately across the entire platform — the Live Map, reports, alerts, and the asset sidebar all reflect the new information right away.
Driver Assignment
Drivers can be assigned to assets in two ways:
Inline Assignment from the Asset List
Each asset card in the sidebar includes a driver assignment dropdown that shows the current driver or "Unassigned". Click the dropdown to select a driver from the list or change the current assignment. This is the fastest way to manage driver assignments without leaving the map view.
Automatic Identification
Drivers can also be identified automatically using iButtons or Bluetooth beacons. When a driver touches their iButton to the reader or carries their beacon near the tracker, they are automatically associated with the vehicle for that trip. This enables per-driver scoring and behavior reports.
Asset Types & Map Icons
Every asset has a type that determines which icon represents it on the Live Map. When you select or change an asset's type, the map marker icon updates automatically to match. This makes it easy to distinguish between different vehicle categories at a glance — a bus looks different from a car, a truck is larger than a van, and marine vessels have their own distinct shapes.
How It Works
The system maps each asset type to a top-down vehicle icon. These icons are displayed on the map as markers that rotate in real-time to show the vehicle's actual heading direction. The marker size is also proportional to the vehicle's real-world size, so larger vehicles appear as bigger markers on the map.
Available Asset Types & Icons
Land Vehicles
| Type | Icon | Map Size | Notes |
|---|---|---|---|
| Car | Sedan top-down view | Small (32px) | Default for 4-seater vehicles |
| 6-seater / 8-seater | MPV/people carrier top-down view | Medium-small (36px) | Multi-purpose vehicles |
| Van | Commercial van top-down view | Medium (38px) | Standard delivery/cargo vans |
| Truck | Truck/lorry top-down view | Medium-large (42px) | Heavy goods vehicles, trailers, heavy equipment |
| 16-seater Van / 17-seater Van / 19-seater Van | Transit minibus top-down view | Large (44px) | Passenger transit vans |
| Bus | Full-size bus top-down view | Extra-large (50px) | Coaches and full-size buses |
Marine Vessels
| Type | Icon | Map Size |
|---|---|---|
| Jetski | Jetski top-down view | 30px |
| Speedboat / Boat | Speedboat top-down view | 34px |
| Sailing Boat | Sailboat top-down view | 36px |
| Catamaran / Ferry | Catamaran top-down view | 36px |
People & Equipment
| Type | Icon | Map Size |
|---|---|---|
| Person / Driver / Staff / Child | Person top-down view | 28px |
| Pet | Pet top-down view | 28px |
| Pram | Stroller top-down view | 26px |
| Generic Asset | Generic asset icon | 26px |
| Baby Car Seat | Car seat top-down view | 24px |
| Tools / Power Tools | Tools icon | 24px |
Changing an Asset's Map Icon
To change the icon that represents a vehicle on the map:
- Click the asset in the sidebar or on the map to open its detail panel
- Use the vehicle type dropdown in the Details tab to select the appropriate type
- The map marker updates immediately
Alternatively, open the Edit Details dialog from the context menu and change the Asset Type dropdown there.
Tip: The map marker icon is determined entirely by the asset type. There's no separate "icon picker" — simply select the correct vehicle type, and the system automatically assigns the matching icon with the appropriate size.
Seater-Based Types
For passenger vehicles, the system provides seater-based types that automatically map to the correct icon size:
- 4-seater — displays as a car (small marker)
- 6-seater / 8-seater — displays as an MPV/people carrier (medium marker)
- 16-seater Van / 17-seater Van / 19-seater Van — displays as a minibus (large marker)
This means you can precisely categorize your passenger fleet, and each vehicle will appear at the correct proportional size on the map.
Status Colors on Map Icons
In addition to the type-specific icon shape and size, map markers are also color-tinted based on the vehicle's current status. This means you can identify both what a vehicle is (by shape/size) and what it's doing (by color) at a glance on the map.
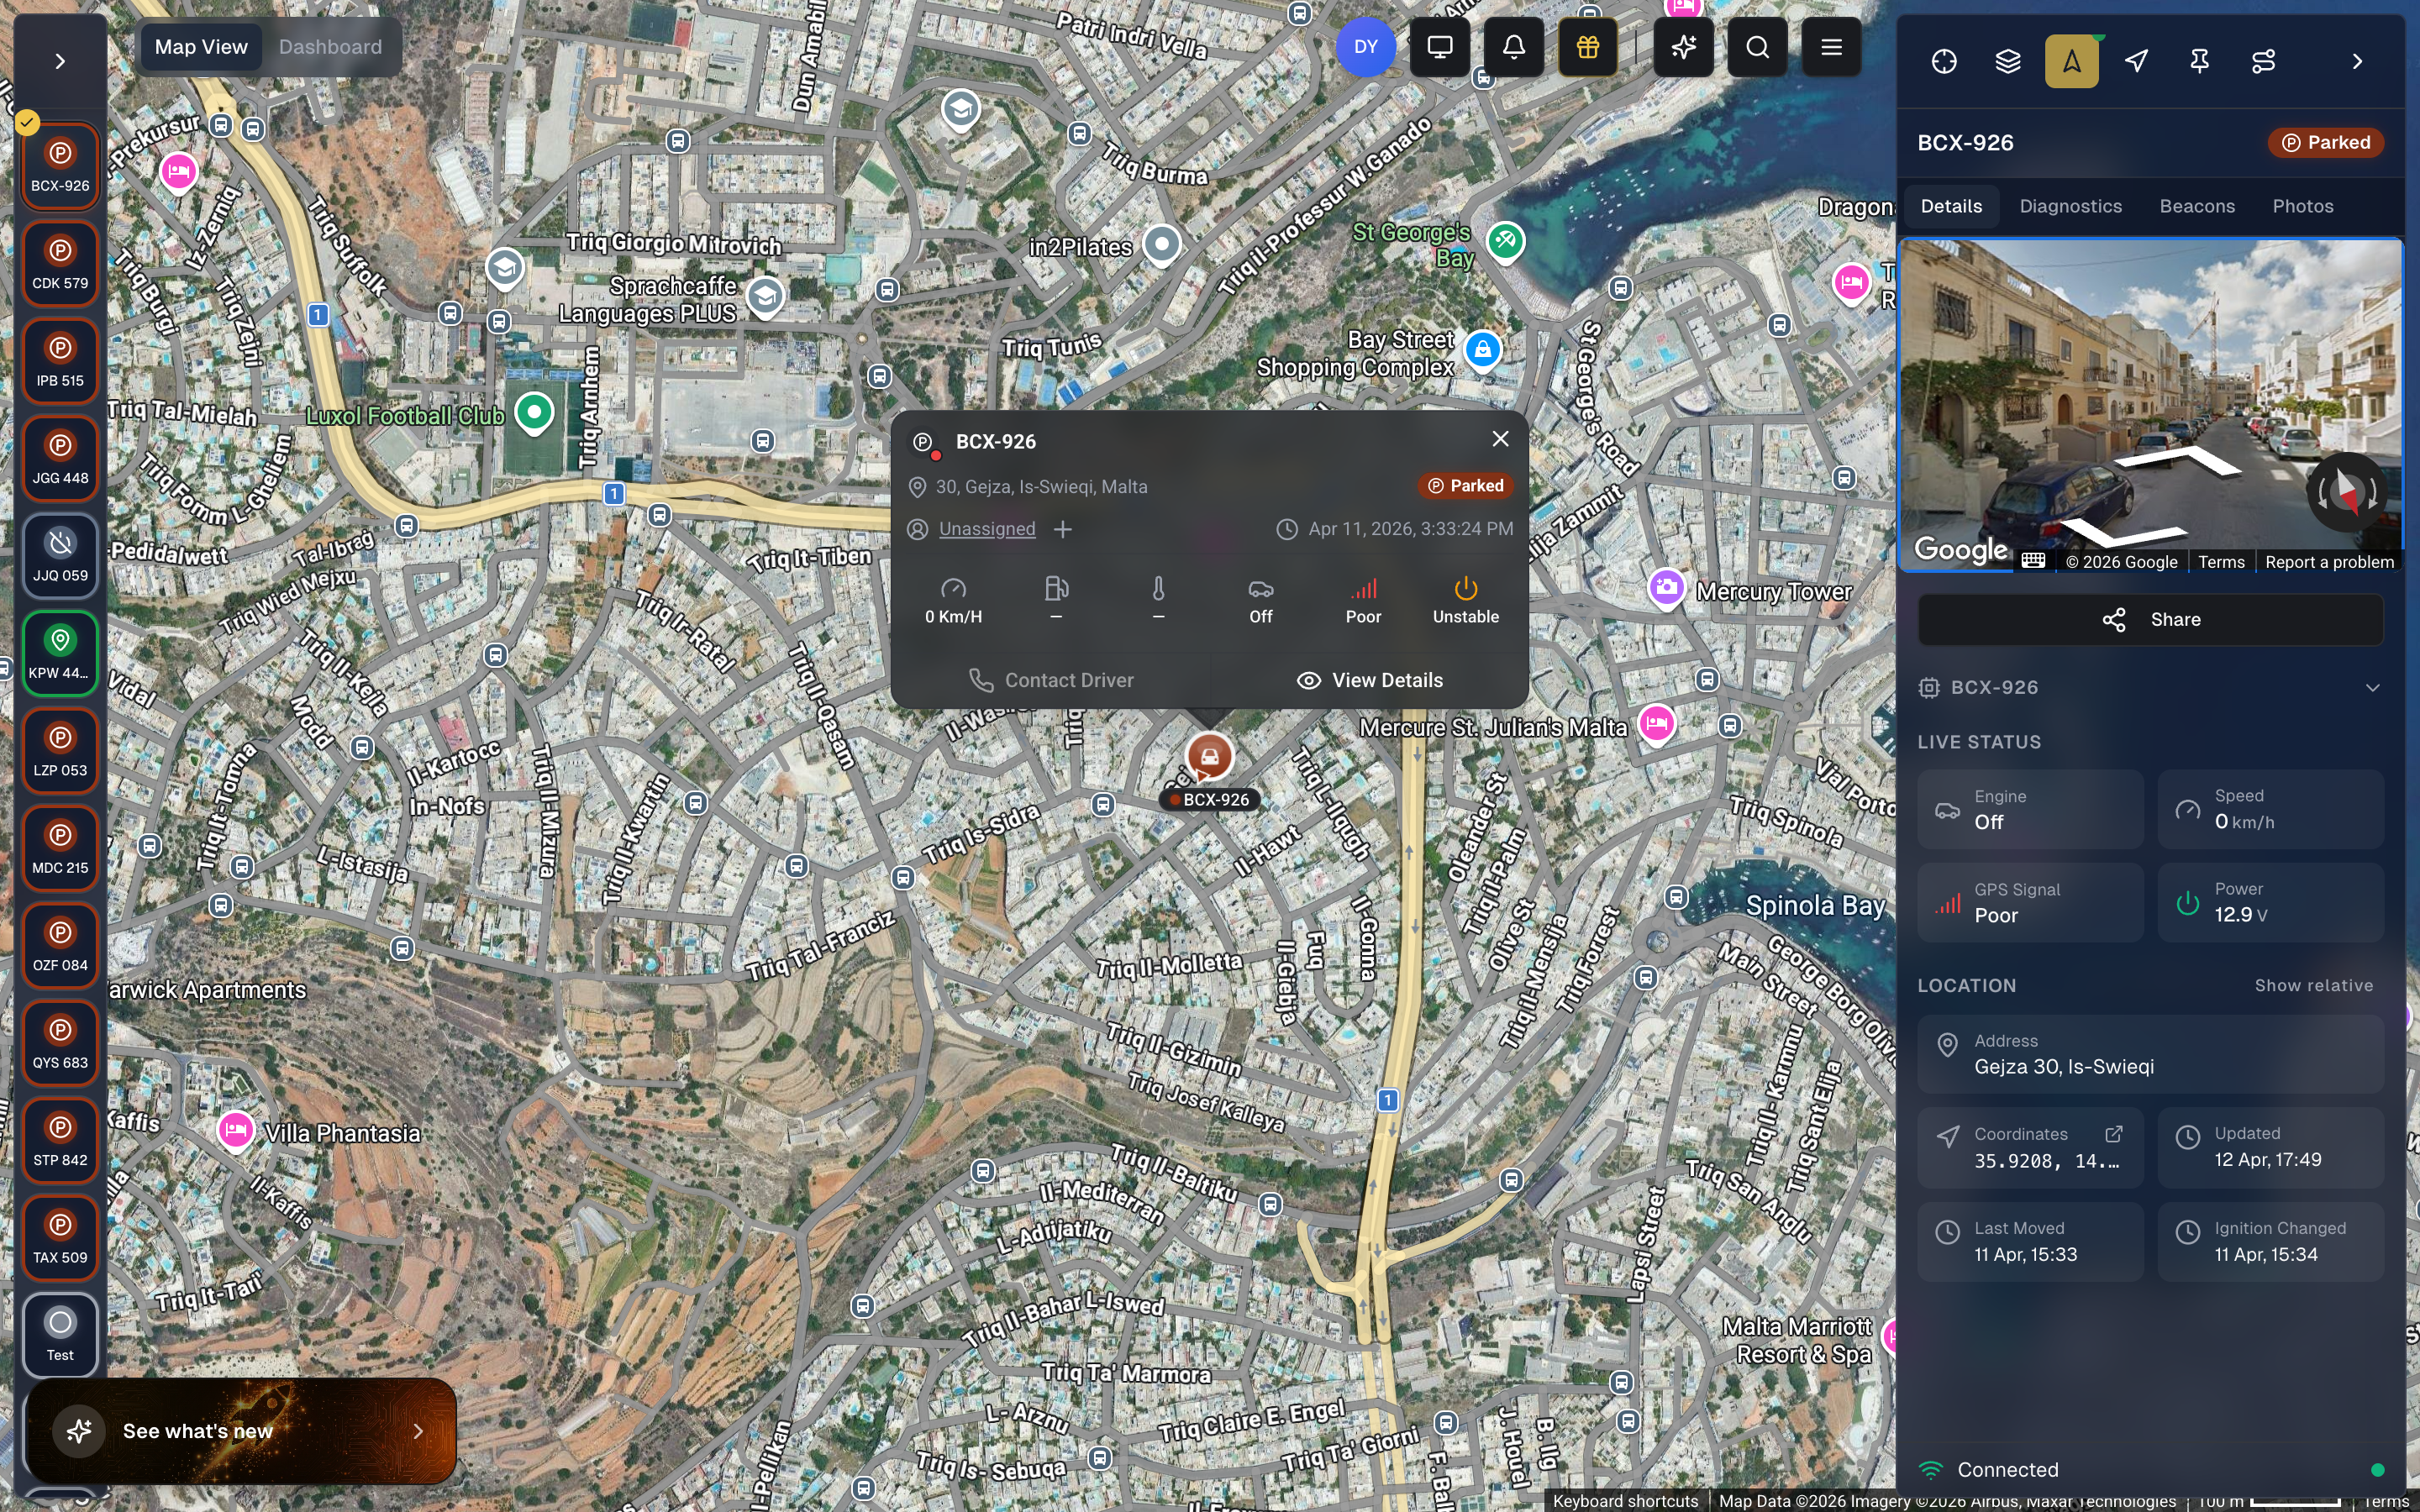
Map Popup (Info Window)
Clicking a marker on the map opens a popup (info window) with a summary of the asset's current state:
- Vehicle name at the top of the popup
- Address — the current or last known street address
- Status badge — the vehicle's current state (e.g., "Parked", "Moving", "Idling")
- Driver assignment dropdown — shows the currently assigned driver or "Unassigned", and lets you change the assignment directly from the popup
- Timestamp — when the last position update was received
- Speed — current speed reading (e.g., "0 Km/H")
- Three status indicators — ignition state, GPS signal quality (Poor/Unstable/Good), and power stability (Off/On), shown as compact icons at the bottom of the popup
- Contact Driver button — calls or messages the assigned driver (disabled if no driver is assigned)
- View Details button — opens the full asset detail sidebar for this vehicle
The popup provides a quick overview without leaving the map. For full vehicle information, click View Details to open the sidebar.
Vehicle Photos on Map
In Settings > Preferences, the Vehicle Photos toggle controls whether default asset photos are displayed on asset cards and map popups: "Display the default photo on asset cards and map popups when a photo has been set." When enabled, the vehicle's default photo (set in the Photos tab) appears alongside the vehicle name in the sidebar list and in map popups, giving your team a quick visual reference.
Deleting an Asset
If a vehicle is no longer part of your fleet:
- Open the asset's detail panel
- Click the Delete button
- Confirm the deletion
Deleting an asset removes it from your active fleet, but historical trip data and reports are preserved. This means you can still generate reports for past periods even after removing a vehicle. The GPS tracker associated with the asset becomes available for reassignment.
Asset Groups
As your fleet grows, organizing vehicles into groups becomes essential. Asset groups let you segment your fleet by department, region, vehicle type, or any other criteria that matches your operations.
To create a group:
- Open the asset management interface
- Click Create Group
- Name the group (e.g., "Northern Region", "Delivery Fleet", "Sales Team")
- Assign assets to the group
Groups unlock powerful capabilities across the platform. You can filter the Live Map to show only vehicles in a specific group, generate reports for an entire group at once, set up alerts that apply to all vehicles in a group, and control which groups each team member can access.
Assets in the sidebar list are automatically organized under their assigned group headers, making it easy to see your fleet's structure at a glance. Each group section is collapsible, so you can focus on the vehicles that matter most.
Organization strategy: Most fleets benefit from overlapping group structures. For example, you might have groups by region ("North", "South") and also by function ("Delivery", "Service", "Sales"). This lets you generate a report for all northern delivery vehicles or see all service vehicles across the country.
Bulk Operations
When you need to make changes across multiple vehicles at once, select them using the checkboxes in the asset list. Bulk operations include:
- Assign to group — add selected vehicles to an asset group
- Generate report — create a combined report covering all selected vehicles
- Export — download the asset list as a CSV file for external use (insurance paperwork, fleet audits, etc.)
Best Practices for Fleet Organization
Use descriptive, consistent names. A name like "FT-VAN-012 (Transit Custom)" is far more useful than "Van 12" when you have 50 vehicles. Include a prefix for the department or region if you operate across multiple locations.
Group early, regroup as needed. Set up your asset groups as soon as you add your first few vehicles. It's much easier to maintain groups incrementally than to organize a hundred vehicles later. Review your groups quarterly to ensure they still match your operational structure.
Keep vehicle details current. When a vehicle changes drivers, gets a new registration, or reaches a maintenance milestone, update the asset immediately. Accurate data means accurate reports and reliable alerts.
Assign trackers before installation. Create the asset in Yipii IoT and assign the tracker before the physical installation. This way, the moment the tracker powers on in the vehicle, data starts flowing to the correct asset automatically.
What's Next?
- GPS Trackers — Set up and configure the GPS devices that power your asset tracking
- Live Map — See all your assets on a real-time interactive map
- Understanding Statuses — Learn how vehicle statuses and map marker colors work together
- Geofencing — Create virtual boundaries around customer sites, depots, and zones
- Reports — Generate trip, mileage, and activity reports for any vehicle or group
Asset Ownership & Sharing
Every asset in Yipii IoT has an owner — the account that originally created or received the asset. The owner has full control over the asset, including editing, deleting, sharing with other accounts, and transferring ownership. Beyond basic ownership, the platform supports view-only sharing and full ownership transfers, making it straightforward to collaborate across organizations or hand off vehicles when your fleet structure changes.
Viewing Asset Ownership
To see who owns an asset and which accounts have access to it:
- Navigate to Menu > Assets
- Click the three-dot menu on any asset and select View
- Scroll down to the SHARING section at the bottom of the detail dialog
The SHARING section displays:
- Owner — the owning account name, shown with an "Owner" badge and crown icon, along with the account
key_name - Viewers — a list of accounts that have been granted view access, each shown with an eye icon and the date access was granted (
granted_at)
Granting View Access (Sharing)
Asset owners can share view-only access with other accounts. This is useful when a third party — such as a client, partner, or subcontractor — needs to monitor a vehicle without having control over it.
To share an asset:
- Navigate to Menu > Assets and open View on the asset you want to share
- Scroll down to the SHARING section
- In the Grant View Access field, enter the
key_nameof the account you want to share with - Click Share
The shared account will then see this asset in their fleet with a view-only indicator.
What view-only accounts can do:
- See the asset on the map with live tracking
- View asset details, location, and status
- View trip history and reports for that asset
What view-only accounts cannot do:
- Edit the asset name, type, or group
- Change tracker settings or send device commands
- Delete the asset
- Share the asset with other accounts
- Transfer the asset
Revoking View Access
The owner can revoke a viewer's access at any time:
- Navigate to the asset's SHARING section
- Click the revoke button next to the viewer account
- The viewer will immediately lose access to the asset
Viewers can also self-remove their own access if they no longer need it.
Transferring Asset Ownership
Asset owners can transfer full ownership to another account. This is useful when selling a vehicle, moving assets between organizations, or restructuring fleet management.
To transfer an asset:
-
Navigate to Menu > Assets and open View on the asset
-
Scroll down and click Transfer Asset
-
Enter the target account
key_name -
Choose a transfer mode:
- Transfer with Data — The asset, tracker, vehicle record, and all related data (service reminders, renewal reminders, odometer history, alerts) move to the new account. Driver assignment and group membership are cleared. Historical tracking data is preserved.
- Transfer without Data — A fresh copy of the asset is created on the target account. The original asset is archived on the source account, preserving all historical data there. Only metadata (name, tracker IMEI, vehicle type) is copied.
-
Confirm the transfer
After the transfer completes, the target account becomes the new owner. The original account loses ownership of the asset.
Important Notes
- Only account admins can share or transfer assets.
- You cannot revoke the owner's own access — you must transfer ownership first.
- Transfer operations are logged for audit purposes.
- Both accounts' billing is automatically recalculated after a transfer.
- An asset can be shared with multiple accounts simultaneously.
Frequently Asked Questions
Can I track assets without a GPS tracker?
Every asset needs a GPS tracker to provide location data. However, you can create an asset in the system without assigning a tracker — it simply won't show any position or trip data until a tracker is connected. This is useful for pre-registering vehicles that are awaiting tracker installation.
What happens to trip data when I delete an asset?
Historical data is preserved even after deletion. If you need to generate a report for a deleted vehicle's past trips, contact support. The GPS tracker associated with the deleted asset becomes available for reassignment to a new vehicle.
How many assets can I add?
The number of assets depends on your subscription plan. The Starter plan supports up to 10 assets, Professional up to 50, and Enterprise accounts have no fixed limit. Your current usage is visible on the Billing page.
Can I transfer an asset between accounts?
Yes. Asset owners can transfer ownership directly from the asset's detail view. Open the asset, scroll to the SHARING section, and click Transfer Asset. You can choose to transfer with all related data or create a fresh copy on the target account. See Transferring Asset Ownership for the full walkthrough.
How do I assign a driver to a vehicle?
You can assign a driver directly from the asset list using the driver assignment dropdown on each asset card. Click the dropdown (which shows "Unassigned" or the current driver's name) and select the driver you want to assign. Drivers can also be identified automatically using iButtons or Bluetooth beacons — when a driver touches their iButton to the reader or carries their beacon near the tracker, they are automatically associated with the vehicle for that trip.
How do I change the map marker icon for an asset?
The map marker icon is determined by the asset's type. You can change it in two ways: use the vehicle type dropdown directly in the Details tab of the asset sidebar, or open the Edit Details dialog from the context menu and change the Asset Type there. The marker icon and size update immediately on the Live Map. See Asset Types & Map Icons for the full list of available types and their corresponding icons.
Why do some markers look bigger than others on the map?
Map marker sizes are proportional to real-world vehicle sizes. A bus marker is larger than a car marker, a truck is larger than a van, and so on. This helps you quickly identify vehicle types on a busy map. See the size table for exact proportions.
Can I use a custom image as a map marker?
The map marker icons are pre-designed top-down vehicle illustrations that match each asset type. Custom images are not currently supported as map markers. To change how an asset appears on the map, select the most appropriate asset type from the available options.
Where did the Reset Device and Command History options go?
These features have moved to the Diagnostics tab in the asset detail sidebar. Click the Diagnostics tab at the top of the panel to access device reset, tracker settings, tracker information, and command history.
How do I edit an asset's name quickly?
Click directly on the asset name in the Details tab of the sidebar. The name becomes editable inline — type the new name and press Enter or click away to save. There is no need to open a separate edit dialog for name changes.
How do I know if an asset is shared with me?
View-only assets appear in your fleet but you cannot edit them. Open the asset and scroll to the SHARING section — it shows you listed as a viewer. Any actions that require owner permissions (editing, deleting, sharing, transferring) will be unavailable.
Can I share an asset with multiple accounts?
Yes. The owner can grant view access to multiple accounts. Each viewer appears in the SHARING section with their account name and the date access was granted. Viewers are independent of each other — revoking one viewer's access does not affect other viewers.
What happens to shared access when I transfer an asset?
Existing view-only shares are preserved during a transfer. The new owner inherits all current viewers and can revoke their access at any time. The new owner can also grant access to additional accounts.
Was this page helpful?